Foundations Certification Summary
â The Foundations Certification introduces the Onnit Academy’s fitness system, covering mobility and the foundational movement patterns (squat, hinge, push, and pull).
â Participants learn to use unconventional training tools such as the suspension trainer, sandbag, battle ropes, kettlebell, steel club, and steel mace.
â Stability improves your access to mobility. Learn to prevent movement in one part of the body and you can improve your ability to move in another.
â Explosive power comes from the hips. To utilize it, you must learn to hinge properly.
â The sandbag is a great introduction to moving external load after you’ve mastered foundational movements with body weight.
â Decompression is crucial for recovery post-workout. Taking five minutes to release the tension out of your muscles sets up big gains down the line.
Whether you’re a trainer or someone who just likes to work out, anyone interested in learning the Onnit Academy training system should start with the Foundations certification.

You should also have the ability to climb, crawl, sprint, and jump. These are primal movements. Obviously there are hundreds, if not thousands of different variations for each of the basic bodyweight training movements out there, but no matter what, all of them come back to being able to perform the basics
Taught by Chief Fitness Officer John Wolf, Director of Fitness Education Shane Heins, and Senior Coach Sam Pogue, the two-day (18-hour) course introduces the principles that guide Onnit’s approach to enhancing longevity and performance—basics that are applicable to any fitness goal.
It also gives you hands-on instruction in the unconventional training tools that have made Onnit a powerful resource for athletes and fitness-seekers looking for results they can’t find in the big box gyms: the suspension trainer, sandbag, battle ropes, kettlebell, steel club, and steel mace.
Yes, Wolf, Heins, and Pogue will teach you to swing a mace without beheading passersby, but you’ll learn much more than just new exercises.
You’ll learn how to breathe, how to move, and even how to stand—all the nuances that promote efficient training, peak performance, and longevity that you’ve probably ignored throughout your years in the gym and won’t find under one roof anywhere else.
Or at least not the way you see them taught in Foundations.
I recently took the Foundations Certifications and the following were some of the lessons (but by no means all) that I took home.
1. Stand Like a Marine
Training your body to stand very straight makes for the ultimate reference point for proper alignment in all your exercises. Start with your feet hip-distance apart with the outside edges of your feet in a straight line and parallel to each other.
Your pelvis should be slightly tucked under, to correct any forward tilting you most likely already have as the result of tight hip flexors. Your knees must be soft.
Your shoulders should be pulled back and down—think “proud chest,” with fingers reaching for the floor—and tuck your chin slightly back. Imagine a string is connected to the top of your head and is pulling you tall with your spine straight.
One thing the coaches often corrected me on was keeping my core tight so that I don’t overextend my spine (which I have a tendency to do). The cue “ribs down” helped me.
This posture creates tension throughout the body, which in turn creates stability.
The tall neutral stance serves as the starting point for finding correct alignment in your exercises. “Having this to refer back to and check in with allows you to create awareness of the relationships of major joint complexes to each other in a given orientation,” says Heins.
In other words, starting out with a very strong base helps you recognize when a joint shifts out of alignment during movement. If, for instance you feel your hips tilt forward or your neck crane backward you’ll immediately know you’re out of the optimal position and can correct yourself.
2. You Need Stability for More Mobility
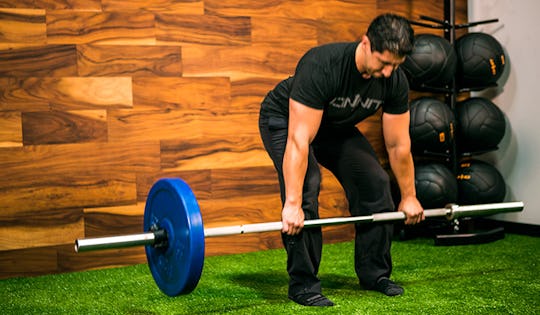
If you can’t stabilize your body in a given position, it will restrict your range of motion in that position. It’s a defense mechanism your body has to keep you safe, but unfortunately it often backfires.
For example, if you can’t keep your hips aligned with your spine when you bend down to perform a deadlift, you probably won’t get the degree of hip flexion you need to reach the bar in the proper position with a neutral spine.
Your back will round excessively as you lift the bar to give you the range of motion you should be getting from your hips, putting you at risk for a back injury.
Instead of stretching your hips and hamstrings exclusively to improve flexibility, work on creating the stability needed for the body to feel safe letting you go into a hip hinge.
Sometimes remembering simple technique cues is enough. In the case of a deadlift, think about standing on a bunched-up rug and spread it flat with your feet as you prepare to pull.
Don’t actually move your feet—keep them stuck to the floor—but actively drive them apart so you feel your glutes turn on. This creates stability in your hips and will help you reach the bar while maintaining a flat back.
Perhaps more than any other factor, I credit that cue for helping to raise my deadlift over the 500-pound mark.
3. Move Your Pelvis First
When warming up, do exercises that work the pelvis first. “It’s the seat of the spine,” says Heins, “affecting its alignment directly, whether static or through movement.” Performing pelvic tilts and circles prepares the body to move well in any capacity.
From there, you can move outward, performing drills for the T-spine, neck, shoulders, elbows, wrists, knees, ankles, and feet.
4. For the Last Time, Your Knees CAN Go Past Your Toes on a Squat
Many trainers claim that the knees drifting in front of your toes during a squat or lunge is a no-no under any circumstances. But Onnit is calling bullshit.
Depending on your individual biomechanics (say, for instance, you’re tall with long legs, like moi), it may be impossible for you to squat without your knees going past your toes.
As long as your joints are stacking so that the load is distributed evenly, your knees don’t have to be restricted to behind the toes to prevent damaging shear forces. A better warning sign to look for?
The heels rising up off the floor, which usually indicates you’re not activating your hips properly.
5. Squat Deeper with Monkey Walks
Most people have trouble getting comfortable in the bottom position of a squat. Warming up with the lateral monkey walk can help.
Get into a deep squat and twist your torso to the left. Plant your hands on the floor shoulder-width apart from each other. Your right hand should line up with your left foot.
Use your hands to support your body as you hop over to the left side and land in your deep squat position again. Your right foot should align with your left hand. Own this bottom position as much as you can, establishing a tall neutral spine as described in #1.
If you’re tight, you’ll find you have trouble landing in a proper squat. You’ll have to focus on driving your knees out and keeping your spine long with your tailbone back and up.
The monkey walk reinforces the mechanics you need for safe, strong squatting, whether you choose to do it with a barbell, kettlebell, mace, or any other implement.
It also serves as a great frontal plane exercise. Most gym rats train almost exclusively in the sagittal plane, performing exercises that move the body forward and back. Moving laterally helps balance muscle groups and builds athleticism.
6. Learn to Hinge with Superman, Instagram, and a Pressed Ham
The hip hinge is a fundamental movement pattern. You use it to deadlift, squat, row, perform kettlebell swings, and generally pick up anything from the floor. But chances are you aren’t doing it correctly, thanks to years of sitting, which have turned off your ability to activate your hips properly.
The Onnit Academy teaches the hinge with three simple (and relatable) cues: Superman, Instagram, and pressed ham.
First, draw your shoulders back and down, but don’t lose the connection between your ribs and hips (remember the tall neutral stance from #1?)—as if you were Superman shedding his Clark Kent disguise and baring the “S” on his chest.
Now tilt your hips back, sticking your butt out, as if you were a hot girl taking a bathroom mirror selfie to post on Instagram. (You know exactly what this means.)
Finally, imagine you’re mooning someone from a car window. Pushing your ass into the glass is descriptively referred to as a “pressed ham.” Push your hips back like you’re driving your butt into that window.
When you’re done laughing at the cues, take a glance in the mirror. You’ve executed an optimal high hip hinge.
7. Ready to Lift? Start With a Sandbag
For a beginner making the transition from body-weight training to weight training, the sandbag is an excellent starting point. For one thing, it’s softer than iron, so it won’t bruise you as easily as a kettlebell or club would if you bang it against you during a clean.
The sandbag also serves as an introduction to using an off-set load, as you have to stabilize it despite the shifting center of gravity inside it. This builds a base for kettlebell, club, and mace training down the line.
8. Use Battle Ropes for Strength
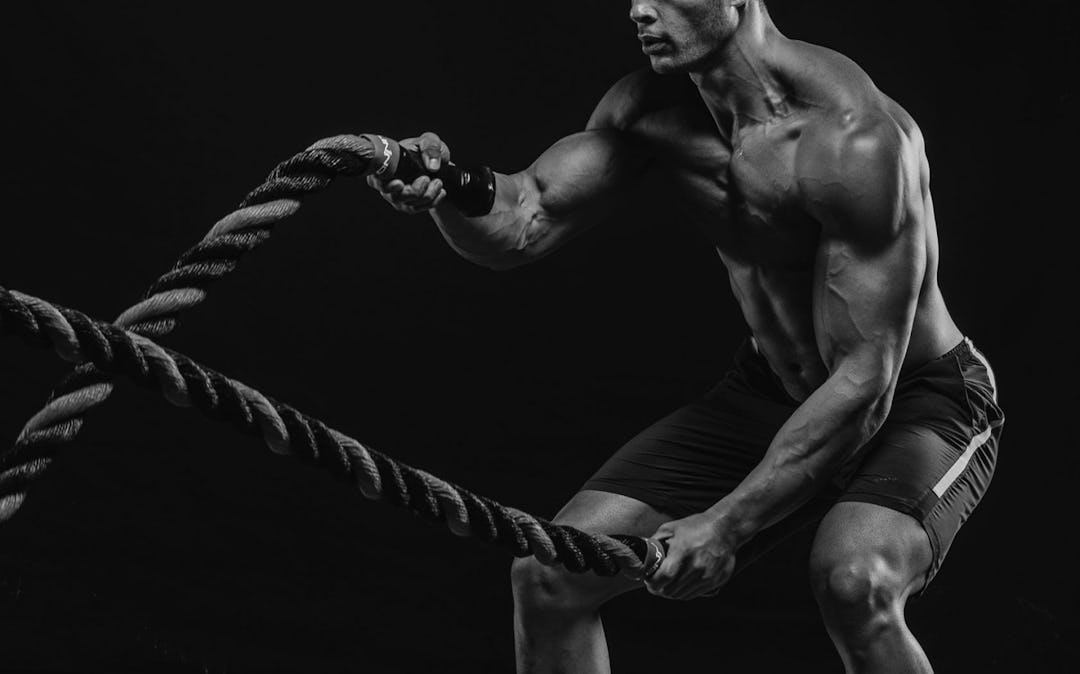
You’ve probably tried battle ropes as a cardio finisher at the end of a strength training session, but they’re an underrated tool for strength gains as well.
Try pressing with them. Grip the ends of the ropes with your thumbs pointing backward and hold them at shoulder level just as you would for any overhead press.
Keeping your ribs down and the same tall, neutral, proud-chest position, press the ropes overhead. If it’s too easy, back away from the anchor point to put more tension on the ropes.
After a few reps, I felt my shoulders and upper back searing—as bad as they ever felt from lifting dumbbells or a bar.
Because the tension in the ropes is pulling on your arms, you’ll have to fight to keep your shoulder blades down and back while keeping your ribs down for core engagement.
This develops razor sharp form that will translate to stronger, safer pressing when you return to a barbell or kettlebell.
BONUS TIP: Anchor your battle rope to a round pipe or PVC pipe filled with concrete rather than simply looping it around the rectangular beam of a power rack. There will be less friction with a smooth pipe, which means less wear and tear on the rope over time.
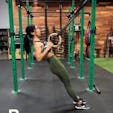
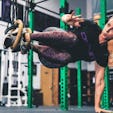
9. The Suspension Trainer Can Teach Anyone to Squat
Onnit’s Master Trainers refer to suspension ring training as “scalable sophistication.” It’s such an effective tool that they’ve even created a new certification dedicated to mastering its use.
If you’re a trainer trying to get a novice or especially limited client to squat properly, or you’re still working on the skill yourself, the rings can provide support while you groove perfect technique.
Grasp the handles and lean back so your weight is supported at a 45-degree angle. Now think “knees forward” and begin squatting. “Being supported by the suspension makes people feel safer to allow their knees to track forward of their toes while maintaining alignment for a more vertical spine,” says Heins. As a result, “they’ll drop deeper into the full squat they had trouble getting into before.”
10. Do a Five-Minute Decompression at the End of a Workout
Lifting creates tension in the muscles. That’s a good thing when you’re in the midst of a workout and trying to produce as much force as possible, but carrying muscle tension out of the gym and back into the world inhibits recovery and increases the risk for injury.
Spend five minutes decompressing the joints and tissues at the end of any session. This process helps to rehydrate the fascia—the connective tissue that links your muscles—and release the muscle tension you built up with your exercises.
Decompression movements are drawn from a wide array of practices used to unwind and release patterns of tension. These include gentle stretches familiar to anyone who’s taken a yoga class. See the series below, led by Onnit Durability Master Coach Sarah Jamieson, for an example.
Decompression is meant to be done slowly and have a relaxing effect, so don’t rush it.
)