

Google old-time strongmen and you’ll see one image come up again and again: A man in his underwear (or sometimes just a fig leaf) with a handlebar mustache hoisting a massive kettlebell (or barbell) overhead with one hand while his torso is bent almost 90 degrees to the side. It looks like the weight is so heavy it’s practically folding him in half, but the man clearly has control over it. That exercise is called the kettlebell windmill, and it’s not only a great show of strength and athleticism, it’s an awesome way to improve shoulder function and rehab your lower back—with or without a fig leaf.
What Is The Kettlebell Windmill?
(See 00:27 in the video above.)
Unlike barbells with globes on each end or gladiator boots, the windmill hasn’t been lost to history. Modern kettlebell practitioners still regard it as a cornerstone exercise due to its diverse benefits and applications. To understand the windmill, you have to first study up on the basic hip hinge movement.
A hip hinge is a fundamental movement pattern and lays the foundation for all the body’s major power moves. Keeping a long spine from your head to your tailbone, you bend your hips back until your glutes and hamstrings are stretched—this prepares them to shorten explosively, and when they do, you can jump, run, shoot, hit, or otherwise burst forward with tremendous power. (Picture any deadlift variation, a glute bridge, or a basic athletic “ready” position—they all feature a hip hinge of various degrees.)
Mastering the hinge also trains your body to use the strength and mobility of your hips to support your weight when you bend, as opposed to letting your lower back take the brunt of it, and that helps protect the back from injury.
A kettlebell windmill starts with a hip hinge, but rather than bend your hips straight back, you’ll bend them about 45 degrees to one side. This intensifies the stretch on your posterior muscles, one side at a time, while preparing you to move in the frontal (side to side) and transverse (rotational) planes as well as front to back—a boon to virtually any athlete, as sports require multidirectional movement.
On top of the hip hinge, you have to maintain the lockout position of an overhead press to complete a kettlebell windmill. Holding your arm overhead with a heavy weight in hand makes for a great challenge when you begin to arc your body down into the hip hinge, and the combination strengthens everything from the shoulder through the core and hips.
How To Perform The Kettlebell Windmill
(See 07:10 in the video.)
Step 1. Hold a kettlebell with your left hand at shoulder level. Stand with your feet between hip and shoulder-width, and turn your feet 45 degrees to the right.
Step 2. Keeping your knees locked straight, kick your left hip out and back about 45 degrees, pressing the kettlebell overhead as you do so. Your spine should stay long and straight from your head to your tailbone.
You should now feel your left leg supporting the majority of your weight. Your shoulder should also be drawn down—don’t shrug as you press. There should be a significant gap between your head and your arm when the weight is overhead.
Step 3. Stand up straight. NOW you’re ready to really begin the windmill. Keep your eyes on the kettlebell throughout the movement. Kick your hip out again and begin hinging, pushing your hips back at that 45-degree angle as far as you can while maintaining that long spine position.
Drive your knuckles up toward the ceiling as you lower your torso down. STOP packing your shoulder down and let it move. Thinking about the movement as punching the ceiling will help create space in the shoulder joint that allows the rotation that lets you complete the movement safely.
Step 4. Slide your right hand down your right leg so it acts as a guardrail while you hinge. Lower your body as far as you can without losing your straight spine position—aim to touch the floor with your fingers (but if you’re new to windmills, don’t expect to be able to do this right away).
Step 5. To stand up straight again, drive up through your fist, imagining there’s a cord tied to it and it’s pulling you up.
Note that the windmill may be too hard to do with your knees locked. You may also have trouble keeping your arm overhead or achieving any significant range of motion. This is perfectly normal if you’re new to rotational training, so don’t be discouraged. Check out the Kettlebell Windmill Variations section below for alternatives that will help you build up to doing the classic windmill.
Benefits of Training With The Kettlebell Windmill
(See 01:10 in the video.)
The kettlebell windmill is a strength program, rehab clinic, and anti-aging treatment all rolled into one. Here are the key selling points.
Lateral strength and mobility
“We lose lateral movement capacity as we age,” says Shane Heins, Onnit’s Director of Fitness Education. That is, our ability to move side to side declines, largely due to lack of use. Even if you’re a young buck, you may already notice that it’s harder for you to bend and twist and shuffle your feet laterally than it was when you were a school-age kid, and you have much less control over those movements than you do bending and flexing front and back. “Loss of this range leads to pain in the shoulder, low back, hips, and knees,” says Heins, because, when your movement is limited, some joints and muscles take on more load than they’re supposed to in picking up the slack for the parts that don’t move so well. Know someone who suffers from sciatica? They probably don’t move very well side to side.
Think about it like this: if your body can’t give an inch laterally, it’s going to have to work that much harder moving front to back, and that increases the risk for injury. Say you’re playing football and an opponent tackles you. Do you think you can absorb the hit better if your body can roll with the impact, or if you have to take it straight on because you’re too stiff to go with the flow?
As you’ll see when you practice it, the kettlebell windmill stretches the crap out of your sides, hips, core, and leg muscles, restoring some of the range that may be slipping away from you. With that restoration comes a greater capacity to move and express strength with movement.
Increased rotation
When you begin to open up your ability to move laterally, you improve your capacity for rotation as well. Proper twisting and turning generates power just as hip hinging does, so it promotes athletic performance, and it also takes pressure off the spine.
Better shoulder function
The shoulders have the most mobile joints in the body, but they’re also the most unstable. Balancing a kettlebell overhead while you contort your body underneath it requires your rotator cuff muscles to brace your shoulder hard to keep your arm in a safe position. As you develop stability, you’ll reduce your risk of shoulder injury, and establish a more solid foundation for strong overhead and chest pressing of any kind.
Slow the aging process
We’re not exaggerating. “As we age,” says Heins, “loss of access to overhead range of motion is one of the primary sources of ongoing decline.” Because we don’t play sports as often and gradually reduce our activity levels, we do less and less overhead reaching, “and not being able to reach overhead minimizes how often we extend our spine back and flex it laterally.” It’s a chain reaction that leads to less movement overall, and that in turn leads to a less active lifestyle and all the risks associated with a lack of activity (i.e., early death!).
The windmill, then, is pretty much an anti-aging hack, maintaining the skill of full shoulder flexion as well as hip hinging and lateral movement so that you remain mobile in 360 degrees, no matter how many years go by and where your fitness journey takes you.
What Muscles Do I Use When Doing Kettlebell Windmills?
(See 03:05 in the video.)
It’s also not an exaggeration to say that the kettlebell windmill works darn near every muscle you own. Even your neck muscles must work in a stabilizing capacity. Here’s a list of the big (and some small) movers that you can count on to get trained by windmills.
- Deltoids (shoulders)
- Rotator cuff
- Trapezius (upper back)
- Rhomboids (middle back)
- Lats (the big muscles on the sides of your back)
- Triceps
- Forearms
- Core (obliques in particular, the muscles on the sides of your abs)
- Glutes
- Hamstrings
- Adductors (groin)
- Calves
Kettlebell Windmill Variations
(See 10:50 in the video.)
The kettlebell windmill can be very challenging when you’re not used to hinging your hips at a funny angle. You probably won’t have the range of motion to do a full, strict windmill at first, but that’s fine. Some slight modifications will allow you to do the basic movement safely and still get most of the benefits. If the classic windmill isn’t working for you, start experimenting with these variations.
Bent-Leg Windmill
(See 11:12 in the video.)
Do the windmill as directed above but allow both knees to bend as you kick your hip out. This will reduce the stretch on your side and give you more range of motion. As you come up, lock your knees out again.
Bent-Arm Windmill
(See 12:30 in the video.)
Do the windmill as directed above but start by moving your arm away from your body (about 90 degrees, rather than straight in front of your torso). Now kick the hip out and—with straight knees or bent—begin to hinge while keeping the weight held strong.
The key here is to aim to keep the kettlebell at the SAME HEIGHT as it was when you were standing with it at shoulder level. It’s your body that moves—not the bell. Bend your hips and focus on getting under the kettlebell, rather than lifting it above you. Once your elbow is locked out, stand up straight. Many people can’t press overhead without compromising form, and the bent-arm windmill trains you to ease into an overhead position with good body mechanics.
Kettlebell Windmill To A Block
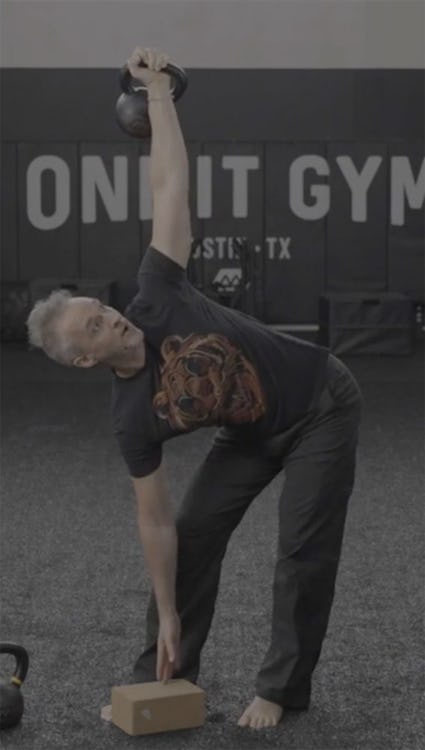
It’s important to standardize your range of motion on every rep you do. If you cut some reps short and go deeper on others, it’s very hard to know if you’re really progressing on the exercise. By placing a yoga block, bench, or mat on the floor at the lowest elevation you can reach with your free hand, you get feedback on your depth. Every time your fingers touch the surface, you’ll know you hit the optimal range of motion that’s available to you right now.
Don’t use the block to rest your hand. Just touch it at the bottom of each rep (while keeping your eyes on the kettlebell overhead). When you hit depth, feel free to adjust your hip and shoulder position if you need so the exercise feels right.
Half-Kneeling Kettlebell Windmill
If you have a lot of trouble controlling the kettlebell overhead or getting your hips to hinge, regress the windmill to a half-kneeling position.
Step 1. Kneel on the floor on one knee and bend both knees 90 degrees (basically, the bottom of a lunge). Turn the toes on your front foot in a few degrees, and turn your rear leg (the lower leg) about 90 degrees inward.
Step 2. Now kick your hip out and perform the windmill, reaching for the floor. The range of motion is much shorter, so you should be able to feel a good stretch in your hips and place your palm on the floor without much difficulty. When you’ve mastered this, go back to the variation with a block, and then move up to the bent-knee or bent-arm options before you try the full-range windmill again.
What Weight Kettlebell Should I Use?
(See 14:38 in the video.)
While that Google search we mentioned in the beginning will bring up pictures of strongmen using gargantuan loads on windmills, we don’t recommend pushing yourself that hard to start out (trust us: those guys didn’t either). The windmill is all about technique, so use a weight that’s light enough to allow you to perform several sets of 5–8 reps to start with, but is also heavy enough to give you feedback on your shoulder and hip position. In other words, you should use enough load to make you work and balance and get into the deepest range of motion you can comfortably control, but not go so heavy that you’re straining to get through the set. Heins says that, for men with little strength training or kettlebell experience, that probably means a kettlebell that’s 8–12 kilograms; 6–8kg for women.
More experienced men, however, may be able to handle 12–16 kilos, while lady veterans might take on 8–12 kilos.
For more info on choosing kettlebell weights, see our guide, What Is The Best Kettlebell Weight To Start With?
How To Stretch Before Exercising
(See 03:27 in the video.)
Do the following mobility exercises before you practice the kettlebell windmill. Perform 3 sets of 10 reps each.
Side Hip Root
(See 03:38 in the video.)
Step 1. Stand with your feet hip-width apart. Bend your hips back at a 45-degree angle while raising your arms in front of you. Keep your feet flat on the floor and try to push into your hips enough that you really feel a stretch in the outer corner of your glute. The end position will look like you’re sitting on a high stool; you should have a soft bend in both knees.
Step 2. Extend your hips and row your arms back, as if pulling something toward you. That’s one rep. Repeat on the opposite side.
Child’s Pose With Twist
(See 04:34 in the video.)
Step 1. Get on your hands and knees and sit back on your butt. Reach your arms out at a 45-degree angle to your left side—your right should be a little in front of your left.
Step 2. Keeping your elbow straight, roll your right arm so your weight is resting on the knife-edge of your hand, and sit your hips back as far as you can (do it gently) while you rotate your torso to the left. You’ll feel a deep stretch in your lat and arm. That’s one rep. Complete your reps on that side, and then switch sides and repeat.
Arm Screw
(See 05:47 in the video.)
Step 1. Extend your arms out to your sides 90 degrees with palms facing up. Shrug your right shoulder and turn your palm over, twisting your arm as if yo u were wringing out a towel. Add to the rotation by reaching and twisting the opposite direction with your other arm.
Step 2. Reverse the motion and repeat on the opposite shoulder. Over time, add more rotation by twisting your torso in the direction of the arm you’re working and actively driving your arms apart so that you feel a stretch between your shoulder blades.


