The kettlebell is renowned for its ability to work the whole body. When you lift a kettlebell, you can’t help but train your grip, core, and dozens of other muscles with virtually any move you perform. Want big arms? You’re better off using dumbbells, isolation exercises, and machines¦ right?
Not so fast. While training with kettlebells won’t target the arm muscles as directly as those other methods, they offer some pretty cool benefits that you can’t replicate without them. Let us show you how to use kettlebells to get bigger biceps, triceps, and forearms while you build total-body strength and conditioning, improve athleticism and mobility, and more.
Benefits of Using Kettlebells To Work Out Your Arms
Kettlebells lend themselves to combination lifts—a blend of two or more exercises that flow into one another. For example, doing a curl into a shoulder halo, or a triceps extension into a pullover while maintaining a hollow-body position (both are featured in the workout below). Combo lifts like these emphasize the arms but allow you to train numerous other muscles and movements too, making the kettlebell a very multi-functional tool. In other words, you’ll get an arm pump with these exercises, but you’ll also build strength and movement skills that carry over to sports you may like to play and other training you enjoy.
Kettlebells also force you to squeeze the handle (or sometimes the bell itself) hard to hold on and keep control of the movement. This is a phenomenon that strength coaches call irradiation, where your gripping starts a chain reaction that creates tightness throughout the body. All this tension lights up lots of muscles, encouraging you to keep your form tight to prevent injury and build total-body strength.
How To Stretch Your Arms Before Working Out
Perform the mobility routine from Onnit Coach Eric Leija (@primal.swoledier)—featured at 00:30 in the video above—before you do the arm workout below. It will warm up your shoulders, elbows, and wrists, improving flexibility and preparing you for the training ahead.
Perform the exercises in sequence (a circuit), doing reps of each for 30–60 seconds. Repeat for up to 4 total circuits, depending on how much warming up you feel you need. If you’re coming off some injuries and your joints feel cranky, do more circuits. If you’re short on time and have healthy joints, you can get away with a shorter warmup.
Get Strong Arms With This Balanced Kettlebell Arm Workout
Leija put together the following arm routine. You’ll need at least two light kettlebells (8 kilos or less) and one heavier one (16–20kg) to do it, and it should be done once per week, separate from your other upper-body training.
Directions
(See 03:45 in the video above.)
The exercises are grouped in pairs, marked A and B. Perform a set of A and then B before resting (called a superset), and then rest 2–3 minutes. Repeat until 3 sets are complete for each exercise in the pair, and then go on to the next pair. Perform 8–12 reps for each exercise.
1A. Kettlebell Crush-Grip Row
Sets: 3 Reps: 8–12
(See 03:45 in the video.)
The first exercise in the routine really illustrates the principle of irradiation discussed above. “Smashing the bell between your hands activates the biceps, lats, and pecs,” says Leija, so you work your arms while giving some extra attention to the bigger muscles they support on your other exercises. “Crush the bell like it’s a tomato can.”
Step 1. Hold a moderate-weight kettlebell by the bell itself with both hands and squeeze it between your palms as hard as you can. Keep this tension throughout the exercise.
Step 2. Keeping a long line from your head to your tailbone, bend your hips back until your torso is nearly parallel to the floor.
Step 3. Row the kettlebell toward your belly until your elbows are at your sides, retracting your shoulder blades and pulling them together. Lower the weight back down until your arms are straight again, making sure to maintain the squeeze the whole time.
1B Kettlebell Pullover To Press
Sets: 3 Reps: 8–12
(See 05:18 in the video.)
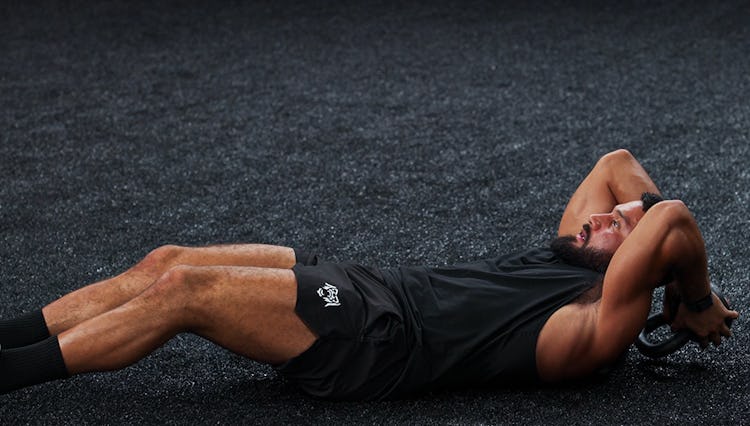
The pullover works the lats and triceps, but doing it from a crunch position, says Leija, adds a little extra range of motion, since the floor isn’t there to stop the kettlebell when you lower it behind your head. You’ll feel this move all through your upper body and deep in your core.
Step 1. Lie on your back on the floor. Extend your legs in front of you, and dig your heels into the floor. Crunch your shoulders off the floor and hold the position, keeping your ribs drawn down toward your hips. Grasp the kettlebell by its bell end and reach your arms overhead and bend your elbows so that the weight is held just above the floor behind you. As you did with the row above, squeeze the kettlebell hard between your hands.
Step 2. Extend your elbows to lockout, and then pull the weight over your chest. Lower the kettlebell to your chest with your elbows close to your sides, and then press it back up. Reach your arms behind you again, and bend your elbows to begin the next rep.
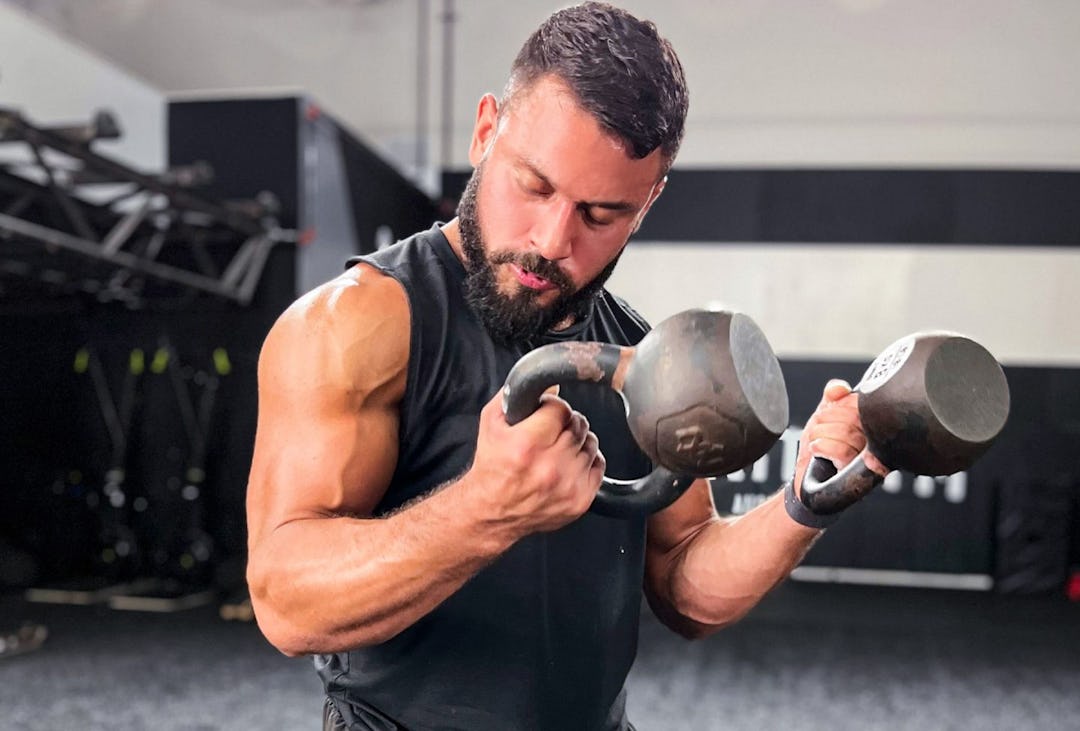
2A. Kettlebell Curl To Halo
Sets: 3 Reps: 8–12
(See 06:50 in the video.)
“This move isolates the biceps and pumps up the shoulders, but it and also works mobility,” says Leija.
Step 1. Hold the kettlebell by its horns in front of your chest with your elbows tight to your sides.
Step 2. Slowly extend your elbows to lower the weight until your arms are straight. Then curl the weight back to your chest.
Step 3. Raise the weight up and around the back of your head in a circular motion, keeping the kettlebell close and your elbows in as tight as you can. Lower the weight down, curl again, and perfom the halo in the opposite direction. Each curl to halo counts as one rep.
2B. Half-Kneeling Bottom’s Up Press
Sets: 3 Reps: 8–12
(See 08:25 in the video.)
Any press will work your triceps, but trying to keep the bell from toppling over makes the bottom’s up press a real killer for the forearms/gripping muscles too. It also challenges shoulder stability, which can translate to stronger pressing with heavier, more conventional press exercises down the line. Leija says that, once you’ve mastered this move from the half-kneeling position, you’re welcome to try it standing for an even greater stability test.
Step 1. Get into a lunge position and lower your body to the floor. Both knees should be bent 90 degrees and your hips should be level with the floor. Hold a light kettlebell by its handle on the same side as the downed knee, and lift it to shoulder level upside down, so the bell end is facing the ceiling.
Step 2. Move your elbow away from your body about 45 degrees and press the weight overhead slowly—take two full seconds. Control it on the way down (another 2 seconds). You’ll have to squeeze the handle hard to maintain control of the kettlebell.
3A. Close-Grip Kettlebell Pushup
Sets: 3 Reps: 8–12
(See 10:09 in the video.)
Sure, you could just do close-grip pushups on the floor and get a hell of a triceps and chest hit, but doing them on a kettlebell demands more of your shoulders and core to keep you stable.
Step 1. Place a kettlebell on the floor and tilt it over so the handle digs into the floor and provides some stability. Res your hands on the bell and extend your legs behind you to get into pushup position. Your body should form a long, straight line. Brace your core.
Step 2. Lower your body until your chest is just above the kettlebell, tucking your elbows close to your sides as you descend. Squeeze your shoulder blades together as you go down, and then spread them apart as you press yourself back up.
To make the exercise harder, bring your feet closer together. To make it easier, widen your stance.
3B. Kettlebell Zottman Curl
Sets: 3 Reps: 8–12
(See 11:39 in the video.)

Trying to keep your wrists straight on these is a workout all by itself, and it will strengthen both sides of your forearms. “The way the weight is distributed with the kettlebell,” says Leija, “it’s a long lever. The weight is further away from the handle than it is when you use a dumbbell. So it’s going to feel a lot heavier. Go light on these.” Eight- or even six-kilo kettlebells will be fine for most people.
Step 1. Grasp two light kettlebells by their handles and squeeze hard. Keeping your elbows close to your sides, curl the weights up.
Step 2. At the top, turn your palms over to face the floor, and lower the bells back down slowly. Rotate your palms forward again to begin the next rep.
How Often Should You Train Your Arms?
The triceps are involved in any pushing or pressing exercises you do. The biceps are recruited on every pulling or rowing move, and the forearm muscles can’t escape working whenever you grip and carry anything—so, chances are, your arms are getting plenty of muscle-building stimulus as it is, if you’re following a balanced strength program. One day of more direct arm training, such as the routine outlined here, is a good adjunct for boosting your arm volume while giving a little extra attention to all the other upper-body muscles. To make a long story short, as long as your other workout days feature some kind of pushing and pulling, you only need one focused arm workout per week.
)