If you’ve been lifting a few years and gained significant size and strength, you can be sure you’ve paid some dues and earned a few rights. One of them is not having people interrupt you in the gym to offer advice (you clearly know what you’re doing). Another is being able to go to the water fountain between sets without someone poaching your bench (muscle is a great anti-theft device).
A guy or gal at the intermediate level also has license to start isolating certain regions of muscles in order to sculpt their physique to the dimensions they choose. For example, using lower-chest workouts to zero in on the costal division of the pec major muscle. Whereas a beginner can focus on basic bench press exercises to activate all the muscle fibers in the chest, a more experienced lifter may need to target the costal pecs more directly in order to see continued gains.
When well-developed, the costal pecs can add volume to the lower part of your chest that makes it stand out from the ribcage. It’s an awesome look rarely seen outside of bodybuilding or physique competition, and it signifies an advanced level of progress.
We brushed up on the research and consulted one of the world’s top muscle experts to bring you the best plan of attack for lower-chest gains, but be warned: it’s probably not what you’re expecting. (Hint: no decline pressing.)
What Are the Muscles In the Lower Chest?
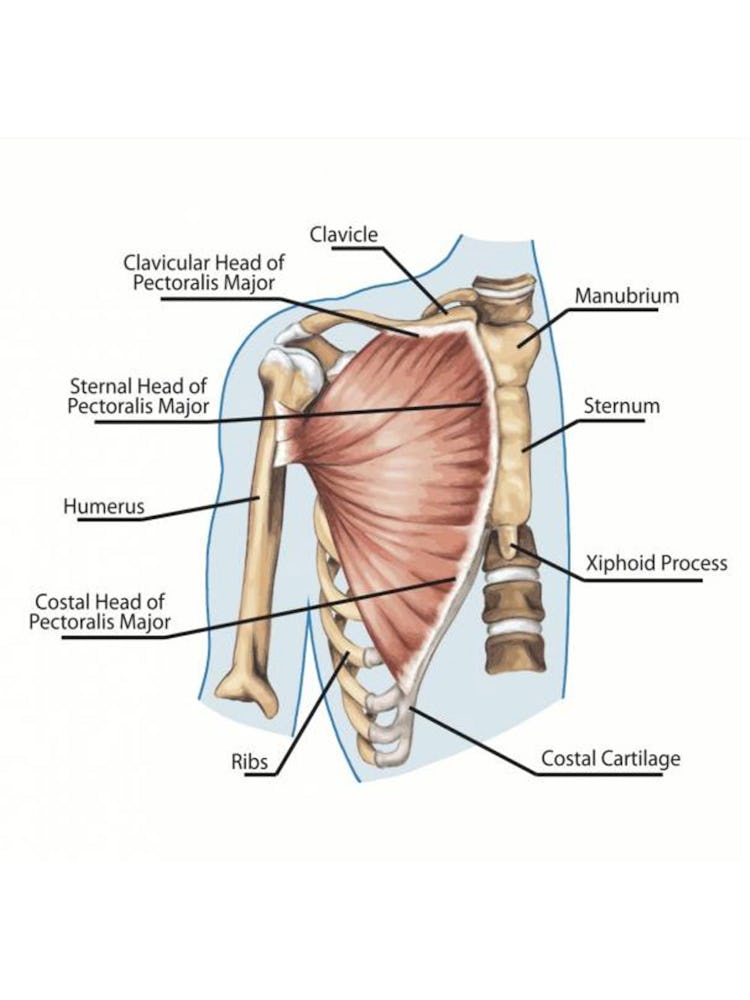
In order to understand how to train the lower chest, we have to look at how it’s constructed and the way it functions. When lifters say they want to target their “lower chest” with a certain exercise, they’re talking about working the costal head of the pectoralis major. Note that most anatomy charts will identify the lower-most portion of the pecs as part of the “sternocostal head” of the muscle, but hypertrophy researcher Chris Beardsley says, based on the muscle’s actions, it’s more accurate to divide the sternal and costal muscle fibers into separate regions.
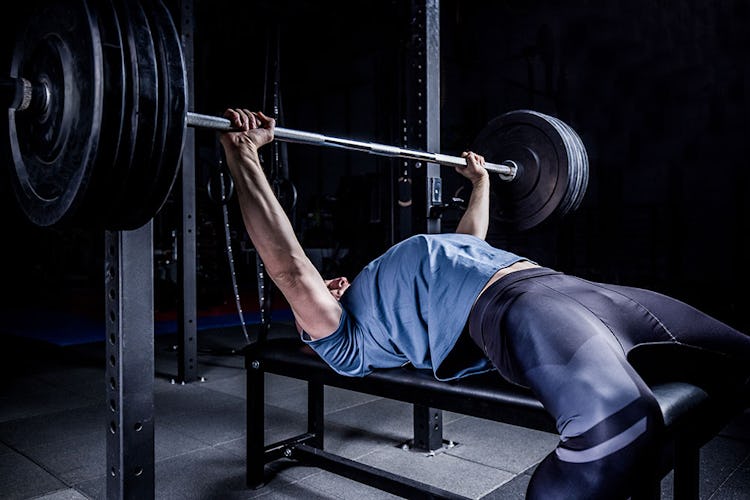
To understand what a muscle does, and therefore know what movements you need to train it, you pretty much just have to look at the direction the muscle fibers run, and know that, when they contract, they’ll pull the insertion point (where the muscle attaches) closer to the origin (where the fibers start from). For example, the sternal fibers of the pec (the ones in the middle area of the muscle) run straight horizontally, originating at the sternum and attaching to the humerus (upper arm bone). That means that when they contract, they’re mainly working to pull the upper arm straight across the front of the body. Therefore, fly motions and flat bench presses work the sternal pec fibers, primarily.
The costal (lower) fibers, however, run from the cartilage of the sixth rib and the connective tissue on the external oblique to high up on the humerus (see the illustration above). The fibers’ direction, then, goes diagonal and even almost straight vertical, so they work more so to pull the arms from where they’re out and away from the body to the front of the body and close to your sides (shoulder adduction). They also work to bring the arms from a straight overhead position to down in front of the body (shoulder extension).
(Of course, the clavicular/upper portion is another region of the pec muscle that acts on the arms. For more on this head of the pec muscle and how to train it, see our guide to upper chest training.)
3 Great Lower-Chest Exercises
Now that we’ve identified where the costal pecs are and what they do, it’s pretty easy to see what kind of exercises will work them.
1. High-To-Low Cable (or Band) Fly
Since one of the costal pecs’ main functions is to draw the arms from wide out to down in front of the body (shoulder adduction), it makes sense to do a fly motion that goes from high to low. However, according to Paul Carter, a strength and hypertrophy coach (@coachpaulcarter on Instagram), most people do these incorrectly, pulling the cable handles or bands across the midpoint of their body. This is beyond the range of motion the costal pecs work in, and it transfers the tension to the sternal pec fibers.
“The cue I give for execution is to punch the floor,” says Carter. “The plane you’re moving in has to run congruent to the orientation of the fibers, so the arms have to come pretty much straight down toward the floor.”
Another mistake to avoid is starting the movement with your arms up too high, to the point where your shoulders roll forward. “People think more range of motion is better,” says Carter, so they let the weight on the cables pull their arms farther back than they should go, exceeding the pecs’ active range of motion. Not only does this do the opposite of what you want, reducing the tension on the pecs, it can be dangerous.
Repeating this mistake can, over time, cause the humerus to poke forward in the glenohumeral (shoulder) joint, leading to a condition called anterior humeral glide, which damages the shoulder capsule. Basically, allowing your arm to go too far behind your body on any exercise will cause your arm bone to stab its way through the front of your shoulder. “You always want to keep the target muscle within the range that it can move the joint,” says Carter. In many cases, that could be a shorter range of motion than you expect.
Carter’s cue is to think about driving your elbows back as your arms come up on the negative portion of the fly (when your chest gets stretched). When they’ve gone as far back as they can go without your shoulders tipping forward, the range of motion is complete.
How To Do The High-To-Low Cable (or Band) Fly
Step 1. Attach single-grip (“D”) handles to the top pulleys of two facing cable stations, or attach bands to two sturdy anchor points overhead. Stand between the cables/bands and slightly in front of them, with feet staggered to help you keep balance. Grasp the handles with your arms out and away from your sides. Bend your elbows to take pressure off the biceps. You should feel tension on the cables/bands and a stretch in your chest, but be sure your elbows don’t point upward and your shoulders aren’t bulging forward.
Step 2. Drive your arms down toward your hips and slightly in front of your body, as if punching the floor. Don’t draw your hands across your body as you would in a sternal pec fly or dumbbell fly (don’t bring your hands together).
Step 3. Allow your arms to go back in an arcing motion to the starting position, again being careful not to let them reach to where your shoulders roll forward. You should feel a stretch in your chest but not your delts.
2. Costal Dip
The dip is mostly thought of as a triceps exercise, but if you can keep your torso fairly upright, you can change the focus to really blast the costal pecs. The form pointers here are the same as for the high-to-low fly—punch the floor, and avoid overextending the shoulders.
Using a band can help you get in the right position (Carter learned this from the biomechanics whizzes at N1 Training, @n1.training on Instagram). Sling one over dip bars and stand on it like a hammock, pushing your legs forward as much as you can—it should allow for the perfect arm path to activate the costal pec fibers. Understand that the purpose of the band isn’t to reduce the amount of your own bodyweight you have to lift, although it will do that to some extent, but to allow your arms to travel from behind the body to in front of it along the path that the costal pec fibers run. You don’t need a lot of band tension to support you—you need just enough to hold your feet in front of you.
How To Do The Costal Dip
Step 1. Loop a light band around dip bars and stand on the band. Suspend your body over the bars with arms locked out, and bend at the hips, pushing your legs forward so you’re as upright as possible.
Step 2. Drive your arms back to lower your body as far as you can without your shoulders rolling forward. Be conservative; it’s probably not as deep as you think (video yourself, or have a friend watch you to make sure you don’t go too low).
Step 3. Punch your arms down to raise your body up and lock out your elbows.
3. Dumbbell Pullover
The pullover is often thought of as a back exercise, but Carter argues that it activates the lower pecs (and pec minor) much more than the lats—and a study in the Journal of Applied Biomechanics agrees with him. Just look at the motion of any pullover (barbell or dumbbell): the arms move from overhead down in front of the body, and that’s going to require some pulling from the costal division of the pecs. Meanwhile, the extreme shoulder flexion involved (the arms moving far overhead) takes the lats out of their active range, and by the time the lats really kick in to pull your arms down for shoulder extension, the resistance the weight provides drops off considerably.
Carter believes that the high-to-low fly and dip have the costal pecs pretty well covered, but if you feel your lower chest is really lacking, experiment with some pullovers. Beardsley’s research suggests that doing reps with a partial range of motion, working near the fully stretched position, may better isolate the lower chest. So you could start a set by doing full-range reps and then, as you fatigue and can’t complete another one, finish with some half-reps.
How To Do The Dumbbell Pullover
Step 1. Hold a dumbbell by one of its bell ends and lie back flat on a bench. Press the dumbbell up and hold it directly over your chest with your elbows pointing out to the sides. Tuck your pelvis under so that your lower back is flat on the bench and brace your core.
Step 2. Keeping your elbows as straight as possible, lower your arms back and behind you until you feel a strong stretch in your chest.
Step 3. Pull the weight back up and over your chest.
Performing the movement with bands or a cable would be even more effective than using a dumbbell or barbell, as the band/cable tension would force the pecs to work harder as they get closer to the chest (which is where the resistance drops off with free weights).
For all of the above movements, Carter recommends working in the 6–10 rep range and adding reps and weight gradually.
“So is that it for lower chest? Wait a minute,” you say. “What about decline presses?”
For years, bodybuilding magazines have told readers that presses and flys done on a decline bench were the best way to hit the lower-chest fibers. Carter, however, says it’s not so.
Setting a bench to a decline that allows the arms to travel on the right path is tricky—it’s easier just to do dips, Carter says. Bodybuilders often take a wide grip on decline presses, mistakenly thinking it will activate more pec muscle, but it actually brings in more of the front deltoids and can be stressful to the shoulder joints. Remember, as with a dip, pressing needs to be done with arms close to the sides to work the costal pecs.
And the decline fly? Done with dumbbells, it would only provide adequate resistance when your pecs are lengthened (arms flared out). As your arms move closer to your body, the demand on your costal pecs would get less and less, and if you cross the midline of your body, the sternal pecs take over. You could use cables or bands to get around that problem, but again, the correct arm path would be difficult to achieve.
As we said in the beginning, an old-school barbell bench press will work the costal pecs as well—so don’t think you have to abandon benching if you want your lower chest to stick out further. Bench presses also work the middle (sternal) and upper (clavicular) pecs, which is why most trainers recommend beginners learn basic lifts when they’re starting out—they recruit a lot of muscle at once, making your training very efficient. With that said, basic, compound lifts don’t isolate any one division of any muscle, so if you have a specific area that you want to improve, they’re usually not the best choice—especially after you’ve been training a while and your gains slow down. As your training and goals evolve, and injuries come up, you may also decide that bench pressing isn’t a good fit for you anymore, and you need to work your pecs with exercises that train the muscle more in isolation.
“When you’re trying to bias a particular muscle,” says Carter, “there’s always going to be some overlap with other muscles, but if you do it right, the fibers you’re trying to bias will be maximally loaded while the other ones won’t be.” So while the dips we prescribed above will work your shoulders and triceps, they’ll mainly hit the lower chest as intended.
Benefits of Working Out Your Lower Chest
Building up your costal pec can help the muscle rise off the rib cage to a greater degree, rounding out the bottom of your chest. Carter also sees lower-chest training as having value for powerlifters.
“If you bench press in competition with a shoulder-width grip,” he says, “the costal pecs are going to contribute to that lift. So strengthening that division of the pecs will help your bench press.” In fact, Carter says that lower-chest work via dips, along with triceps training, should probably make up most of your assistance work for the bench press.
The Ideal Lower-Chest Workout for The Gym
The costal division of the pecs is a pretty small area, and most chest work you do (pressing and fly exercises) is going to activate it to some degree, so don’t go overboard trying to bring up your lower chest. One or two exercises for it in one workout should do it. Here are some ways you can set up sessions to focus on lower chest gains.
Sample Lower-Chest Workout Option A
If you train on a body-part split and you have a dedicated chest day, you could prioritize the costal pecs by training them first when you’re fresh. Then you could hit the rest of the chest divisions (upper and middle) as shown below.
Use several warm-up sets to work up to a weight that allows you the prescribed number of reps, and then take that set to failure (the point at which you can’t perform another rep with good form). For the costal dips, you can warm up with pushups. If you’re very strong at dips, you may need to add weight with a dip/chinup belt, or hold a dumbbell between your feet, so you can reach failure at 6–10 reps, or close to it.
1. Costal Dip (Lower Chest)
Sets: 1 Reps: As many as possible
2. High-To-Low Cable or Band Fly (Lower Chest)
Sets: 1 Reps: 6–10
3. Low-To-High Cable or Band Fly (Upper Chest)
Sets: 1 Reps: 12–15
Step 1. Set the handles on both sides of a cable crossover station to the lowest pulley setting. Grasp the handles, and step forward to lift the weights off the stack so that there’s tension on the pec muscles. If you don’t have access to cable stations, use elastic resistance bands as shown, attached to a rack or other sturdy object.
Step 2. Stagger your feet for stability, and let your arms extend diagonally toward the floor, in line with the cables—but keep a slight bend in your elbows. Your palms will face forward. Keep your torso upright and stationary throughout the movement.
Step 3. Contract your pecs to lift the handles upward and in front of your body. The upward path of motion should be in line with the clavicular fibers of the upper pecs—think: diagonal.
Step 4. At the top of the rep, your hands should be touching each other in front of you at around face level, wrists in line with your forearms. Squeeze the top position for 1–2 seconds, and then lower the weight under control, back to the start position.
4. Dumbbell Bench Press (Middle Chest)
Sets: 1 Reps: 15–20
Step 1. Hold a dumbbell in each hand, and lie back on a flat bench with the weights at shoulder level. Flatten your lower back into the bench and brace your core.
Step 2. Press the weights straight over your chest to lockout.
Sample Lower-Chest Workout Option B
Here, you’ll open with an incline press for the upper chest—a commonly weak area—and then do two lower-chest exercises back to back. Pullovers are done last when the pecs are fully warmed up and full of blood. Performing an exercise that forces the muscles to stretch so much should never be done first in a workout—put it at the end for safety’s sake.
Use several warm-up sets to work up to a weight that allows you the prescribed number of reps, and then take that set to failure (the point at which you can’t perform another rep with good form).
1. Incline Dumbbell Bench Press
Sets: 1 Reps: 6–10
Step 1. Set an adjustable bench to a 30–45-degree angle. Grasp a pair of dumbbells and lie back on the bench, making sure your entire back is in contact with it—do not arch your back so that it causes your lower back to rise off the pad.
Step 2. Start with the dumbbells just outside your shoulders, elbows bent, and your forearms/wrists in a semi-pronated or neutral (palms facing in) position.
Step 3. Keeping your elbows pointing at about 45 degrees, press the dumbbells straight up until your arms are just shy of full lockout. Lower the dumbbells back down under control, until they’re just above and outside your shoulders.
2. Costal Dip
Sets: 1 Reps: As many as possible
3. Dumbbell Pullover
Sets: 1 Reps: 8–12
Sample Lower-Chest Workout Option C
Many lifters like to follow a push/pull/legs split, in which they work all the pushing muscles on one day (chest, shoulders, triceps), pulling muscles another (back, biceps), and then quads, hamstrings, and calves in a third workout. In this case, your push day could start with some costal-pec work to satisfy the chest component.
Use several warm-up sets to work up to a weight that allows you the prescribed number of reps, and then take that set to failure (the point at which you can’t perform another rep with good form).
1. Weighted Costal Dip
Sets: 1 Reps: 6–10
Add weight to your body with a dip/chinup belt, or hold a dumbbell between your feet.
2. Dumbbell Bench Press
Sets: 1 Reps: 12–15
3. Dumbbell Lateral Raise
Sets: 1 Reps: 8–12
Step 1. Hold a dumbbell in each hand and bend your hips back so that the lateral deltoid (the middle head of your shoulder) is perpendicular to the floor.
Step 2. Raise the weights outward to 90 degrees.
4. Bent-Over Lateral Raise
Sets: 1 Reps: 15–20
Step 1. Hold a dumbbell in each hand and bend your hips back until your torso is nearly parallel to the floor. Keep a long line from your head to your pelvis, and brace your core.
Step 2. Raise your arms out the sides.
5. Overhead Banded Triceps Extension
Sets: 1 Reps: 8–12
Step 1. Attach a band to a sturdy object overhead and grasp an end in each hand. Step away from the anchor point and raise your arms overhead. Your legs should be staggered. Bend your hips back to put tension on the band.
Step 2. Extend your elbows without moving your upper arms or torso. Switch the front leg on each set.
The Ideal Lower-Chest Workout At Home, or Without Weights
You can target lower chest without special equipment, but we do suggest you invest in some exercise bands, and find a way to rig up a dip station (two sturdy chairs, or the parallel bars at a park could work).
1. Costal Dip
Sets: 1 Reps: As many as possible
2. High-To-Low Band Fly
Sets: 1 Reps: As many as possible
3. Pushup With Feet Elevated
Sets: 1 Reps: As many as possible
Step 1. Place your hands around shoulder-width on the floor, and raise your feet behind you on a bench, box, or other stable surface. Tuck your tailbone slightly so that your pelvis is neutral, and brace your core. Your body should form a long, straight line.
Step 2. Lower your body, tucking your elbows about 45 degrees from your sides, until you feel a stretch in your pecs. Press yourself back up, allowing your shoulder blades to spread at the top.
4. Sternal Band Fly
Sets: 1 Reps: As many as possible
Perform the same motion as the high-to-low fly, but set the bands at shoulder height, so the line of pull lines up with the middle of your chest. Bring your hands together in the end position.
Why Only 1 Set?
You may be surprised that we’re prescribing only one work set per exercise in these workouts, when you’ve probably heard for years that 3 or more sets is best. Scientists are still going back and forth on how much volume is needed for muscle growth, but Carter’s experience has led him to believe that one hard set—taken to failure—is all that’s needed, more often than not. This is backed by a very applicable study in the Journal of Strength and Conditioning Research, which showed that only three total sets for a muscle group PER WEEK was enough to spark gains, and the gains were equal to what was measured in lifters who performed as many as 12 sets!
It’s important to note that the subjects weren’t newbies, for whom any amount of training would produce results. They had between one and four years of lifting experience, and were reasonably strong.
The researchers wrote: “Hypothetically, both low and high volume training may lead to microtraumas of the muscle fibers, but the high volume training at the expense of additional time and effort¦
“The equality in lower and upper body strength development¦ indicates that when a minimum (threshold) level of strength training volume has been performed at a higher intensity the consequent physiological adaptations may be optimized and additional workloads (e.g., 12 sets per muscle group per week) do not contribute further improvements, at least over a short training period.”
In other words, hit your lower chest hard, and then get out of the gym!
)