Trainers don’t agree on much—like how many sets a client should do, whether the person needs to take creatine, or if Taylor Swift music is an appropriate workout jam—but they all know that people who exercise, regardless of their body type or fitness goals, need to squat. The question then becomes, “What type of squat should they do?” Front squats and back squats are the two most popular versions of this foundational exercise, but they work your major muscle groups in different ways, and each has its pros and cons. Here, we’ll lay out the differences between front squats vs. back squats, the muscles worked, and the advantages and disadvantages of each, so you can decide which type of squat is best for you.
What’s The Difference Between a Front Squat and a Back Squat?
The main difference between the front squat and the back squat is where you position the barbell. When performing a front squat, the bar is held on the fingertips (or directly on the front of the shoulders) and is supported by the front deltoids. Conversely, in a back squat, the bar rests across your trapezius and rear delts, so the weight is loaded on the backside of your body.
Front squatting recruits the chain of your body’s anterior muscles more heavily, engaging the quads and core to a greater degree. Back squatting, on the other hand, emphasizes the posterior chain—the large muscle groups of the back, glutes, and hamstrings.
Where you hold the bar also affects how you’re inclined to move throughout the exercise. “Back squats are a hip-dominant movement,” says Don Saladino, owner of Drive Health Clubs in New York City (where he trains stars such as Hugh Jackman and Blake Lively). “You’re leading with the hips, so your torso is more inclined to lean forward as you perform the exercise. With front squats, because of where the weight is loaded, you’re forced to remain more vertical.” If you lean forward on a front squat like you do back squatting, you’ll lose your balance and drop the bar at your feet. “This makes the front squat a more quad-dominant movement,” says Saladino.
The differences between the front and back squat are really just a matter of degrees. Both versions work your entire body, and Saladino compares squatting in general to moving while performing a plank position—your shoulders, abdominals, and back must engage to support proper form as your legs go through a full range of motion. That makes squats—of any kind—arguably the most functional and challenging exercise you can do.
How To Perform The Front Squat
(See 01:48 in the video above.)
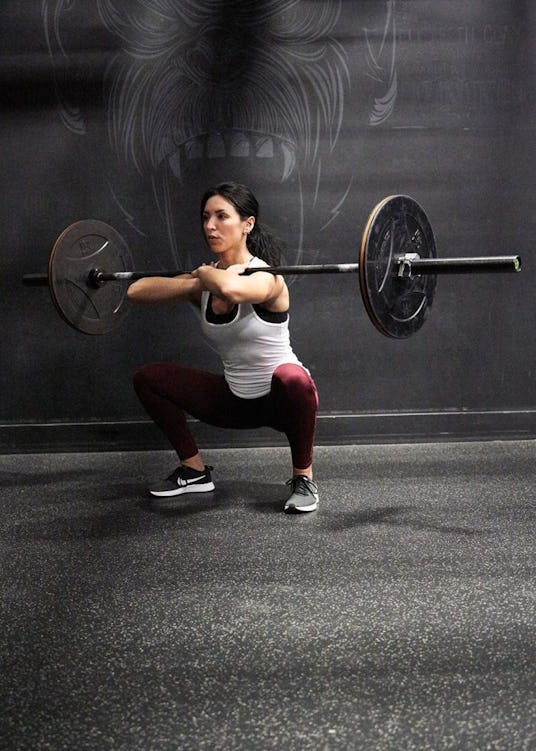
Step 1. Grasp the bar with hands shoulder-width apart and point your elbows forward so that you can position the bar over the tips of your fingers (palms face up). As long as you keep your elbows pointing forward, you will be able to balance the bar.
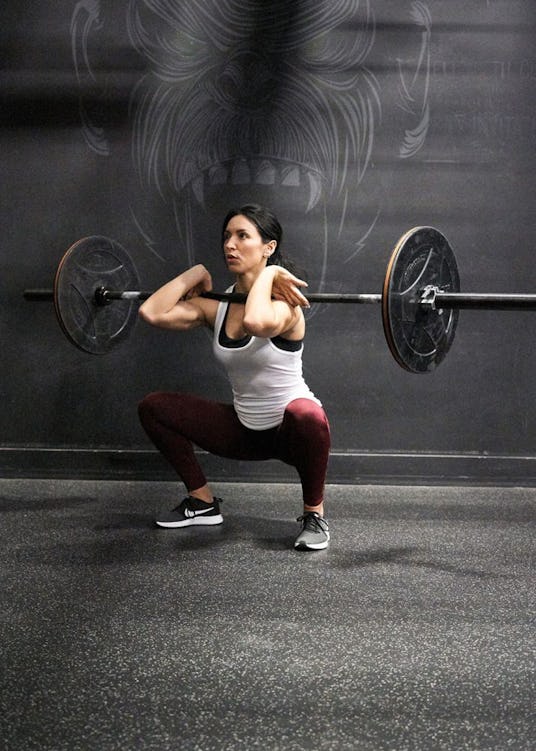
Another way to do it is to cross your arms in front of you, holding the bar on the front of your shoulders (left hand in front of right shoulder, right hand in front of left, as pictured below). To do the classic front squat with the bar on your fingertips, you need a reasonable amount of flexibility through your shoulders and wrists to position the barbell correctly. If you don’t have it, the cross-arm version may be the better option for you at the moment (see also “Using Straps To Front Squat” below).
Step 2. Lift the bar out of the rack and step back, setting your feet between hip- and shoulder-width apart. Turn your toes out slightly. Without letting your feet actually move, try to screw both legs into the floor as if you were standing on grass and wanted to twist it up—you’ll feel your glutes tighten and the arches in your feet rise.
Step 3. Pull your ribs down and take a deep breath into your belly and brace your core. Your head, spine, and pelvis should form a long line—your pelvis should also be perpendicular to your spine, and not tilted toward the floor. Focus your eyes on a point straight in front of you.
Step 4. Squat as low as you can while keeping alignment and maintaining your upright torso position. Remember to point your elbows forward, and raise them up if you feel them slipping downward. Ideally, you’ll be able to descend to where the crease of your hips is below the top of your thighs.
Your knees must stay in line with your toes. Trying to push them out and actively root your feet into the ground will all but ensure this.
Step 5. Extend your hips and knees to return to standing, pushing through the middle of your feet and squeezing your glutes.
Note: Because of the awkward bar position, which is less stable than in the back squat, you won’t be able to use as much weight as you would back squatting. If you’re used to doing back squats, make sure you adjust accordingly.
Using Straps To Front Squat
(See 03:50 in the video.)
One way to make the front squat more comfortable is to use lifting straps. Many people don’t have the mobility in their shoulders, wrists, and fingers to hold the bar in the classic front squat position (called the rack position), and the straps allow you to rest the bar on your shoulders instead, making it much easier to stabilize the bar.
Simply loop the straps around the bar and wrap the loose ends around each hand. Then hold onto the straps when you take the bar out of the rack.
How To Perform the Back Squat
(See 04:57 in the video.)
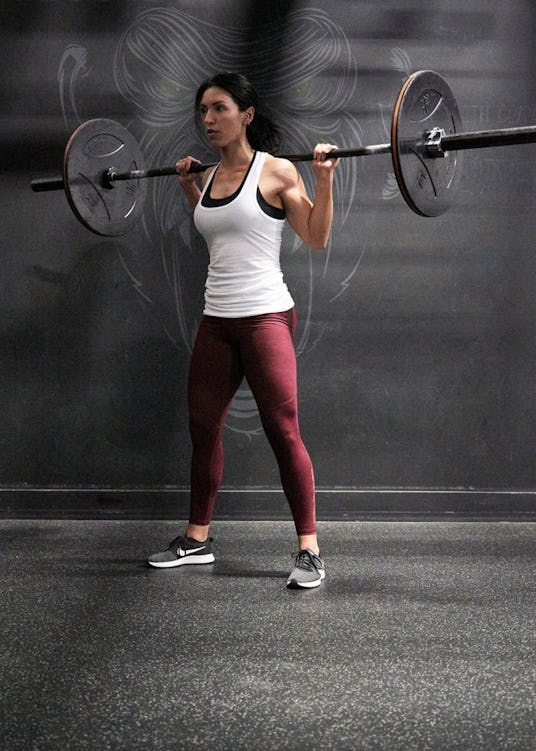
Step 1. Set up in a squat rack and grasp the bar with your hands as far apart as is comfortable. Step under the rack and squeeze your shoulder blades together and down, wedging yourself under the bar so that it rests on your traps or the back of your shoulders.
A “high-bar” squat describes the position of the bar as being high up on the traps, just below the neck. If you feel more stable with the bar resting lower on your back, balanced across the rear delts, you’re doing a “low-bar” squat. The former is advantageous for staying more upright with your torso and hitting your quads. The latter may allow you to lift heavier, but you’ll lean forward more on the descent. Either technique is OK. Experiment with both and see which you feel more comfortable with.
Step 2. Nudge the bar out of the rack and step back, setting your feet between hip and shoulder-width with your toes turned slightly outward. Without letting your feet actually move, try to screw both legs into the floor as if you were standing on grass and wanted to twist it up—you’ll feel your glutes tighten and the arches in your feet rise.
Step 3. Pull your ribs down and take a deep breath into your belly and brace your core. Your head, spine, and pelvis should form a long line—your pelvis should also be perpendicular to your spine, and not tilted toward the floor. Focus your eyes on a point straight in front of you.
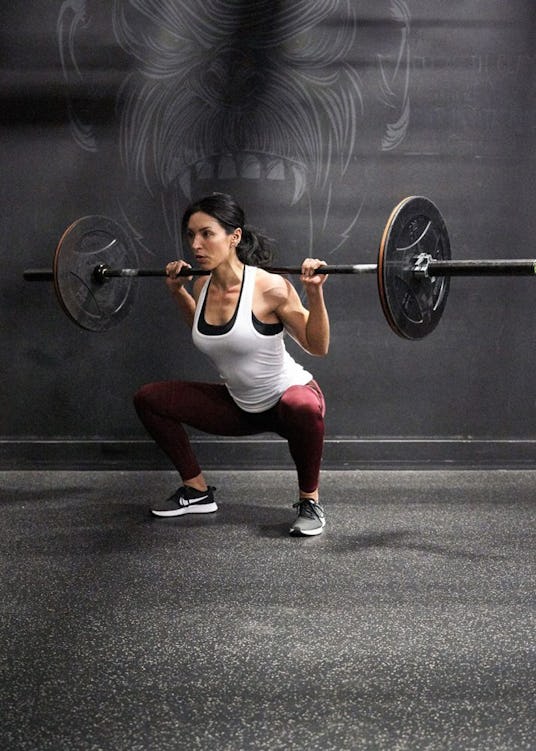
Step 4. Bend your hips back as if you were going to sit in a chair, continuing to screw your feet down. Allow your knees to bend and push them out as you lower your body down. Go as low as you can while keeping your alignment. Ideally, you’ll be able to descend to where the crease of your hips is below the top of your thighs.
Your knees must stay in line with your toes. Trying to push them out and actively root your feet into the ground will all but ensure this.
Step 5. Extend your hips and knees to return to standing, pushing through the middle of your feet and squeezing your glutes.
Front Squat Benefits
If you’re looking to develop your quads, you can’t go wrong with adding front squats to your workout routine. Some bodybuilders build their leg workouts around front squats for this reason. If you’re interested in training in Olympic weightlifting, the front squat is a major component of the clean and jerk, so it will give you a foundation of strength and technique to base weightlifting training on.
The biggest potential benefit to front squatting versus back squatting, however, is that the vertical torso position makes the squat pattern safer for the lower back. “When people are back squatting, it’s common that they can’t maintain a neutral lumbar spine,” says Saladino. They lean their torsos too far forward, or let their hips rise faster than their shoulders as they come up out of the bottom of the squat, and their lower backs round over, putting the little muscles and discs in the lumbar spine at risk for strain. In the front squat, your vertebrae are essentially stacked, so your torso moves almost straight up and down, avoiding shear forces that cause injury.
One study in the Journal of Strength and Conditioning Research examined the biomechanical differences between front and back squats. Researchers found that the back squat placed significantly more compressive forces on the lumbar spine, and concluded that front squats may be the better choice for lifters with knee problems such as meniscus tears, as well as for long-term joint health.
Back Squat Benefits
There’s ample reason why the back squat is called the “king of all exercises.” If you’re interested in getting as strong as possible, or training in powerlifting, it’s essential. The bar placement (along the back) is more comfortable and easier to balance than that of the front squat, so you have the stability to lift greater loads. Though the science isn’t clear, most coaches argue that it also recruits more overall musculature than the front squat, drawing heavily on everything from your shoulders and back to your glutes, hamstrings, and calves, in addition to the quads and core.
Strength gains (i.e., big numbers) will come faster with the back squat, but, as discussed above, the risk for lower-back injury is greater. For general population clients who are only interested in having healthy, well-shaped, and strong legs, many trainers eschew the back squat entirely for front-loaded squat variations, such as front squats, landmine squats, and goblet squats. Unless you’re an athlete who competes in the sport of powerlifting or gets tested on back squat strength (as some power athletes do), it’s not an exercise that you “must” do.
Muscles Used In The Front Squat
The primary muscles worked are:
– Quadriceps
– Glutes
– Hamstrings
– Abdominals
– Lower back (spinal erectors), upper back
– Shoulders
A 2015 study published in the Journal of Sports Sciences compared the muscle-recruiting effects of the front squat versus the back squat. The researchers found that the vastus medialis—one of the four quadriceps muscles—was targeted more heavily during the front squat. Of course, all the major muscle groups of the legs were shown to be highly active during both lifts, but the quads engage to a greater degree when the weight is loaded anterior to the trunk.
Muscles Used In The Back Squat
The back squat targets all the major muscle groups of the body, but its focus is on the posterior chain. The primary muscles worked are:
– Glutes
– Hamstrings
– Quadriceps
– Lower back (spinal erectors), upper back
– Abdominals
– Shoulders
The same 2015 study that identified that the vastus medialis worked harder in the front squat showed that the semitendinosus—one of the three hamstring muscles—was lit up more during the back squat. Again, both versions of the squat hit all the major muscles of the lower body, but when the weight is loaded posterior to the trunk, there’s greater engagement of the hamstrings.
Front Squat vs. Back Squat Ratio
Some coaches believe that a lifter should be able to front squat 90% of the weight that he/she back squats. So if your best back squat is 315 pounds, your front squat ought to be around 280. However, Saladino scoffs at this notion, arguing that it’s nothing more than nonsense used to help trainers market programs.
“There are any number of anatomical or mechanical reasons that a person might be better at either the front squat or back squat,” he says. Generally speaking, your front squat load will be less than your back squat load, simply because of the less stable bar position and biomechanics of the lift, but you don’t need to shoot for a specific strength ratio to ensure balance—or meet anyone else’s criteria of fitness. Rather, focus on incorporating both versions of the squat—if you can—and aim to perfect your form so you can safely and effectively improve the performance of both lifts over time.
)