Are you still looking for the right workout program to kick off your 2022 resolution to get in your best shape ever? Check out the routines from Elite Physique, a new book by strength and conditioning coach, longtime fitness author, and Onnit contributor Chad Waterbury, PT, DPT. Dr. Waterbury’s book isn’t another fitness title filled with cookie-cutter programs and novelty exercises—it’s a whole training philosophy designed to help people reach their true potential, whether they’re trying to make the most of their newbie gains (the ones that come more easily when you’re new to training), or, despite years of consistency, find themselves gaining and losing the same 10 pounds over and over.
Elite Physique offers regimens for fat loss, muscle gain, and targeting weak body parts, but it also teaches you the science of how to train to reach your goals, empowering you to catch your own fish, so to speak, rather than rely on an endless stream of other fitness books to hand them to you. Below is an edited excerpt from the chapter on fat-loss training, along with the first four weeks of a sample 12-week training plan that you can do at home.
Modifying Your Training for Fat Loss

The simplest approach to losing fat is to follow any muscle-building workout program while eating less. If you can cut a couple hundred calories a day from what you’re currently eating, you’ll lose fat. And for the first few weeks, it should work exactly like you expect. However, problems begin after the first month or so. Sooner or later, you’ll feel the effects of that calorie deficit. You’ll have less strength during your workouts and slower recovery between them. The negative impact on your training means you’ll end up doing less total work in the weight room, thereby burning fewer calories, and that will eventually stop your fat-loss efforts in their tracks.
The solution is to find ways to keep up your calorie deficit while accommodating for the effect it has on your strength, so you don’t sacrifice muscle mass and set your metabolism back further. Low-intensity cardio (longer, slower activities) and its counterpart, high-intensity interval training (HIIT), are two good options to accelerate fat loss in a way that won’t sacrifice your strength and muscle. Low-intensity work burns calories and builds the aerobic system, which enhances recovery, while HIIT offers big results for a small time investment.
Thus, you need these program modifications when training for fat loss:
– Perform fewer sets of weight training, or the same number of sets but for fewer exercises (to compensate for your lower energy levels).
– Don’t train to muscular failure, except for the final set of bodyweight exercises (again, to reduce the stress of strength training).
– Supplement strength training with a broad spectrum of energy systems work (cardio/endurance training) to burn calories and support recovery.
These key changes, combined with a calorie deficit, will ensure that you lose fat while maintaining muscle and strength. And you’ll build endurance that translates to virtually any sport. In the end, you’ll emerge with a leaner, more athletic physique—exactly what you expected when you bought this book.
Let’s take a closer look at energy systems—the way your body fuels your weight-training and cardio—and then I’ll show you how to combine cardio and lifting for the ultimate fat-loss program you can do at home with minimal equipment.
Utilizing Energy Systems Training for Fat Loss

Your body relies on three different systems to produce energy. First is the ATP-PC system, which uses phosphocreatine to fuel high-intensity muscle contractions. The ATP-PC system kicks in for the first few seconds of any activity you do, and it supplies the bulk of the energy needed for explosive, powerful muscle contractions, but it peters out quickly. (Creatine monohydrate has become one of the most popular supplements in history because of its powerful support of this energy system.)
The second energy system is anaerobic glycolysis, a process where your body breaks down glucose without the help of oxygen. This is used primarily after the ATP-PC system tires, and it kicks in hard while you’re lifting weights for higher reps or running short to moderate distances. The third system is aerobic metabolism, which breaks down glucose and fatty acids for fuel with the use of oxygen. It also uses ketones when you’re following a low-carbohydrate diet (Volek, Noakes, and Phinney 2015). You draw on aerobic energy to run, swim, or cycle long distances; it’s your main fuel source for endurance activity.
With all that said, these three systems constantly overlap to provide the energy you need during exercise, so it’s important to train them all. Of the three systems, aerobic metabolism can directly burn fat for energy, which is why it should be part of any fat-burning program. The other two systems, ATP-PC and anaerobic glycolysis, are used to build more muscle and mitochondria in your cells, which in turn increases your metabolic rate.
Importantly, each system does not make an equal contribution at any given level of intensity. During maximal activity, ATP-PC and anaerobic glycolysis are the primary drivers. Conversely, low-intensity activity is dominated by aerobic metabolism. For example, an MMA fighter could shadowbox at a low intensity for 30 minutes to develop his aerobic base, or strike with maximal intensity for 10 seconds and then rest a bit. Both kinds of training will contribute to powerful endurance in different ways. Same activity, but different energy systems.
There are two primary types of energy systems training:
1. Continuous training, which is performed at a relatively low intensity from start to finish without stopping, such as a 30-minute jog or 45 minutes on a bike. This is also called low-intensity, steady-state cardio (LISS), and primarily works the aerobic energy system.
2. Interval training, which consists of two or more bouts of high-intensity exercise with a period of rest between each. For example, a swimmer might perform eight 50-meter sprints with 90 seconds’ rest between each; a boxer might perform 12 20-second bouts of punching with 60-second rest intervals.
Programming Energy Systems Training for Fat Loss
The simplest solution here is to program LISS on days when you don’t lift weights, whenever possible. As a general rule, 30 to 60 minutes of LISS exercise performed three days per week covers your bases, and you can rotate workouts of different durations for the sake of variety. Regarding HIIT, the goal is to use a work-to-rest ratio that allows you to maintain your high-intensity performance. Think of HIIT as speed training: Once you start slowing down, the training effect diminishes.
These days it’s common to see HIIT protocols with extremely brief rest periods, which can make some people nauseous. That is not necessary, and it can even be detrimental in the long run. In the program below, you’ll see longer rest periods between bouts for HIIT than you’ll typically find in YouTube videos or other places vying for your attention. That is by design. There will be times when you’ll probably feel like you can perform these HIIT protocols with significantly less rest than what is prescribed, but I don’t recommend that. As the saying goes, just because you can doesn’t mean you should. Remember that when you’re training to burn fat and keep muscle, you don’t want your workouts to be more stressful than they have to be.
Programming Intensity
The intensity of HIIT training is straightforward: Exert maximum effort during each bout of activity. With LISS, however, there are a few different ways to determine the correct intensity, and any of them can work. They are as follows:
– Start at a level of intensity you think you can maintain for 30 minutes. ¨
– Be able to carry on a conversation the whole workout. This means you can complete a sentence without gasping for air (commonly referred to as the “talk test”). ¨
– Monitor your heart rate to determine your maximum aerobic heart rate (MAHR).
The third option here stems from Dr. Philip Maffetone, author of The Big Book of Endurance Training and Racing. His formula for LISS is simple: Subtract your age from 180 to determine your maximum aerobic heart rate (MAHR) in beats per minute (bpm). That formula helps you determine the heart rate you don’t want to exceed while performing LISS. For example, a typical 42-year-old man has an MAHR of 138 bpm (180 – 42). Since it’s impossible to maintain a specific heart rate during exercise, MAHR should be taken as a range between the number you calculate and 10 bpm below that, which, in this example, is 128. So your low-intensity aerobic workouts should keep your heart rate between 128 and 138 bpm for the duration.
How do you measure heart rate? Ideally, with a heart rate monitor. But you can ballpark it by holding two fingers to the carotid artery in your neck and counting the beats for six seconds. Multiply the number of beats you count by 10, and you’ve got the approximate beats per minute.
Maintaining the MAHR range helps you train at an intensity high enough to improve aerobic power but low enough to avoid the anaerobic threshold, where your body starts burning more glucose for fuel, thereby taking away from the aerobic training effect you’re trying to get (Maffetone 2010). Over the course of weeks and months of aerobic training, you’ll develop more mitochondria, capillaries, and myoglobin within the hypertrophied type I muscle fibers (Qaisar, Bhaskaran, and Van Remmen 2016). Low-intensity activity also increases your heart’s stroke volume, allowing more blood to be ejected with each heartbeat (Hellsten and Nyberg 2015). This means your cardiovascular system can maintain your performance with fewer beats per minute.
The MAHR calculation works well for most, with a few exceptions. It will probably not be accurate for someone who is severely deconditioned, is recovering from an injury, or has a very low resting heart rate. In those cases, stick to a level of intensity you can maintain for 30 minutes, or follow the talk test.
Sample Fat-Burning Program

You’ll perform three LISS and two or three HIIT sessions each week. The LISS sessions are intended to be performed on the days you don’t lift weights in order to burn fat, accelerate recovery, and reduce the likelihood of an interference effect (cardio endurance training eating into your muscle recovery from strength training), but if that doesn’t fit your schedule, perform them whenever you can—earlier or later on the days you lift weights, or directly before or after those sessions. This isn’t ideal scheduling, but you’ll still make progress.
The HIIT workouts are intended to be done at the end of your lifting workouts, but, as with the LISS sessions, you can put them elsewhere in the week if it better suits your schedule.
There are three types of workouts for both LISS and HIIT. Each time you do cardio, you’ll alternate between LISS and HIIT, and rotate through the specific protocols. Here are the workouts you’ll do.
LISS
Perform a 30-, 45-, or 60-minute session on three of your non-lifting days. Keep your heart rate at your MAHR or within 10 bpm below. Appropriate exercises include brisk walking, jogging, cycling, swimming, stair-climbing, rowing, a basketball game, shadowboxing, or soccer drills.
HIIT
Perform any activity that allows you to train with speed and an all-out effort. Examples include jumping rope, sprinting, kettlebell swings or snatches, stair-stepper climbing, sled pushing or pulling, loaded carries, elliptical machine, rowing machine, Assault bike, battle rope slams, roundhouse kicks to a heavy bag, or vertical climbing. Rotate between the following.
5:45 protocol: 5 seconds of maximal activity followed by 45 seconds of rest. Repeat for 10 rounds. ¨
10:60 protocol: 10 seconds of maximal activity followed by 60 seconds of rest; 10 seconds of maximal activity followed by 60 seconds of rest; 10 seconds of maximal activity followed by 2 minutes of rest. That’s one round. Repeat for three total rounds. ¨
15:45 protocol: 15 seconds of maximal activity followed by 45 seconds of rest; 15 seconds of maximal activity followed by 2 minutes of rest. That’s one round. Repeat for four total rounds.
For example, in Week 1 of the program, you may do the 5:45 protocol (HIIT) after your lifting session on Monday, a 30-minute jog (LISS) on Tuesday, the 10:60 protocol after lifting Wednesday, a 45-minute bike on Thursday, and a 60-minute walk Saturday. The following week, you could pick up with the 15:45 protocol after lifting on Monday, and begin the cycle again with a 30-minute jog on Tuesday.
The Elite Physique Fat Burner 3 Workout

The FB3 plan prioritizes your bodyweight for resistance. Additionally, you’ll need one moderately heavy dumbbell or kettlebell, a long resistance band, and a Swiss ball to fill in the gaps. Since a range of loads isn’t possible with bodyweight, most of your sets should be performed for as many repetitions as possible (AMRAP), but stop each set one rep short of failure. On the last set, you can push closer to exhaustion, as long as it doesn’t compromise your form in any way.
Your full-body strength relies heavily on your core. Since it’s common to lose strength while cutting calories, this program emphasizes making your midsection stronger. That’s why your core exercises in this program are almost always performed first, when you have the most energy, instead of at the end of a workout when you’re fatigued.
DIRECTIONS: WEEKS 1–4
You’ll lift weights three days a week, rotating between Workouts A, B, and C. Space the workouts apart by at least a day. So you could do Workout A on Monday, B on Wednesday, and C Friday, rest on the weekend, and repeat the cycle on the following Monday.
For each workout, perform exercises 1A–D as a circuit. So you’ll do one set of 1A, rest as prescribed, 1B, rest, and so on, until you’ve completed every exercise in the circuit. That’s one round. Rest 90 seconds, and repeat for 4 total rounds.
The first four weeks of the program appear below, and you can find the remaining eight weeks—as well as several other programs for fat loss and muscle gain—in my book, Elite Physique.
Workout A
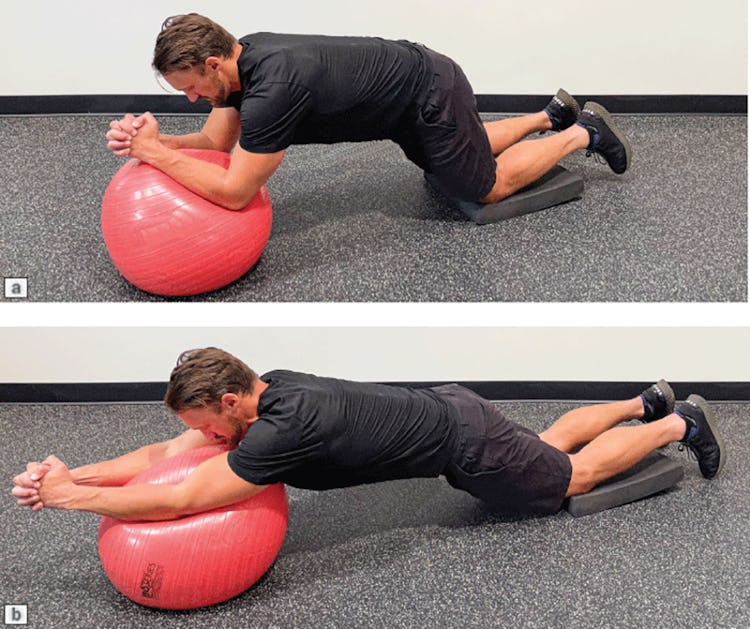
1A Swiss-Ball Rollout
Reps: AMRAP Rest: 45 sec.
Step 1. Start on your knees with your forearms resting on a large Swiss ball, elbows bent and resting below your chin (see figure a).
Step 2. Brace your abs, squeeze your glutes, and then shift your body forward as far as possible while you simultaneously extend your elbows, rolling the ball forward (see figure b).
Step 3. Slowly reverse to the starting position and repeat.
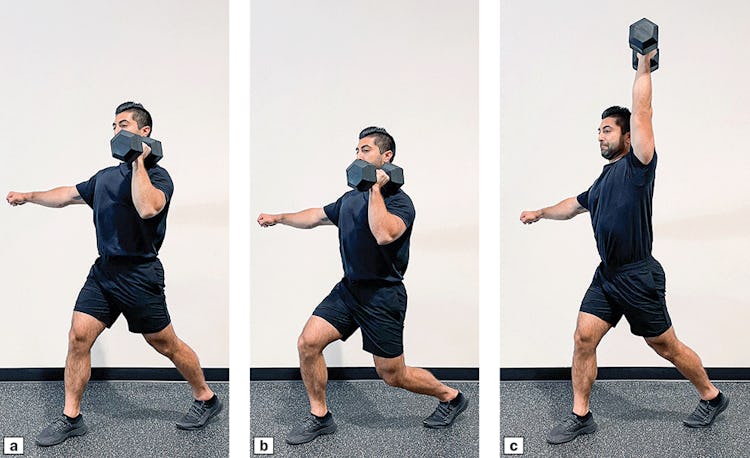
1B One-Arm Overhead Push Press
Reps: AMRAP Rest: 45 sec.
Step 1. Hold a kettlebell or dumbbell in your left hand at the side of your shoulder, palm facing in and elbow tucked tightly to your side. Take a step forward with your right foot to get in a split stance, with your toes forward and both knees bent slightly. Extend your right arm to the side for balance (see figure a).
Step 2. Bend your knees quickly to lower your body four to six inches (10-15 cm) to prepare for the leg drive (see figure b).
Step 3. Push through the center of your feet to straighten both legs as you simultaneously press the weight overhead until your elbow is locked straight (see figure c). The movement is intended to be explosive, so dip your knees quickly and extend them fast to generate momentum.
Step 4. Lower the weight under control and repeat for reps.
Step 5. Switch the weight to the right hand, put your left foot forward, and repeat.
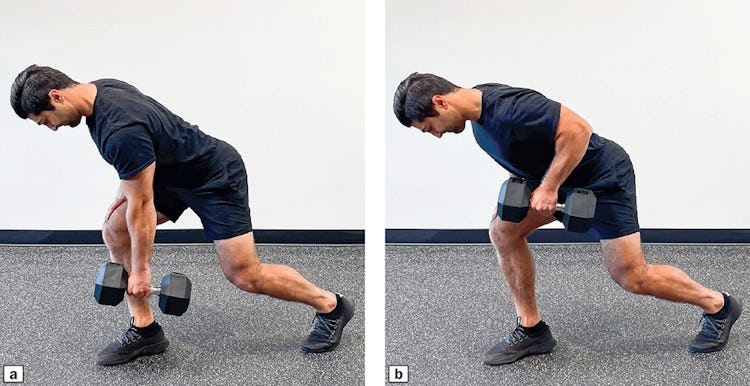
1C One-Arm Row
Reps: AMRAP Rest: 45 sec.
Step 1. Grab a dumbbell or kettlebell in your left hand. Stand with your feet shoulder width, then step your right leg forward a couple feet. Push your hips back and shift your trunk forward until it’s around 45 degrees relative to the floor. The majority of your weight is on your right (front) leg. Your left arm is straight and hanging down, palm facing in (see figure a). Place your right hand on the top of your right thigh, and slightly arch your low back.
Step 2. Bend your left elbow and pull the weight up until your left palm is near the side of your torso (see figure b).
Step 3. Slowly reverse the motion. Switch the weight to your right hand with your left leg forward and repeat.
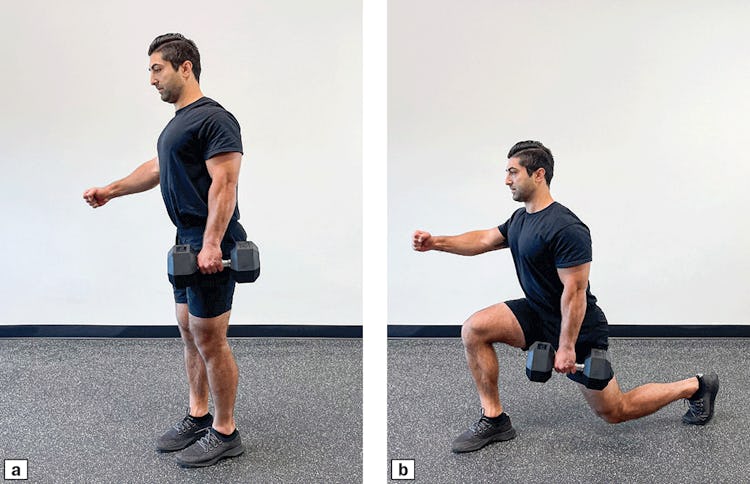
1D Reverse Lunge
Reps: AMRAP Rest: 90 sec.
Step 1. Stand with your feet together while holding a weight in your left hand hanging down at arm’s length (see figure a).
Step 2. Take a long step back with your left leg, plant the toes, and lower your body until your rear knee is at or near the floor (see figure b).
Step 3. Step back to the starting position.
Step 4. Perform all your reps with one leg, and then switch the weight to your right hand and repeat the reps while stepping back with your right leg.
Workout B
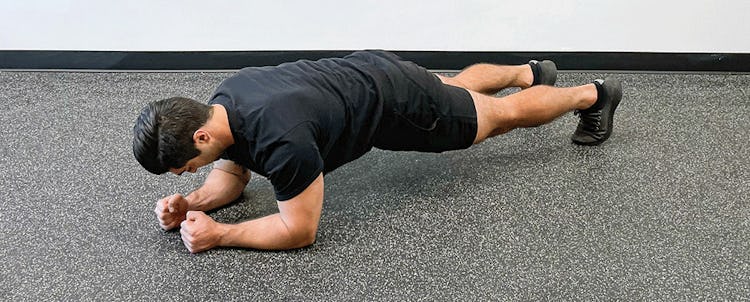
1A Hardstyle Plank
Reps: Hold for 10 seconds with max effort Rest: 45 sec.
Step 1. Start with your elbows resting directly below your shoulders and your body in a straight line from neck to ankles (see figure).
Step 2. Brace your abs, squeeze your glutes, and then pull your elbows toward your knees. Your elbows won’t move but you’ll feel an intense contraction in your lats and abdominals.
Step 3. Maintain the effort for as long as possible.
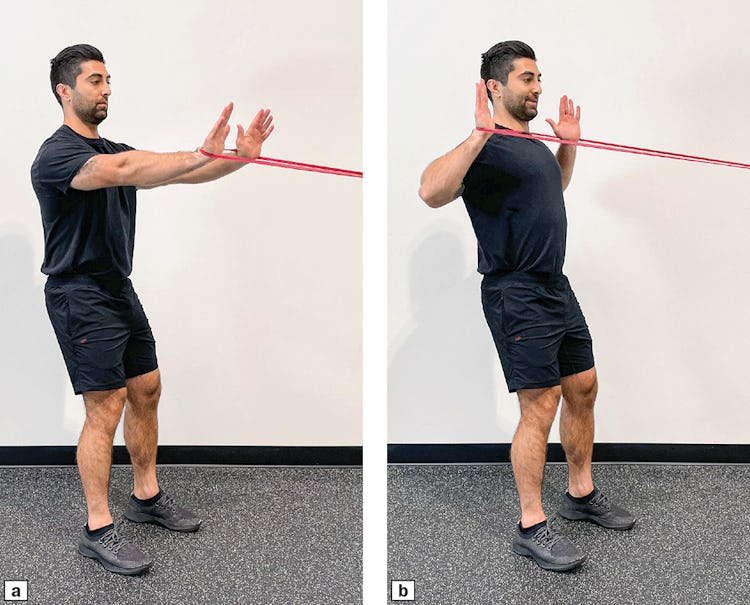
1B Face Pull
Reps: 12 Rest: 45 sec.
Step 1. Attach a long resistance band to a sturdy object, and hook the open end of the band across the back of your wrists with your palms facing forward, fingers spread and pointing up (see figure a). Stand tall with your arms held in front and parallel to the floor. Step back to generate tension on the band.
Step 2. Perform a horizontal row, and then at the halfway point of the motion, externally rotate the shoulders until the upper arms are slightly below parallel to the floor (see figure b).
Step 3. Slowly reverse the motion and repeat.
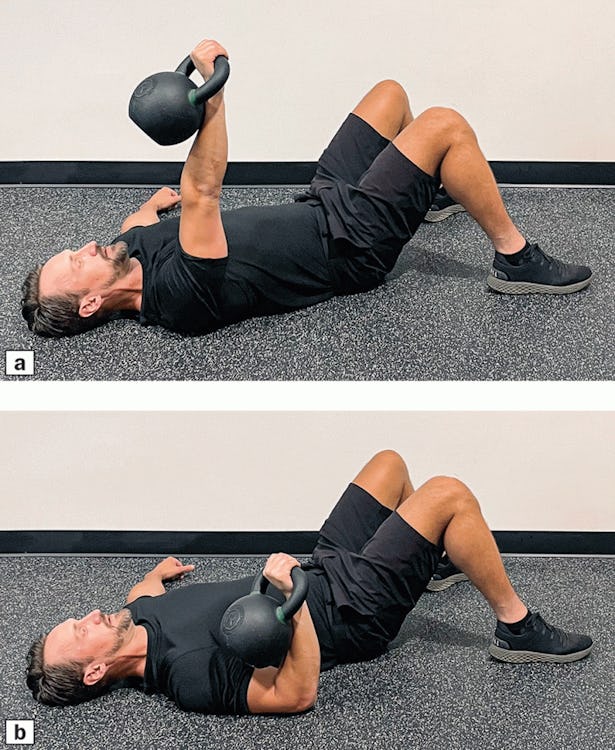
1C One-Arm Floor Press
Reps: AMRAP Rest: 45 sec.
Step 1. Lie on your back with your knees bent and feet flat on the floor, wider than shoulder width. Hold a dumbbell or kettlebell in your right hand directly above your right shoulder, with your elbow locked straight. Place your left arm on the floor, angled out slightly from your body (see figure a).
Step 2. Squeeze your glutes, brace your abs, and then bend your right elbow and lower the weight until your elbow is resting on the floor (see figure b). Press the weight until your elbow is locked straight. Repeat for reps.
Step 3. Switch to your left hand and repeat.
1D Stepup

Reps: AMRAP Rest: 90 sec.
Step 1. Stand with your left foot flat on a box or step, high enough so that your knee is bent 90 degrees. Your right foot is on the floor behind the left while holding a weight down at your side in your right hand (see figure a).
Step 2. Push through the heel of the left foot to lift yourself up until it is straight and the foot of the trailing leg is alongside it (see figure b).
Step 3. Without putting any weight on the trailing leg, lower it back to the floor.
Step 4. Perform all your reps, then switch sides and repeat the set.
Workout C
1A Pallof Press

Reps: Hold 20 seconds each side Rest: 45 sec.
Step 1. Attach a band to a sturdy object around chest height. Grasp the handle of the cable or the band with both hands, fingers interlocked.
Step 2. Step away from the cable or band so it’s to your right and approximately parallel to the floor. Stand with your feet slightly wider than shoulder width, hands against your chest (see figure a).
Step 3. Brace your abs, squeeze your glutes, and then slowly straighten your arms in front, parallel to the ground (see figure b). Maintain the position without rotating your trunk or pelvis.
Step 4. Hold for the recommended time, then switch sides so the cable or band is to your left.
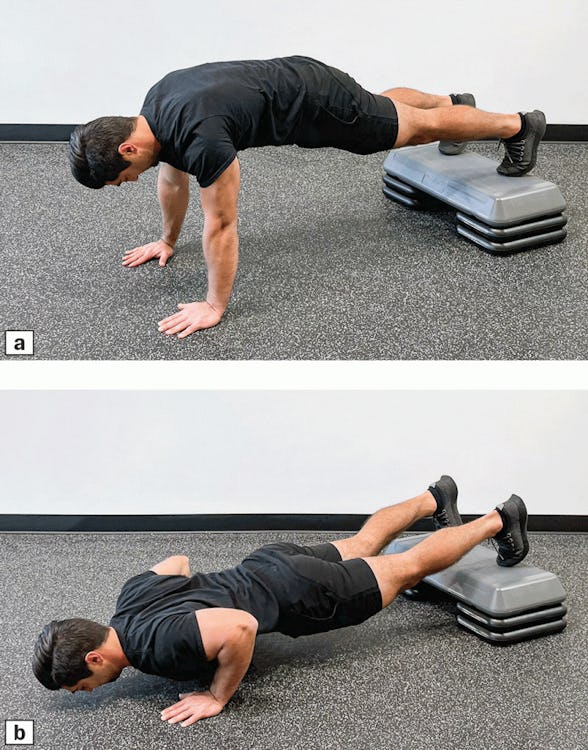
1B Feet-Elevated Pushup
Reps: AMRAP Rest: 45 sec.
Step 1. Get into the top position of a pushup, with your hands on the floor slightly wider than shoulder-width apart (see figure a). Your feet are approximately hip-width apart and resting on a box or step that’s up to 24 inches (60 cm) high. Your body is aligned from neck to ankles.
Step 2. Bend your elbows and lower your body as one unit until your chest is near the floor (see figure b).
Step 3. Push back up and repeat.
1C Straight-Arm Lat Pulldown

Reps: 12 Rest: 30 sec.
Step 1. Loop one end of a long resistance band over a secure structure higher than your head. Loop the other end under your palms, and stand with your feet slightly wider than shoulder-width apart. Push your hips back and bend your knees slightly to shift your trunk forward to around 70 degrees relative to the floor. Hold your arms parallel to the floor, slightly wider than shoulder width (see figure a).
Step 2. Brace your abs, squeeze your glutes, and then pull your arms down until your palms are just outside your thighs (see figure b).
Step 3. Slowly elevate your arms back to the starting position and repeat.
1D Kettlebell Swing

Reps: 5 Rest: 90 sec.
Step 1. Stand with your feet wider than shoulder width, with a kettlebell resting on the ground about a foot (30 cm) in front of you. Push your hips back, keep your knees directly above your feet, and then reach forward to grab the kettlebell with both hands while maintaining a neutral spine (see figure a). This is only the starting position and is not repeated throughout the subsequent reps.
Step 2. To initiate the swing, explosively pull the kettlebell so it swings back between your legs (see figure b).
Step 3. Explosively thrust your hips forward as you stand, driving through the center of your feet, using minimal assistance from your arms to elevate the kettlebell. Swing the kettlebell up until it’s around chest height (see figure c). Your body should be perfectly vertical at the end of the motion.
Step 4. Reverse the motion, and continue for the desired number of reps. To end the set, perform a hip hinge and lower the kettlebell straight down to the floor.
Pick up Elite Physique at HumanKinetics.com


)


