Many people have trouble pairing the idea of getting stronger with bodyweight training alone because, well, only lifting weights equals muscle and strength, right? Bodyweight is for beginners, and people who don’t have access to a gym¦
Well, not quite. Your average gymnast or wrestler does the majority of their training with bodyweight; ditto for the guys in your local park who do pullups and pushups by the hundreds. And have you ever seen a speed-cyclist’s legs? These athletes may not load up on squats, deadlifts, and leg presses, but no one’s questioning their strength and muscle mass. The fact is, done correctly, bodyweight training can be quite challenging, even humbling, and give you more than enough stimulus to grow muscle and gain power.
The following is a guide to getting bigger, stronger legs by lifting your bodyweight—and nothing else.
Can You Build Leg Muscles and Strength Without Weights?
The science is pretty clear now that the main driver of muscle growth is mechanical tension—the tension your muscle fibers experience when you take a set of an exercise to failure, or close to failure, and your rep speed slows down involuntarily. In other words, it doesn’t matter whether you’re lifting weights or using your own bodyweight for resistance, or whether you’re doing high reps or low reps. As long as you train hard enough that your muscles start to fatigue and your reps slow down near the end of your set, they’re going to experience enough tension to deliver a stimulus that allows you to gain muscle and strength.
Notice that the operative term is “tension,” not load. Lifting weights is a pretty easy way to measure, control, and progress the amount of tension you apply—for example, you know how much you’re lifting when you grab 40-pound dumbbells, and you know that when you can use the 45s, you’ve gotten stronger. But the weight of your body can create mechanical tension too. You just have to be a little more creative in how you use it. The exercises we recommend here will hit your legs in a number of ways you’re probably not at all used to, making your body feel as heavy as a loaded barbell.
When you do bodyweight exercises, you often have the opportunity to use a greater range of motion than when you lift weights, because there is no barbell or dumbbells to accommodate. This is beneficial if you’re limited in your mobility, as performing lengthened-range exercises will improve your ability to get into those deeper positions. Improved mobility, in turn, promotes joint health and athleticism.
The Most Effective Bodyweight Leg Exercises

You don’t need any weights to do the exercises that follow. Some basic equipment such as a bench, exercise mat, furniture sliders, and an elastic resistance band will help you perform them in some cases, so it’s good to have access to a home gym or garage that provides some options, but you don’t need barbells, dumbbells, or machines.
Slider Leg Curl
Target: hamstrings
(See 01:35 in the video above.)
The slider leg curl works the hamstrings’ two functions at the same time. That is, extending the hips and flexing the knees, similar to a glute-ham raise (an excellent bodyweight hamstring exercise we’ve already written about, but one that requires a special bench that isn’t available in most gyms). All you need is a pair of furniture sliders, or, if you’re training on a smooth, waxed floor, some towels or even paper plates can work too.
Step 1. Lie on your back on the floor, and place the sliders under your heels. Position your feet right behind your butt with your knees bent. Tuck your pelvis under, take a deep breath into your belly, and brace your core. Drive your heels into the floor to raise your hips to full extension.
Step 2. From there, slowly extend your legs until you feel you’re about to lose tension in your hamstrings, and then slide your heels back toward you as if doing a normal leg curl. Keep your hips extended the whole time, but be careful not to hyperextend your lower back.
Aim for 2 sets of 6–12 reps. If that feels easy, you can hook some elastic exercise bands around your heels for extra resistance.
Bodyweight Leg Extension (aka Reverse Nordic)
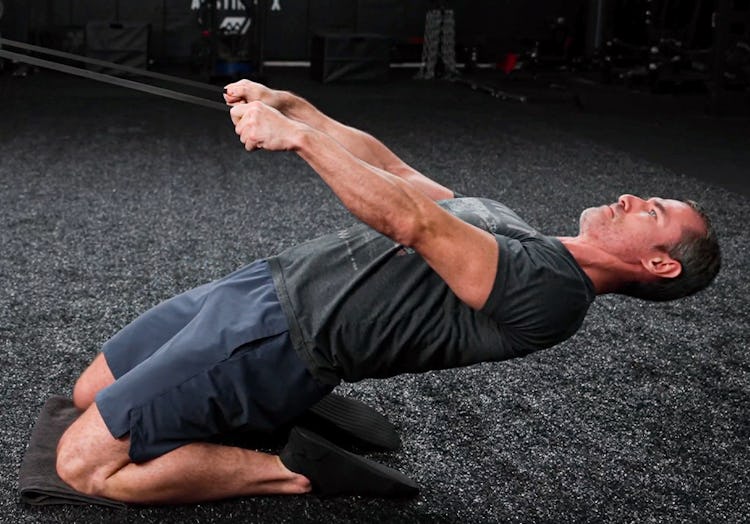
Target: quadriceps
(See 02:27 in the video.)
Almost all quad exercises involve hip flexion too. That means you fold at the hip when you do them, as in a squat, lunge, and even a leg extension. The bodyweight leg extension is unique in that the hips remain extended the whole time. This forces the quads into a deep stretch when you bend your knees, making them work from a lengthened position. This is an unusual range to train the quads, and makes for a nice complement to more conventional quad exercises.
Step 1. Attach an elastic exercise band to a sturdy object at about the height your head would be if you were kneeling on the floor. (The band isn’t a must have, but it will help you get more range of motion on the exercise.) Place a mat or towel on the floor and kneel on it with your shoelaces down and knees about shoulder-width apart. Grasp the free end of the band, and hold it with your arms extended in front of you. Scoot back until there’s light tension on the band.
Step 2. Extend your hips so you’re standing tall, and tuck your pelvis under slightly so it’s perpendicular to your spine. Squeeze your glutes and brace your core.
Step 3. Slowly allow your body to drift backward (your butt moves toward your heels), keeping your hips extended and driving your feet into the ground so that your quads control the descent. You’ll feel a strong stretch in your thighs.
Step 4. When you feel you can no longer control the movement backward, use your quads to extend your knees and come back to the starting position. Use the band to help you pull yourself back.
Try for 2 sets of 5–10 reps, but you may only be able to manage a few reps with these at first. Do them with control and progress gradually. As you get stronger, you can eventually ditch the band and use your bodyweight alone, unassisted.
Copenhagen Plank
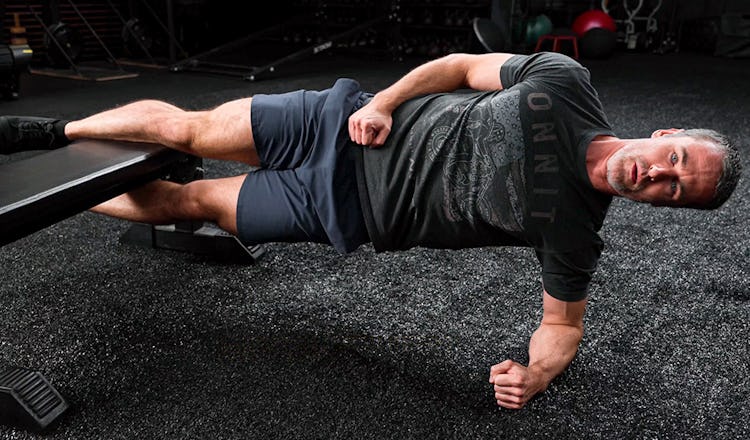
Target: Adductors
(See 04:09 in the video.)
The main way people train the adductor muscles directly is with the seated adductor machine, but the Copenhagen plank allows the body to remain in a straight line, stacking the shoulders and hips over the knees just as they appear when you’re standing and moving. Since it’s also a variation of the side plank, you’ll get some core work from it too.
Step 1. Lie on one side, and place your top leg on a box or bench. The knee of the top leg should be bent enough so that your entire shin can apply pressure to the surface of the box. The bottom leg can be straight or slightly bent. Plant your bottom elbow and forearm on the floor, and brace your core.
Step 2. Drive your top shin down into the box to raise your body off the floor, and try to close the space between your two legs, sandwiching the platform you’re working on. Your body should form a nearly straight line in the top position.
Aim for 2 sets of 10–12 reps each leg, moving with a slow, controlled tempo. If performing reps is too difficult, simply get into the top position and hold it for a 15 to 30-second isometric. That’s one set.
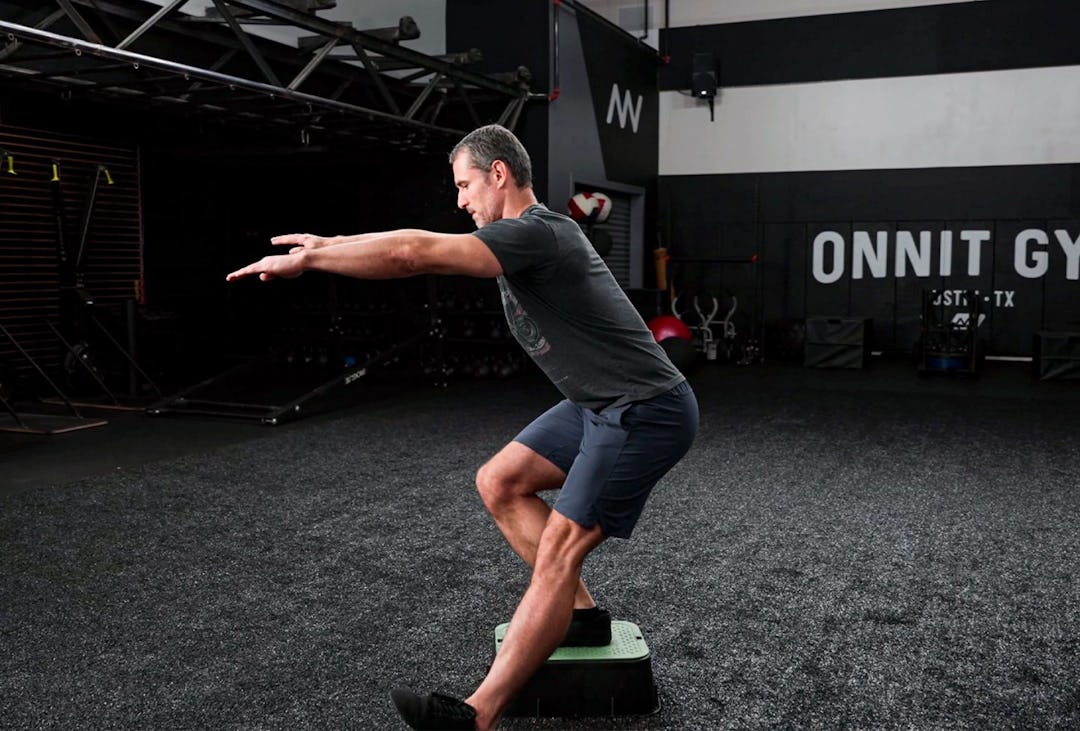
Touchdown Squat
Target: glutes and quads
(See 05:33 in the video.)
A true one-legged, full-depth, single-leg squat (known as a pistol squat) is very challenging and is not doable for most people without a lot of practice. Here’s a way you can work up to a pistol, doing a similar movement that challenges balance, stability, and ankle mobility while also working the quads and glutes hard.
Step 1. Set a box or some mats on the floor so that, when you stand on them, you’ll be a few inches above the floor. You can build this height up over time. Stand on the surface with one leg and raise your other leg out to the side a bit so it’s out of the way.
Step 2. Hinge your hips back so your torso bends forward and lower your body until the heel on your free leg gently taps the floor. Try to keep your working knee in line with your hip. Extend your hips and knee to come back up to standing.
Go for 2 sets of 5–10 reps.
Lateral Leg Raise
Target: abductors
(See 06:23 in the video.)
This exercise is more of a mobility move than heavy duty strength training, but it will burn like fire and strengthen the outer hip muscles and glutes. Lateral leg raises work your lower body in the frontal plane—i.e., moving side to side—which is a neglected movement pattern and very important for athletes. You can use it as part of your warmup on a leg day, or do it as a finisher.
Step 1. Hold on to a sturdy object for balance and stand with your feet hip-width apart.
Step 2. Raise one leg out to your side as high as you can without bending the knee or twisting your hips. Hold the top for a second, and then control the descent.
Perform 2–3 sets of 8–12 reps.
As you get more comfortable with the movement, progress to performing straight-legged hip circles, raising your leg in front of you, then out to the side, and finally behind you.
How to Stretch and Prepare For a Bodyweight Leg Workout
Stretching and mobility work are paramount for getting the most out of your athletic potential and avoiding injury. Done before your lower-body workout, the following three drills can warm and limber up your hips, hamstrings, knees, and quads.
Squat and Reach
(See 00:28 in the video above.)
Step 1. Stand with your feet shoulder-width apart, and turn your toes out about 20 degrees. Keep your head, spine, and pelvis in a long straight line as you squat down and wedge your elbows between your knees, using your arms to gently pry your knees apart even more. As you push the knees out, try to extend your torso to get as tall and upright as possible.
Step 2. Plant your hands down on the floor inside your knees, and twist your torso to the right, reaching one hand straight overhead. Turn your head as well so you’re watching your hand. It’s OK if your heel comes off the floor as you twist, but try to keep it down. Return your hand to the floor, and repeat on the opposite side.
Step 3. Stand back up from the bottom of your squat position, keeping your heels on the floor. That’s one rep. Perform 2 sets of 3–5 reps.
High-Knee Walk
(See 01:31 in the video.)
Step 1. Stand tall, and take a step forward, raising one knee to your chest as high as you can. As the knee rises, grab hold of your shin with both hands and pull it into your chest for a deep glute and inner-thigh stretch. Avoid slouching or bending forward as you do. Try to keep the support leg straight as well.
Step 2. Release the leg, plant your foot, and repeat on the opposite leg.
It’s OK to come up onto the ball of your foot with each step. Do 2 sets of 8–10 strides.
Spiderman Walk
(See 02:43 in the video.)
Step 1. Stand tall, and take a big lunge step forward. Place your hands on the floor to the inside of your lead leg, and lower your trailing knee to the floor.
Step 2. Tuck your pelvis under slightly, and push your hips forward until you feel a deep stretch—it’s OK to let your knee move in front of your toes.
Step 3. Twist your torso away from your lead leg and raise your arm overhead. Turn your head and follow it with your eyes. Be sure to raise the arm above you, not behind, so you create a straight vertical line between your planted arm and your raised arm.
Step 4. Return your hand to the floor, and then step forward with the rear leg to stand tall again. Repeat the lunge and twist on that leg.
Perform 2 sets of 5–6 strides on each side.
Sample Bodyweight Leg Workout Plan
Here’s a balanced leg routine that makes the most of the exercises listed above.
DIRECTIONS
Perform the exercises in sequence, completing all sets for one move before going on to the next. Remember to take each set close to failure. You should only stop at the point where you don’t think you could do another rep with good form.
(See 07:07 in the Best Bodyweight Leg Exercises video at the top.)
1. Sliding Leg Curl
Sets: 2 Reps: 6–12
2. Touchdown Squat
Sets: 2 Reps: 5–10
3. Copenhagen Plank
Sets: 2 Reps: 6–12 (or hold for 15–30 sec.)
4. Bodyweight Leg Extension
Sets: 2 Reps: 5–10
5. Lateral Leg Raise
Sets: 2 Reps: 8–12
)