Summary
– The most effective strength-training programs are based on conjugate training, percentages of your one-rep max, or Rating of Perceived Exertion (RPE).
– The so-called “best” training program is one you believe in and enjoy, and that suits your mindset and the way you like to train.
– You can combine conjugate training, percentage-based training, and RPE to create programs that are customized to suit your goals, and readiness to train on any given day.
This May Be The Best Way To Get Stronger
Every serious lifter is on a lifelong hunt for the best strength-training program. There are plenty of options to choose from—including 5×5, 5/3/1, Sheiko, the Westside conjugate system, etc.—and they all have their benefits and drawbacks. Having coached strength athletes for the past 30 years, and competed in powerlifting and strongman myself, I’ve come to realize that there is no perfect training program.
Well, maybe¦
The so-called “best” way to get stronger may lie not in one program by itself but in a combination of three training philosophies that have already been around a long time, and, individually, have guided many a great athlete to victory. Finally, I think I’ve brought them together in a way that provides the ultimate balance of intensity, variety, and recovery to let you make smooth progress on your lifts indefinitely while reducing your risk of injury.
The Top 3 Programs For Building Strength
There are three umbrella types of strength-training programming that produce results. First, I’ll explain what they are and how they work, and then I’ll show you how the system I devised brings their best aspects together while sidestepping the pitfalls.
#1. Conjugate Training (the Westside Barbell System)

In a conjugate system of training, you work on improving multiple athletic qualities at the same time. In any given week, you can have a workout that focuses on max strength (how much you can lift for one rep), muscle size, speed/explosiveness, prehab/rehab, and more. The most famous example of conjugate training is the Westside template—the kind of training done at Westside Barbell in Columbus, Ohio, a gym that’s been home to some of the strongest powerlifters in history.
The basic Westside template has you training four days a week. There are two heavy workouts, called max effort days, that are centered around a major barbell lift you want to improve (as Westside was developed for powerlifters, it’s usually some variation of the squat, bench press, and deadlift—although it doesn’t have to be). There are also two lighter workouts in the week, called dynamic effort days, in which you focus on speed and explosiveness.
On max effort days, you choose exercises that support gains on your main lift, and gradually work up to an all-out max set of one, two, or three reps. These lifts are usually cycled weekly. For instance, a guy who wants to bench press more but has a weak lockout might perform close-grip bench presses one week, floor presses the next, and a bench press to boards the week after. This should strengthen his triceps at the end range of motion of his bench press so that he can lock out more weight.
On the dynamic effort days, you work on your ability to apply force to the bar quickly, which can help you overcome sticking points in your lifts. Dynamic days may have you squatting/deadlifting and benching with lighter weights and more explosive effort so that the bar moves fast, or doing jumps and throwing exercises.
Both max effort and dynamic effort workouts will also include exercises that are done for higher repetitions to help you build muscle (essentially, bodybuilding training), and other work that’s geared to balancing out any weaknesses you have.
Pros
Apart from being very effective for helping you improve in multiple areas simultaneously, the Westside training style can easily be adjusted to suit your goals. It’s a loose system that can work using many different exercises—not just the powerlifting big three—and it can evolve along with you as your strengths and weaknesses change. Truthfully, the “best” program you can do is one that suits your mindset. That is, if you believe in the training, and you enjoy doing it, that’s the system that’s going to produce the best results for you. With this in mind, Westside is well-suited to those who love to smash heavy weights and test themselves on a regular basis.
Cons
For people who like more structure in a program (i.e., “do X sets of Y reps for Z exercise every week for four weeks”), it may not be the best choice. Westside also tends to be implemented improperly by lifters who don’t fully understand it. Trainees who push too hard and don’t recover enough will get injured.
#2. Percentage-Based Training
Many powerlifting and Olympic weightlifting programs use percentages of one’s one-rep max to determine how much weight to use on a given day. For example, if you can press 100 pounds for one all-out effort of one rep, and your program calls for 5 sets of 5 at 75% of your max, you’ll do your sets with 75 pounds.
Percentage-based training is good for making sure you train at intensities that are high enough to produce results, but they don’t account for how you’re feeling on a particular day. For instance, your program may call for 3 sets of 1 with 95%, but if you’re having one of those days where everything feels heavy and the bar is moving slowly, what are you supposed to do? If you soldier on anyway and try to hit 95%, you may get injured.
Pros
You never have to wonder how much weight to use because the program has predetermined it mathematically. Percentages can also help you zero in on certain goals. For instance, loads in the 80–90% range tend to be good for muscle size, while 90% and above is geared more for strength development. It can also be very satisfying to watch the percentages climb each week in your program while you check them off. You can gain momentum from conquering each weight at a time.
Cons
Dogmatically insisting on using a certain weight because the program calls for it is a big mistake. If you miss a lift in one workout—due to any number of circumstances—you can feel like a failure. You may be more timid going into your next workout, and miss again as a result. This could ultimately lead to a domino effect that ruins the rest of your program. Remember, the mental aspect of training is important.
Percentage-based training simply doesn’t account for day-to-day fluctuations in recovery and readiness. In other words, percentage programs don’t take into consideration the fact that people have busy lives and bad days that impact their strength.
#3. RPE Training

Because of the drawbacks inherent in percentage-based training, RPE was born. It stands for Rate of Perceived Exertion, and it’s simply a subjective measure of how hard a set feels to perform. When you apply RPE in your workouts, you assign a numerical value to a set and use it to guide the intensity of your effort. The RPE scale generally goes from 10, an all-out effort, down to 6, which is almost easy. RPE for strength training was popularized by Mike Tuchsherer, a world-class powerlifter and founder of Reactive Training Systems.
Here’s how it works. An RPE of 10 means you choose a weight that’s so heavy you know it won’t allow you to complete one more rep than the prescribed number with good form. Whether the set calls for 1 rep, 3 reps, or 5 reps or more, you max out your strength for that rep number. For example, if your squat calls for a set of 3, and the weight you choose lets you get 3 reps, but you couldn’t go for a fourth even if someone held a gun to your head, you’ve hit an RPE 10.
An RPE 9 means that you could get 1 or maybe 2 reps more than the target number. So, if your workout prescribes a set of 3 and you do 3 but think you could have done 4 reps, or 5 reps tops, you’ve done an RPE 9.
You can probably guess how it goes from here. An RPE 8 means that you could finish 2 or 3 more reps than prescribed.
RPE 7 = 3 or 4 more reps.
RPE 6 = 4 or 5 more reps.
Letting RPE guide your sets can actually be very similar to using percentages of your max. A set of 3 done with an RPE 9 is going to be around 90% of the one-rep max for most people, and, of course, a set of 1 rep at RPE 10 will be 95–100% of your max. But using RPE instead of a percentage allows you more leeway to find the load that’s best for you on any given day.
RPE lets you adjust the weights you use in a workout on the spot. Depending on how you’re feeling that day—i.e., how well recovered you are, the mood you’re in, your level of focus, etc.—you can increase or decrease the weight you’re lifting on your subsequent sets so that you customize your training to the intensity you’re capable of at the moment. This is a great way to avoid pushing too hard on days when you don’t have it in you, helping you avoid overtraining and injury. By the same token, RPE can let you know it’s OK to push harder on days you feel good, so that you make the most of those sessions.
Now let’s look at how you might use RPE in a workout. Say your program calls for the bench press to be done for 4 sets of 5 at an RPE of 9. You would warm up, work up to a weight that you think will allow you 6 or 7 reps, and perform 5 for your first set.
If it feels only moderately tough, so that you think you could have gotten 8 reps if you really went for it, that means it was an RPE 7. You know now to increase the weight a bit so that the lift feels harder. For your second set, let’s say you add 10 pounds, and again you get 5 reps—but now you’re sure you could have only gotten 1 more. That’s an RPE of 9.
Let’s say you do your third set of 5 with the same weight, and that’s also an RPE 9. You’re right on track. But you can tell that you won’t be able to get another set with the same load. Now you know to reduce the weight by 5 pounds so that your fourth work set remains at an RPE 9. Before you know it, you’ve done nearly all your sets with exactly the right intensity the program prescribes while tailoring them to your own individual strength level.
Pros
RPE can help you take advantage of days you feel great in the gym and are ready to train hard as well as prevent you from overdoing it on days you’re not so energized. Over time, this can make for more productive workouts and fewer ones that sap your confidence or cause injuries.
Cons
In order for RPE to work, you have to be honest with yourself and pay attention to how you’re feeling. A beginner is likely to undershoot his/her RPE, while competitive lifters often overshoot it. You may be so fired up to train that you give an RPE 10 on a set but write it down in your training log as an 8, and that can affect your performance on future workouts.
The Perfect Program For Strength Training?

Having seen all of the above programs work well for some people and poorly for others, I started experimenting with a new system that combines the best aspects of each and, I believe, minimizes their flaws. The Total Performance Method, named after my facility, Total Performance Sports, in Malden, Mass., is a conjugate system that uses percentages and RPE.
Like the Westside conjugate method, we rotate exercises and train heavy, allowing people to max out on days they feel up to it, but not all the time. We assign percentages of the one-rep max to lifts, so you have a good idea of how much weight to use, but we also use RPE so that that load isn’t written in stone, and you can adjust on the fly based on how you feel. In other words, the percentages serve as a recommendation, but RPE lets you make the decision.
So, let’s say your program calls for squats done for 5 sets of 5 reps at an RPE 9 and 77.5% of your max. You’ll warm up, and if all is going well on the warmup sets, you’ll do your first work set at the percentage and RPE indicated. If afterward you feel like the 5 reps weren’t too tough, i.e. your RPE was more like a 7 or an 8, you can go up in weight by 2 ½% for the next set—so you’d increase the load to 80%. If that still feels light, you can go up by another 2 ½% on the following set. If for some reason that still doesn’t make your RPE high enough, just keep going with that weight until all sets are completed. You’ll know you can probably go heavier next time.
On the other hand, if your RPE on the first work set was higher than what was prescribed, back the weight off a little. You can reduce it by as much as 10% so that your next set lets you hit the right RPE number. If you reduce the load by 10% and the set still feels too hard, you can be sure you haven’t recovered properly, and you should end the workout, go home, and rest. Any more work at that point would be counterproductive.
Here’s how it all might look in your training log.
Lower-Body Day
1) Squat
5 Sets of 5 Reps @ RPE 9/77.5%
Set 1: 5 reps, 80 pounds*, felt like an RPE 7. Go up to 85 pounds to make it harder.
Set 2: 5 reps, 85 pounds, felt like an RPE 9. Stay with this weight.
Set 3: 5 reps, 85 pounds, felt like an RPE 9. Stay with this weight.
Set 4: 5 reps, 85 pounds, felt like an RPE 10. Reduce the weight to 80.
Set 5: 5 reps, 80 pounds, felt like an RPE 9.
*Program assumes a squat max of 100 lbs. Numbers are rounded to the nearest whole number that most gym’s weight plates can total.
It doesn’t matter that two of the five sets were done at RPE’s and percentages that were different from what you were prescribed. You trained as hard as you were capable of that day and, most importantly, you didn’t miss any lifts! That means you’re not overtaxing your muscles, joints, and nervous system, or endangering your safety with weights you can’t handle. The next time you squat, you’ll have a better idea of which loads to choose, and your chances of having a great workout are much higher.
Here’s something to keep in mind, however. When you use variations on the lift you’re trying to improve, as Westside lifters do, the RPE will automatically be higher. This means that when you do a lift with paused reps, using special bars—such as a safety squat bar (SSB), Swiss bar, cambered bar, etc.—or using accommodating resistance via bands or chains, you have to anticipate that it will feel harder than using the plain ol’ conventional barbell and weight plates, and adjust accordingly.
For example, say you do a regular squat one week and your RPE is 8 for a set of 5 reps. The next week, if you do a paused squat for 5 reps, your RPE will be more like a 9, because pausing a rep is more challenging than just going down and up with the bar. To account for this, you have to reduce the percentage of your max that you’re using by five percent to make it an RPE 8 again. Otherwise your RPE will be too high and you may not make all your reps. You’ll have to do this for every little deviation you make from the conventional version of the exercise. So, if you do a pause squat, you take off five percent, and if you do a pause squat with a safety-squat (SSB) bar, you take the weight down by 10%.
Write Your Own Strength Program
Now that you know the basics of how conjugate training, percentages, and RPE work, you can put them together to write your own programs.
As discussed above, the conjugate system helps you determine the lifts you want to build, the exercises that will build them, how to cycle them, and how heavy to train (one-, two-, or three-rep maxes). RPE lets you keep track of how hard you’re working. But when it comes to percentages, it can be confusing to know which ones to use and when. To remedy that, I look to Prilepin’s chart.
“Whose what?”
Back in the days of the Cold War, Soviet scientists analyzed lifters and determined about how many sets and reps they should do with different percentages of their maxes in order to see gains. The result of their research is Prilepin’s chart—a table of percentages, sets, and reps that many great lifters and coaches have used as a guide for decades. (See the graphic below, right-hand side, for the chart).
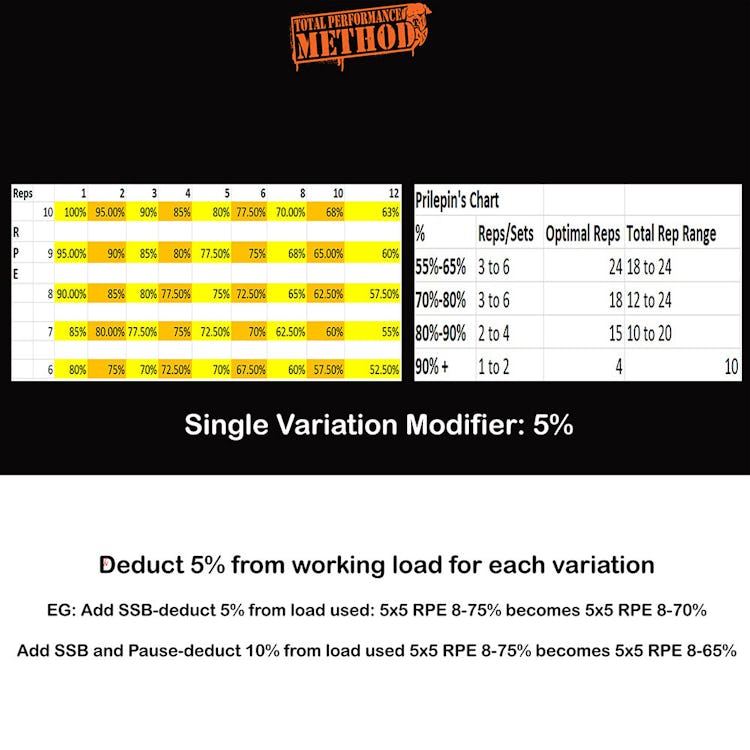
Graphic courtesy of Total Performance Sports
Here’s how it works. Say you want to train your main lift in the 80–90% range—a good zone for muscle and strength gains. The chart tells you to do 2–4 sets of 2–4 reps until you hit at least 10 reps, and as many as 20 reps, for the exercise. That could end up being 4 sets of 4 reps, 3 sets of 3 reps, or a lot of other combinations, and the exact configuration you do in a workout depends on a lot of factors, but, as you can see, the “optimal number” of reps will be 15. That means a total number of 15 reps done with weights in that percentage range should be ideal for strength gain. You can customize your workouts any number of ways based on preference and how you feel, but, ultimately, as long as you follow the parameters in the chart, you’ll be fine.
There are many ways to set up an effective program using all these tools I’ve given you. One of the simplest is just to follow Prilepin’s chart from top to bottom. For example, you could set up a 12 to 16-week program where you spend a few weeks in each percentage range on the chart, moving from the 55–65% bracket down to 90%+. Take a deload week (where you lighten the weights and/or reduce the number of sets you do in your workouts) here and there as needed, and aim to peak in your final week, maxing out your lifts.

In the first week of each training block, you could set your RPE on the low side, maybe 8, so that you give yourself a chance to get accustomed to the program. The second week, you could bump up the RPE—and the percentage—to a 9, and in Week 3, go heavier with an RPE 10. To ensure that the weights are challenging enough at those lower percentages, you can limit your rest periods to a minute or so and build work capacity. Something like this¦
Week 1: 4 sets of 6 @ RPE 8/60%
Week 2: 4 sets of 6 @ RPE 9/65%
Week 3: 4 sets of 6 @ RPE 10/70%
The next training block would move to the 70–80% range on Prilepin’s chart, and could look like this:
Week 4: 3 sets of 5 @ RPE 8/72.5%
Week 5: 3 sets of 5 @ RPE 9/75%
Week 6: 3 sets of 5 @ RPE 10/77.5%
Now you’d probably increase your rest periods as the weights got heavier, and go up in smaller weight increments so you had time to adapt.
Of course, you don’t have to wait months to test where your maxes are. If you’re having a good day and your RPEs are lower than you intended, that’s a good time to throw in a heavy set or two of 1 to 3 reps, as Westside lifters do. Saving your heaviest work for the days you really feel up to it is a good way to perform it more safely, and set PRs.
Another way to program is to alternate periods of higher volume and lighter weight with weeks of just the opposite—heavy weight and low volume. For instance, spend four weeks in the 70–80% zone on Prilepin’s chart, and then four weeks at 90%+. This contrast makes for big gains in muscle and strength.
As you experiment with programming, be aware of a few caveats¦
1. You don’t want to train at high percentages and RPEs for much more than three weeks at a time. Think 85%+ and 9/10 RPE. At that point, your joints and nervous system begin to get overstressed.
2. You shouldn’t do high amounts of volume at moderate intensities for too long either—as in 70–80% for 7/8 RPE for more than four weeks. Again, you’ll risk burnout.
Wave your percentages and RPEs any way you see fit, but keep them varied.
3. A good strategy when trying to develop multiple lifts at once—as in the squat, bench press, and deadlift—is to reduce the intensity on one of your workout days. For example, you can squat heavy on Monday and deadlift heavy on Friday, but do your pressing with 75% and an RPE 8 on Wednesday. (See the sample workout split below.) Doing three heavy days in one week is asking for trouble.
Strength Program FAQ

Hopefully, you now have some ideas of how you can use conjugate, percentages, and RPE to write your own workouts. But before you start planning your next year in the gym, let me clear up a few questions you may have.
Do I Have to Use an RPE and % For Every Exercise? Can’t I Just Lift Weights??
Percentages and RPE don’t need to be assigned to all your exercises. Not only would that be tedious and complex, it just isn’t necessary. Use percentages and RPE to guide the main lifts you want to improve so you can moderate the overall stress of your workouts. This means big, heavy barbell exercises like squats, deadlifts, snatches, cleans, etc. The remaining exercises in your workouts—assistance lifts, including any dumbbell/kettlebell or bodyweight work you want to do—should be done with more conventional set and rep schemes, and can largely be done by feel. Old standbys like 3 sets of 10, 4 sets of 8, and so on will work fine, provided you suit them to your goals. But, generally speaking, avoid training to failure. You should almost always have a rep or two left in you upon the completion of any set.
Does RPE Always Correspond With A Percentage of My Max?
No. RPE will often be in line with percentages of your max when you’re going really heavy—sets of 3 and under. But there are many times when your RPE may be high but the weights are lighter, such as when you’re doing variations on lifts with special bars or intensity techniques (described above). You may also start a program unsure of what your one-rep max is—maybe because you don’t compete in any strength sport, and so you don’t need to know it (or maybe you just never max out). You wouldn’t really know, then, what load any percentage would have you use, so you’d just be guessing. In that case, you’d have to let RPE be your compass.
There may also be instances, such as when you’re coming back from an injury or illness, or when you’re stressed out by life, where you’ll want to hold back a little on your sets so you don’t make it even harder to recover from your training.
How Do I Assign RPE In My Own Workouts?
Generally, you want to train hard. So RPEs of 8, 9, and 10 will be used the most frequently. RPE’s of 6 and 7 are typically used for workouts when you want to coast after several weeks of intense training (i.e., take a deload week). You can wave your intensity as shown above by starting the first week of a training block with lighter loads and stopping yourself far away from failure, such as with an RPE 7 or 8, and then ramp up from there. You can also assign yourself light, heavy, and medium days, where you, say, squat with an RPE 10 on Monday, then lighten it up and just practice the lift with sets at an RPE 7 on Wednesday, and come back on Friday with an RPE 8 for a moderate session.
You can also go totally by feel and assign yourself RPEs based on how your warmup sets go. Just be wary of how many hard workouts you have in a week, and try to undulate the intensity so you don’t burn out.
Sample 6-Week Workout
There are many nuances to how I use the Total Performance Method to maximize gains that go beyond the scope of this article. Whether you’re a competitive lifter, or just a regular guy/gal who likes to train heavy and be strong, and you’re interested to see how I personally prefer to bring conjugate, percentages, and RPE together, I have programs available that you can use for those goals (go to tpsmethod.com).
In the meantime, I’ll give you a sample of how I might change exercises, percentages, and RPE week to week to bring up three main lifts—the squat, becnch press, and deadlift. The following is a six-week program that a powerlifter might use to peak his/her one-rep maxes for a meet. You’ll notice that the RPE changes according to the variations we do on the main lifts, and those lifts change often to shore up the lifter’s weaknesses.
WEEK 1
Day I
Squat
2 Sets of 3 Reps @ RPE 9/80%
2 Set of 3 Reps @ RPE 10/85%
Reverse-Banded Squat*
1 Set of 2 Reps @ RPE 9/95%
*Attach bands to the top of the power rack and loop the open ends over the ends of the barbell to reduce the load you’re lifting at the bottom of the squat.
Day II
Bench Press
2 Sets of 3 Reps @ RPE 8/80%
1 Set of 3 Reps @ RPE 9/85%
Day III
1” Deficit Deadlift*
2 Sets of 2 Reps @ RPE 8/80%
1 Sets of 2 Reps @ RPE 9/85%
*Stand on a platform that’s raised one inch above the floor.
Day IV
Dynamic Bench Press with Band*
8 Sets of 3 Reps @ 40%
*Attach bands to the bar to increase the load as you lockout the weight. Dynamic effort sets are performed as explosively as possible. Alternate your grip between close, medium, and just outside medium each set.
WEEK 2
Day I
Squat
1 Set of 2 Reps @ RPE 7/80%
2 Sets of 2 Reps @ RPE 8/85%
1 Set of 2 Reps @ RPE 9/90%
Reverse-Banded Squat
1 Set of 1 Rep @ RPE 10/100%+
Day II
Bench Press

1 Set of 2 Reps @ RPE 8/85%
2 Sets of 1 Rep @ RPE 8/90%
Reverse-Banded Bench Press
1 Set of 1 Rep @ RPE 10/95%+
Day III
Deadlift
1 Sets of 2 Reps @ RPE 8/85%
1 Set of 2 Reps @ RPE 9/90%
1 Set of 2 Reps @ RPE 10/95%
Day IV
Dynamic Bench Press with Band
10 Sets of 3 Reps @ 45%
Alternate your grip between close, medium, and just outside medium each set.
WEEK 3
Day I
Squat
1 Set of 2 Reps @ RPE 8/85%
1 Sets of 2 Reps @ RPE 9/90%
1 Set of 1 Reps @ RPE 10/95%
Day II
Bench Press
1 Set of 1 Rep @ RPE 8/90%
2 Sets of 1 Rep @ RPE 9/95%
Reverse-Banded Bench Press
1–2 Sets of 1 Rep @ RPE 10/100%+
Day III
Deadlift

2 Sets of 2 Reps @ RPE 7/80%
2 Sets of 1 Reps @ RPE 7/85%
Day IV
Dynamic Bench Press with Bands
12 Sets of 3 Reps @ 50%
Alternate your grip between close, medium, and just outside medium each set.
WEEK 4
Day I
Squat
3 Sets of 2 Reps @ RPE 8/80%
Day II
Bench Press
1 Set of 3 Reps @ RPE 6/70%
2 Sets of 3 Reps @ RPE 6-7/75%
Day III
Deadlift
1 Set of 1 Rep @ RPE 8/90%
1 Sets of 1 Rep @ RPE 10/95%
2 Sets of 1 Rep @ RPE 10/95%+
Day IV

Dynamic Bench Press with Bands
8 Sets of 3 Reps @ 50%
Alternate your grip between close, medium, and just outside medium each set.
WEEK 5
Day I
Squat
1 Set of 1 Rep @ RPE 8/90%
2 Sets of 1 Rep @ RPE 10/95%+
Day II
Bench Press
1 Set of 1 Rep @ RPE 8/90%
2-3 Sets of 1 Rep @ RPE 9-10/95%+
Day III
Deadlift with Chains*
3 Sets of 2 Reps @ RPE 8/80%
*Attach chains to the bar to increase the load as you rise to lockout.
Day IV
Dynamic Bench Press with Bands
10 Sets of 3 Reps @ 55%
Alternate your grip between close, medium, and just outside medium each set.
WEEK 6
Day I
Squat
3 Sets of 2 Reps @ RPE 8/85%
Day II
Bench Press
2 Sets of 2 Reps @ RPE 7/80%
2 Sets of 1 Rep @ RPE 7/85%
Day III
Deadlift
1 Set of 1 Rep @ RPE 6/75% (as explosive as possible)
1 Set of 1 Rep @ RPE 6/80% (as explosive as possible)
1 Set of 1 Rep @ RPE 7/85% (as explosive as possible)
Day IV
Off
The following week, test your maxes on the squat, bench press, and deadlift.
Get more workouts from Murphy at tpsmethod.com.
)