
Summary
– The tuck jump builds lower-body power and coordination
– It works all the major lower-body muscles and the core.
– Tuck jumps should not be used for conditioning, due to safety concerns. (Don’t do them for high reps as part of a circuit workout.)
– To prepare your body for tuck jumps, work on landing safely.
There’s a famous photo of Bruce Lee jumping in the air with dumbbells in each hand and his knees tucked to his chest. His body is so neatly folded it almost looks like he’s crouching on the ground. The photo perfectly illustrates The Dragon’s mystique: a man who made incredible displays of power and athleticism seem simple and effortless.
In case you haven’t deduced as much already, Lee was doing a tuck jump in that pic, and the move was one of many he used in a workout regimen that was ahead of its time. If you hope to capture some of his explosiveness, this guide to tuck jumps will help you master an exercise that put spring in the step of one of the greatest martial artists of all time.
What Is The Tuck Jump?
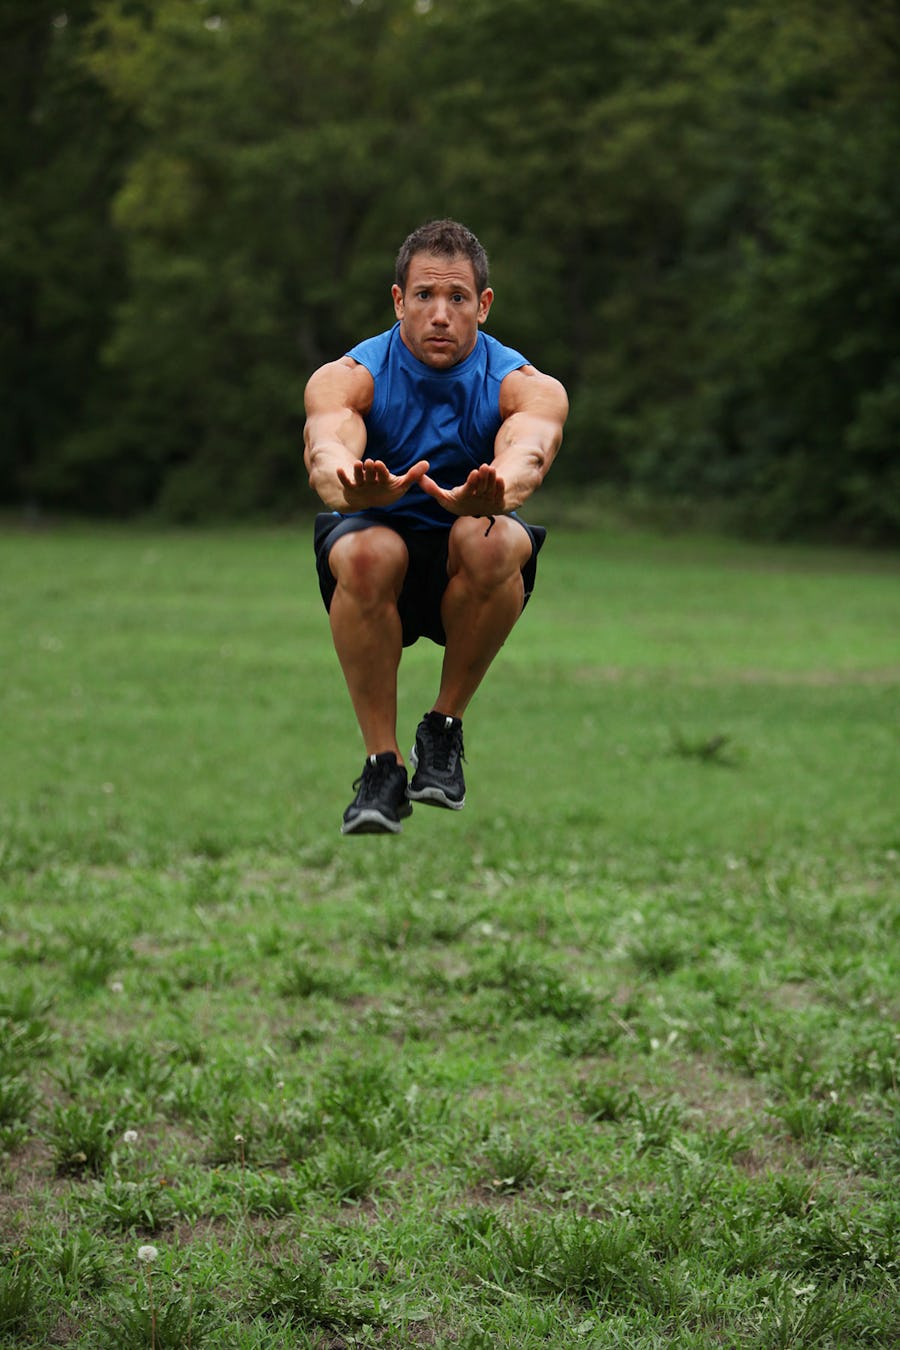
The tuck jump is a vertical jump in which you raise your knees to your chest as you rise into the air. Interestingly, unlike other vertical jumps, the tuck jump is not purely a triple-extension movement. That is, vertical jumps, along with Olympic weightlifting exercises such as the clean, have the hips, knees, and ankles all extending simultaneously to generate explosive movement. While the tuck jump begins like a vertical jump, the knee tuck causes hip-, knee-, and ankle-flexion, which contributes greatly to its effectiveness. Tuck jumps are primarily done by athletes to develop power and coordination.
Like all jumps, tuck jumps are a full-body exercise that work a lot of big muscles, so you often see them used in exercise classes and circuit workouts for the sake of raising the heart rate, but we don’t suggest that you perform them for that purpose. The tuck jump is a high-impact exercise—even more so than most other jumps, due to the height and the tucking of the knees—and performing it with anything less than perfect form is dangerous. So is jumping into tuck jumps too soon (no pun intended), failing to build up to them gradually.
For those reasons, we recommend starting with lower-intensity jump exercises for a while to condition your joints for the impact of tuck jumps, and ultimately using the tuck jump for its original intention—to develop explosive power. (See “Alternatives To The Tuck Jump” below.)
“The majority of people who do tuck jumps aren’t ready for them yet,” says Sam Pogue, CPPS, FRCms, VP of Brand at TrueCoach, and a performance coach to athletes, including World Series champion pitcher Jake Arrieta. But we’ll show you how to prep your body the best way possible to fast-track your hops.
What Muscles Does The Tuck Jump Use?
The tuck jump works all the muscles of the lower body and the core. Here’s a breakdown of how they contribute to the movement.
Glutes and hamstrings. Both muscle groups have an eccentric contraction (that is, they tense while lengthening) as you lower your hips toward the floor during the jump’s countermovement—think: coiling the spring. Then, when you explode upward, the glutes and hamstrings shorten rapidly to drive the hips forward, creating the power that propels the jump.
Quads. Like the glutes and hamstrings, they contract eccentrically on the way down and then concentrically to extend the knees as you jump. When you’re in the air, the rectus femoris quad muscle works again, along with the hip flexor muscles, to pull your knees up toward your chest.
Calves. The calves extend the ankles, assisting the glutes, hamstrings, and quads in getting your feet up off the floor.
Core. The abs and lower back must brace the spine as you lower into the jumping position, as well as when you tuck the knees and land back on the floor.
All of the above muscles also work as shock absorbers, reducing the force that acts on the joints upon landing.
While tuck jumps work many muscles, don’t make the mistake of thinking that they’re a great way to “tone” your legs. Jumps work primarily fast-twitch muscle fibers to provide explosive movement, but the volume you’ll train them for isn’t enough to build serious leg muscle, and no muscle group stays under tension long enough to induce the metabolic stress that’s associated with muscle gains. Jumps are done to translate the strength you build with more traditional lower-body exercises (squats, deadlifts, lunges, etc.) into powerful movements you can make on an athletic field, such as running, jumping, and cutting.
Benefits of the Tuck Jump
Tuck jumps are mainly used to increase bilateral power output. That is, to train your ability to move explosively on two feet. “Jumps are also really good for developing coordination,” says Pogue, “increasing your understanding of where your body is in space.” Because the tuck jump has the added hip and knee flexion at the end, its coordination demands are higher than a typical vertical jump. “It’s akin to the long jump,” says Pogue, the track and field event where you kick your legs out in front of you to get as much distance as possible. If you can tuck jump proficiently, it’s pretty much a given that you’ll be able to run fast, jump high, and turn on a dime when needed during sports play.
Nevertheless, you’ll notice that athletes get tested on their vertical jump height, not their tuck jump performance. “The tuck jump isn’t as applicable to sports as a vertical jump,” says Pogue, “but it’s a good jump to practice if you want to maximize athleticism.”
Pogue, himself a former baseball player, liked to use tuck jumps during games, because of their effect on the central nervous system. Explosive, reactive movements make the mind more alert and focused, so you can use tuck jumps to “wake you up” before you need to do something that’s explosive, fast, or requires maximum attention. “Baseball can be slow sometimes,” says Pogue, “so I used to use tuck jumps to recharge if I’d been standing around for a while.” Doing one or two reps before you step up to bat could make the difference between a strike and a base hit.
As tuck jumps place so much stress on the hips, knees, and ankles, they’re sometimes used in clinical settings to help identify an athlete’s risk of injury, particularly to the knee. A study published in Athletic Therapy Today concluded that tuck jumps may be a useful assessment tool in gauging neuromuscular control, and risk of ACL injury among female athletes.
How To Stretch Before Doing A Tuck Jump
Use the following warmup drills from Onnit Durability Coach Cristian Plascencia (@cristian_thedurableathlete on Instagram) before performing tuck jumps in a workout.
How To Do A Tuck Jump
Step 1. Stand with your feet between hip and shoulder-width apart and soften your knees.
Step 2. Bend your hips and knees to lower your body into a quarter-squat. You’ll end up in the universal athletic stance (picture a lineman in football)—hips and knees bent, chest lined up with your toes, looking forward, and ready to explode. Your torso should be about 45 degrees to the floor with your lower back in its natural arch. Swing your arms back as you bend your hips back so that they run parallel to your spine.
All of the above must happen quickly and in one movement. Think of it as coiling a spring as you dip your hips down and back before you reverse the movement to explode upward.
Step 3. Immediately rise up, extending your hips, knees, and ankles (come up onto your toes) and swinging your arms forward and up to jump as high as you can into the air. As you rise, pull your knees upward with you, tucking them under your chest. Your thighs should end up parallel to the floor. Try to stay tall as you tuck—don’t actively crunch yourself into a ball.
Step 4. Extend your knees on the descent and use your toes to buffer your feet as you land. “Land like a ninja,” says Pogue, bending your hips and knees as needed to absorb the force of the ground, although you should end in the same athletic position that you started the jump.
Take a moment to reset your feet before you begin the next jump, and begin it from a tall standing position again. You can also begin each successive jump immediately, rebounding out of your landing, but we don’t recommend this unless you’re an experienced jumper, and we definitely don’t like it as a means to get cardio. “Doing multiple reps like that can get really sloppy,” says Pogue. As you fatigue, your form will break down, and that’s when people get hurt. “If you want to get your heart rate up,” says Pogue, “there are other ways to do it without risking a blowout of your ACL.” When you can do 2–3 sets of 1–3 reps with good landings, you can attempt doing the tuck jump with continuous reps (no reset).
Don’t think you have to jump to the moon to demonstrate your explosiveness. If you can jump to where your feet are at the level your hips would be while standing, Pogue says you’re getting some pretty good air. As for loading the jump with dumbbells, a la Bruce Lee, it isn’t necessary, and it increases your risk of a bad landing.
When Should I Do The Tuck Jump?
For maximum power development, do tuck jumps when you’re fresh, at the beginning of a workout (but after you’ve warmed up thoroughly). They’re a great way to kick off lower-body sessions, so try them before squats or deadlifts, or any running/sprinting you do. As stated above, you can also do them during downtime from sports activities, for the sake of keeping your energy up.
Alternatives To The Tuck Jump
As you might have guessed, if you don’t land the tuck jump properly, you’re going to land hard, and that can wreak havoc on your ankles, knees, and hips. Pogue recommends building up to tuck jumps by first mastering the depth jump and box jump, in which you practice proper landings and absorbing the impact.
Depth Jump Prerequisite
Start with the most basic version of the depth jump, which has you rising onto your toes and then dropping your heels. It may not look like much, but it will go a long way toward conditioning your joints for a hard landing, especially if you haven’t jumped since you were a kid.
Step 1. Stand with feet hip to shoulder-width apart and raise your arms overhead.
Step 2. Raise your heels up, balancing on the balls of your feet.
Step 3. Now, in one motion, drop your heels and drive your arms down behind you, landing in a quarter-squat/athletic position. Stick the landing so that your ankles and knees have a moment to fully absorb the force.
Perform 3 sets of 3 reps, 1–2 times per week. Pay attention to how you land (it may help to have a friend watch you, or set your phone up to film your sets). You should be able to land without your knees caving inward, feet rotating out, or losing your spine position. Do not move on to any other jumping exercises until these problems are corrected.
Depth Jump
When you feel you’re doing the prerequisite exercise smoothly, and you’re sure it’s not aggravating your knees or ankles, move on to the classic depth jump and box jump below. (Note that it may take a few weeks to feel comfortable with the depth jump prerequisite; don’t rush it.)
Step 1. Place a box or step that’s about 12 inches high on the floor. Stand on the box with feet between hip and shoulder width.
Step 2. Step off the box with one foot and let yourself drop to the floor, landing with both feet in the quarter-squat/athletic position with arms driving behind you and parallel to the spine. Stick the landing, and step back up on the box to repeat for reps.
Perform 3 sets of 3 reps, 1–2 times per week. Again, be aware of any changes in your shin position (they must be vertical upon landing) and be sure that you’re landing with feet forward and flat on the ground. When you feel comfortable doing the depth jump from a 12-inch box, increase the box height to 24 inches. When you can perform depth jumps safely from a 24-inch box, you should be ready to do tuck jumps.
Box Jump
While you work on the depth jump, practice the box jump too (in the same session or in another workout that week). The box jump develops power similar to the tuck jump, but is safer and less demanding.
Step 1. From a standing position, bend one knee and raise it in front of you until your thigh is parallel to the floor. Notice where your foot is—the height of the box you use should be below that level. Place an appropriate-sized box on the floor and stand a foot or so behind it.
Step 2. Bend your hips and knees as described in all the jump variations above, lowering into the athletic position, and then jump up onto the box, controlling your landing.
Perform 3 sets of 3–5 reps. Gradually increase the height of the box over time.
In addition to lower-level jumping movements like those above, lower-body strength lifts such as squats and Romanian deadlifts will help enormously to prepare your body for tuck jumps. Pogue recommends doing the single-leg version of these exercises too, as most landings won’t happen on perfectly even feet.


