Single-Arm Kettlebell Press Exercise Summary
– The single-arm kettlebell press can be done several ways to challenge the core and other stabilizer muscles while working the upper body. Standing and seated versions are the most popular.
– Standing presses are more stable and let you lift heavier. Seated presses require more core strength and mobility in the lower body.
– Single-arm presses can also be done in a half-kneeling position, or on a bench, to promote better form.
Single-Arm Kettlebell Press: How To Do It & Get Ripped
Pressing a kettlebell overhead with one arm is one of the most functional movements you can perform. It builds strength throughout the upper body, trains the shoulder muscles through a full range of motion, and works the core. A variation on the classic single-arm kettlebell press is to do it seated. Removing the legs as a source of support forces the abs and other stabilizers to work even harder.
You’re about to learn how to master both pressing movements for maximum upper-body strength and stability.
How To Do The Single-Arm Kettlebell Press
The standard, standing single-arm press is done as follows.
https://www.youtube.com/watch?v=1r7_B5NT6Eo&feature=emb_title
Step 1. Grasp a kettlebell with both hands and lift it up to shoulder level on one side. Transfer the weight to one hand, and hold it so that the handle runs diagonally across your palm, between your thumb and the last two knuckles. (Another option is to clean the kettlebell from knee level, or the floor.)
Step 2. Stand tall, and tuck your tailbone so that your pelvis is parallel to the floor. Draw your ribs down, brace your core, and squeeze your glutes. Focus your eyes straight in front of you; your neck should be neutral. Draw your shoulders back and downward—think: “proud chest.”
Actively twist your feet into the floor, but don’t let them move. Think of your legs as screwdrivers, or that you’re standing on grass and trying to twist it up beneath you. You should feel the arches in your feet rise and your glutes tighten, creating tension in the lower body.
Step 3. Tuck your elbow close to your side so that your forearm is vertical and the weight is in front of your chest. Your wrist should be aligned with your forearm and facing the midline of your body. This is called the rack position, and every rep begins from here. You can extend your opposite arm out to your side to help you balance.
Step 4. Press the kettlebell overhead, maintaining your shoulder position as you do so (keep your shoulder pulled down and back). As you press, allow your elbow to move away from your body and your arm to go upward in an arcing motion. As the weight goes up, allow your wrist to rotate so that your palm faces forward when your arm locks out. Reverse the motion to lower the kettlebell. Actively pull it back down by squeezing your lat muscle.
Avoiding bending backward or to either side during the press. Keep your core engaged (ribs pulled down).
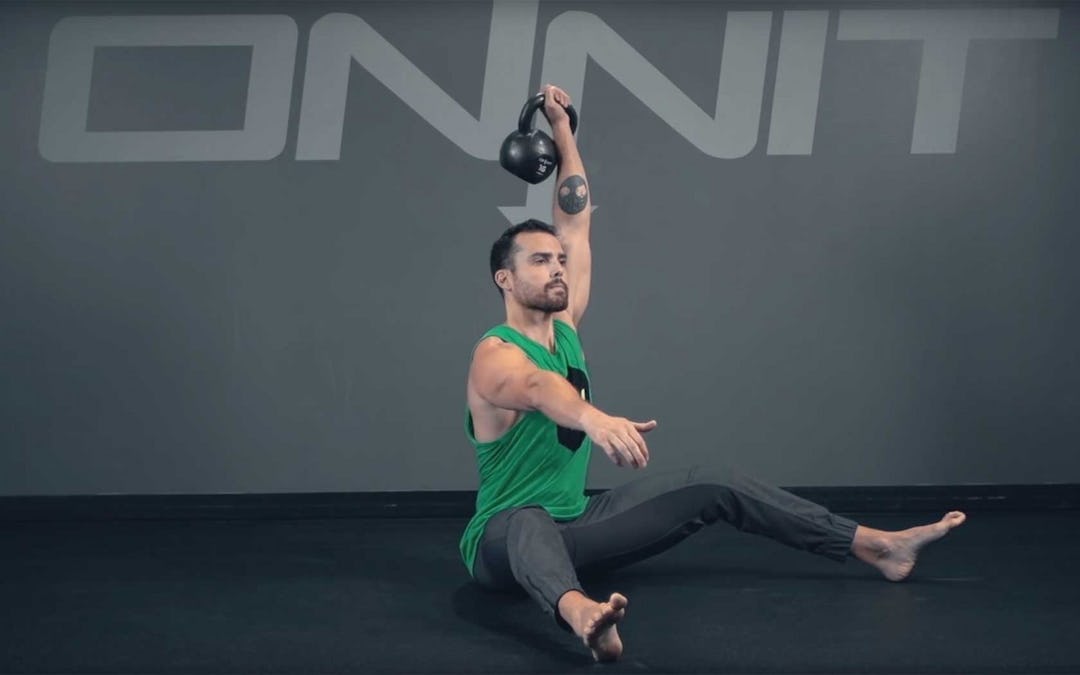
Seated Single-Arm Kettlebell Press
When you’re ready to step up (er, rather, sit down) to the next level of kettlebell pressing, try the seated version.
Step 1. Place a kettlebell on the floor, and sit on the floor so that the bell is between your legs. Extend your legs in front of you to form a V.
Step 2. Grasp the kettlebell with both hands, and lift it up to shoulder level on one side. Transfer the weight to one hand, and hold it so that the handle runs diagonally across your palm, between your thumb and the last two knuckles.
Step 3. Sit tall, and tuck your pelvis so that it’s parallel to the floor. Draw your ribs down, brace your core, and squeeze your glutes. Focus your eyes straight in front of you; your neck should be neutral. Draw your shoulders back and downward—think: “proud chest.”
Step 4. Tuck your elbow close to your side so that your forearm is vertical and the weight is in front of your chest. Your wrist should be aligned with your forearm and facing the midline of your body. You can extend your opposite arm out to your side to help you balance.
Step 5. Press the kettlebell overhead. As you press, allow your elbow to move away from your body and your arm to go upward in an arcing motion. As the weight goes up, allow your wrist to rotate so that your palm faces forward when your arm locks out. Reverse the motion to lower the kettlebell. Actively pull it back down by squeezing your lat muscle.
Try to minimize movement in the legs by bracing hard. Avoid twisting or rocking to get the weight up. If you have to do that, it’s too heavy.
Muscles Used in the Single-Arm Kettlebell Press
The press works nearly the entire body, even when done sitting down. From top to bottom, here are the muscles you can expect to activate when performing either variation of the single-arm kettlebell press.
- Deltoids (anterior and lateral)
- Rotator cuff (supraspinatus)
- Upper pec
- Upper back (lat and traps)
- Triceps
- Forearm (wrist flexors and extensors)
- Serratus anterior
- Core
- Glutes
- Hamstrings (mainly in the seated press)
Benefits of the Single-Arm Kettlebell Press
Pressing with a kettlebell feels distinctly different from using a dumbbell or barbell, and offers some important advantages. For one thing, the load is offset from the handle. That is, the weight of the bell hangs an inch or so below where you grip it, and that makes the load harder to control. Your gripping and shoulder muscles, including the rotator cuff, have to contract harder to keep your press on the right course—otherwise the imbalanced weight would pull you all over the place when you try to lift it. The same can be said for your core. And when you press one-handed, you get even more core activation, because the trunk needs to prevent bending and rotation that would otherwise result from loading one side of your body and not the other.
The kettlebell’s offset loading has another advantage, too. The weight of the bell dangles below the handle, so it has the effect of pulling your arm downward throughout the press. As a result, you really can’t cheat any reps. To get the weight overhead, you have to use a full range of motion and lock out your elbow—i.e., really work hard—or you’ll feel that you haven’t completed the rep.
Kettlebell pressing is one of the most shoulder-friendly ways to press overhead. When you start the movement from the rack position, your palm faces in toward the midline of your body. This is known as a neutral grip, and it’s a much safer position to press with than having the palm turned forward (as it’s done with a barbell). The humerus (upper-arm bone) glides through the shoulder joint more smoothly, reducing the risk for impingement or other undue stresses that come with years of heavy training.
Now what happens if you do the single-arm kettlebell press from a seated position? Right away, you’re training hip flexor and hamstring mobility, because you’ll need both to sit upright with your legs extended in front of you. There’s nothing to push off with your feet or back (as in the floor or a bench), so your reps will automatically be much stricter. You also can’t bend and extend your knees, as in a push press, to power the weight overhead. Of course, your core will be recruited to the extreme, because, with your legs unable to provide balance, there’s nothing left to keep you from falling over.
Without the stability provided by having your legs underneath you, you won’t be able to lift as much weight as when doing the move standing, but that can be a benefit too. If you train at home and only have access to light weights—especially in a garage or other room with low ceilings that don’t allow you to press while standing—doing the single-arm press from the floor can let you make the most of the situation, giving you a training effect without the need for heavier weight.
How To Stretch Before Doing the Single-Arm Kettlebell Press
Before you try the standing single-arm kettlebell press, warm up your shoulders and back with these moves from Onnit Coach Natalie Higby, co-creator of the Durable Athlete app. Perform 2–3 sets of 5–10 reps for each move.
Sky Reach To Arm Thread
Step 1. Get on all fours with your hips over your knees and shoulders in line with your hands. Twist your torso to the right, and reach your arm straight overhead. Keep your core tight so that you don’t arch your lower back—you want the movement to come from your T-spine.
Step 2. Reverse the direction, and reach your arm through the space between your left arm and knee. Keep your hips in the same position—don’t let them drop or twist as you turn your torso. Try to get the back of your shoulder on the floor in the end range of motion. Complete your reps, and then repeat on the opposite side.
Quadruped Swimmer’s Stretch
Step 1. Get on all fours with your hips over your knees and shoulders in line with your hands. Press your knees and hands into the floor to create tension, and brace your core. Raise your right arm straight out in front of you with your palm facing in.
Step 2. Rotate your palm toward the floor as you draw your arm down and behind your back, bending it so that the back of your hand touches your lower back. From there, pull your elbow toward the floor until you feel a stretch. Now raise your elbow up again, and then lift your hand straight up off your back.
Step 3. Reverse the motion to extend your arm in front of you again. Complete your reps, and then repeat on the opposite side.
And for the seated single-arm kettlebell press, add these warmups as well.
Wide-Stance Hinge w Spinal Fold
Step 1. Stand with feet outside shoulder width and toes facing forward. Keeping a long line from your head to your pelvis, hinge your hips back as far as you can. Allow your knees to bend as needed (you’ll feel a stretch in your hamstrings and glutes).
Step 2. Take a deep breath into your belly, and then let it out. As you do so, fold at the hips to reach down and touch the floor.
Step 3. Bend your knees, and slowly push your hips forward and roll your back up to a tall standing position. Come up one vertebrae at a time—your neck should be the last thing that extends.
Rotating Pyramid
Step 1. Get into pushup position, and drive your hips up into the air. Allow your knees to bend as much as you need in order to keep your head, spine, and pelvis aligned (don’t let your lower back round).
Step 2. Raise your right hand off the floor, and reach it toward your left ankle, twisting your torso as needed. Reverse the motion and repeat on the other side.
Alternatives to the Single-Arm Kettlebell Press
Most kettlebell trainees will begin with the basic standing single-arm kettlebell press. When they’ve got that down, they will go on to the seated version, but for some people, neither variation will be appropriate. If you have trouble keeping your lower back from arching excessively, or you know you have a weak core and tight hips, performing the press from the half-kneeling position is a great way to target these weaknesses while still working the shoulders hard. Spend a few weeks mastering it, and then try the standing press—you might be amazed by how much more stable and strong you feel.
Half-Kneeling Single-Arm Kettlebell Press
*When you’re first exploring this exercise, the half-kneeling press should be done with the downed knee on the same side as the pressing arm. In other words, if you’re pressing with your right arm, your right knee should be down on the floor. When you get the hang of that, you can switch it up so that you press on the same side as the raised knee. This requires a little more balance and stability, shown below.
Step 1. Get into a half-kneeling position—one knee on the floor and the other bent 90 degrees. Your feet and knees should be about hip-width apart. Tuck your tailbone slightly so that your pelvis is parallel to the floor, and draw your ribs down. Brace your core. Draw your shoulders down and back to a “proud chest” position. Grasp a kettlebell with the hand that’s on the same side as the raised knee, and use both hands to raise the weight to the rack position at your shoulder.
Step 2. Squeeze the glute on the side of the downed knee. Now press the kettlebell overhead to lockout, and then control it on the way down.
Seated Single-Arm Kettlebell Press on Bench
If you want to press from a seated position, but you’re not yet ready for the seated press on the floor, you can use a bench. Sitting with your hips and knees bent 90 degrees removes the hip and hamstring mobility requirements, and makes for a stable pressing position that encourages strict form (you can’t use momentum from the legs). As you get more familiar with the movement, you can gradually lower the elevation that you use, and extend your legs further in front of you, until you’re sitting on the floor. For instance, press from the bench for a few weeks, and then go to a stack of firm mats for a few weeks, and then a block or a few stacked weight plates so that you’re just a few inches above the floor. As your lower-body mobility improves, you’ll get more comfortable being in a full seated position.
Step 1. Sit on a bench with your hips and knees at 90 degrees. Set your pelvis parallel to the floor, and achieve a proud chest position. Brace your core. Use both hands to raise the kettlebell to the rack position. You can extend one arm out to your side to help with balance.
Step 2. Press the weight overhead to lockout, and control the descent.
)