The rack pull is a deadlift variation that competitive and recreational strength athletes use to improve the top half of their deadlift, strengthen their grip, and spare their lower back. Below, we’ll break down what the rack pull is, how it may benefit you, and how you can use it to get really freakin’ strong.
Key Takeaways
1. The rack pull is a barbell deadlift performed with a shortened range of motion. The strength you gain from the rack pull transfers to the standard deadlift.
2. The rack pull strengthens the lockout (or top half) of your deadlift by allowing you to pull heavy weights in that specific range of motion.
3. The shortened range of motion ensures your torso stays more vertical, reducing the stress placed on your lower back compared to full-range-of-motion deadlifts.
4. Remember these cues when performing rack pulls: Keep your chest up, don’t round your back, and drive your hips forward—hard—to complete the lift.
What Are Rack Pulls and What Are Their Benefits?
(See 00:27 in the video.)
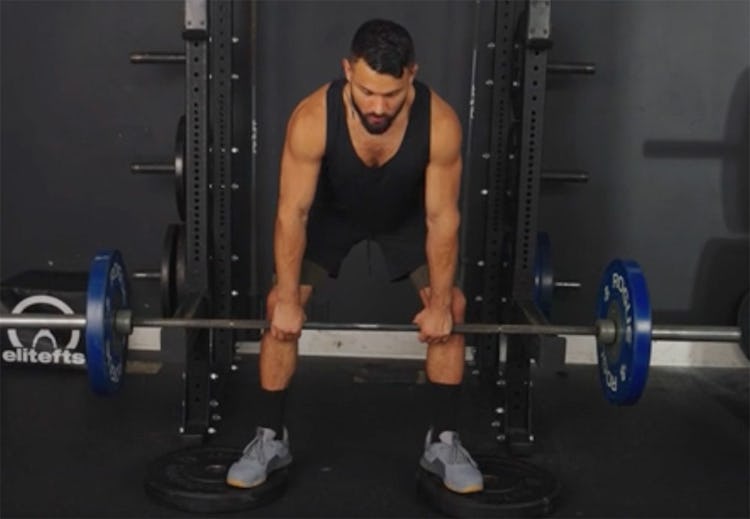
The rack pull is a deadlift performed from the safety bars of a power rack in order to shorten the range of motion (ROM). The lifter starts the pull with the barbell set just below his or her knees, as opposed to the bottom of the shin, as would be the case with a deadlift done from the floor. Basically, you’re doing the top half of a regular deadlift.
Because the range of motion is shorter, and you begin the lift in a stronger biomechanical position, you’re able to use a heavier weight than you could deadlifting from the floor. Rack pulls, therefore, let you acclimate to handling more weight, and they train you to extend your hips more powerfully, strengthening the lockout portion of your deadlift. If you have a sticking point in your normal deadlift—that is, trouble getting the weight over your knees and to lockout—rack pulls can be beneficial. Using heavier than normal weights can also build up your grip, and that can translate to stronger deadlifts from the floor as well.
Additionally, the rack pull can be a friend to folks with an achy lower back, as the shorter range of motion allows you to stay more upright and takes some pressure off your lumbar region versus the more bent-over position of a conventional deadlift. If you’re trying to train around a back injury, you could use the rack pull in place of a deadlift for a while. This would allow you to train the same basic movement pattern and muscles, but with less risk of further injury.
How to Do Rack Pulls: Correct Form to Avoid Injuries
(See 01:55 in the video.)
Step 1. Set the safety bars of a power rack to just below knee level. The barbell should sit just below your knees when laid across the bars.
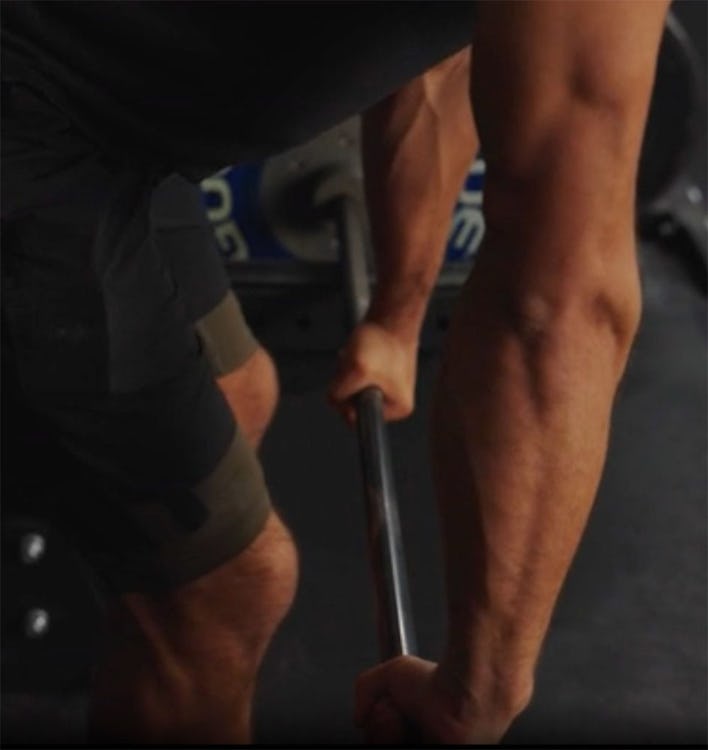
Step 2. Stand in front of the barbell with your shins touching it and your feet about hip-width apart. Tuck your chin and push your hips back until you feel a stretch in your hamstrings and you can reach the barbell. Think: “long spine” from your head to your tailbone. Grip the bar firmly with your hands placed right outside of your knees. (If you perform conventional deadlifts regularly, set up just as you would for a conventional deadlift.)
Step 3. Take a big breath into your belly, and contract your abdominal muscles.
Step 4. Keeping your spine long and your core braced, pull the barbell off the safety bars, driving your hips forward until your hips are completely locked out and you’re standing tall. Squeeze your butt at the top of the rep. Slowly lower the barbell back to the safety bars by reversing the motion—don’t let it just crash down.
Common Mistakes and How To Correct Them
(See 02:59 in the video.)
Mistake #1: Using different form than your deadlift.
“One of the most common mistakes I see with the rack pull is people altering their deadlift mechanics to perform it,” explains CJ McFarland, CSCS (@cjmcfarland17 on Instagram), a competitive powerlifter and the assistant strength and conditioning coach for the football program at Temple University in Philadelphia.
In an effort to lift as much weight as possible, people will often incorrectly treat the movement as a kind of shrug, or even try to squat the weight up by overbending their knees, when all they have to do is think of the exercise as a deadlift done from the halfway point.
“Replicate the position your body is in during the deadlift, where your shoulders end up over or slightly in front of the bar,” says McFarland, and begin the pull from there. That’s the strongest position and will help you lift the most weight possible.
Mistake #2: Choosing the wrong weight.
Go too light, and you defeat the purpose of performing the rack pull, which is (typically) for you to pull heavier weights than you can deadlift. By the same token, if you lift too heavy, you’ll round your back and risk injury to your lower and/or upper spine. McFarland suggests starting out with 100–110% of your deadlift max for one to three reps. (I.e., use the most weight you can deadlift from the floor, full range.) Take your sets to failure, or close to it (the point at which you can’t perform another rep with good technique, or stop one rep shy of that point).
Mistake #3: Not creating enough tension.
Before you begin the lift, screw your feet into the floor without actually moving them. Think of your legs as screwdrivers and tighten them down into the floor. If you do it right, you’ll feel the arches in your feet rise and you’ll feel very rooted into the ground. Your butt, hamstrings, and quads will tighten. This cue creates more tension in the active muscles, helping you produce more force when you begin the pull while maintaining good form.
Mistake #4: Letting the bar drift away from you.

Keep the barbell tight against your shins and thighs as you lift and lower it. Maintaining a consistent bar path ensures your form stays intact. If the bar strays from your body, you’ll round your upper back and potentially tweak something in your spine.
Muscles Worked By Rack Pulls
(See 06:59 in the video.)
The primary movers in the rack pull are the glutes and hamstrings. Secondarily, the traps, spinal erectors (lower back), forearms, and core will work hard.
Your glutes and hamstrings extend your hips as you lift the barbell from the safety bars to the lockout position, while your traps and lower back work to keep your back from rounding during the movement. Even if you’re wearing lifting straps (which improve your grip), your forearms will still get strong under the immense load of the barbell. And while rack pulls won’t chisel out a six-pack, you’ll develop a stronger core through the bracing required during every repetition.
Professionals’ Instructions For Setting Up The Rack
(See 07:45 in the video.)
The classic rack pull is performed inside a power rack with the bar set below your kneecaps. However, you can use various setups to mimic the rack and shorten or lengthen the movement’s range of motion.
“The closer to the ground the rack pull is, the stronger it correlates to your actual deadlift max,” says McFarland, but the harder it will be to perform. “The higher the height of the rack pull, the more weight you will be able to lift,” but the less it may transfer to your deadlift max.
Be sure to lift inside the power rack from the safety bars. If you set the bar on J-hooks outside the rack, you’ll risk banging the bar against the posts, interfering with your lift. Another tip is to check the weight capacity of the power rack that you’re using. Some power racks can only handle loads up to 500. If you’re a competitive powerlifter who can pull above 700 pounds (or you aspire to be one soon), you must ensure the rack can safely support the weights you’re using.
It’s also worth mentioning that many gym owners and gym goers may frown upon you performing rack pulls on safety bars inside a power rack. For one thing, gym equipment is expensive, and repeatedly slamming a barbell against a power rack can damage the bar and the rack and wear down the barbell’s knurling (the cross-hatch pattern you hold on to that enhances your grip on the barbell). Also, depending on how crowded the gym is, people may not appreciate you hogging a rack that might otherwise be used for squatting.
Alternatively, you can elevate a loaded barbell to knee height by placing one or two 45-pound bumper plates under each end. Some strongman and powerlifting gyms offer 26-inch-diameter plates, which place the bar around the middle of your shins when loaded onto the barbell. (See below for more information about those variations.)
If your gym has stackable rubber mats, they provide another option for performing the rack pull movement with the added advantage of being movable and usually more adjustable when it comes to choosing a height. Rubber mats can also absorb the force of the bar when you lower it so that there’s less rattling and noise. Another option is wooden blocks, which work the same way.
How To Warm Up For The Rack Pull
(See 09:00 in the video.)
Use these exercises to warm up your hips and back before performing the rack pull in your workouts.
1. Bodyweight Hip Hinge
Step 1. Stand with feet parallel and bend your knees slightly.
Step 2. Now drive your hips back as far as you can while keeping a long spine from your head to your tailbone. When you feel a stretch in your hamstrings, or you can’t push your hips back any further without losing your spine position, come back up to standing. Do 2–3 sets of 5–15 reps.
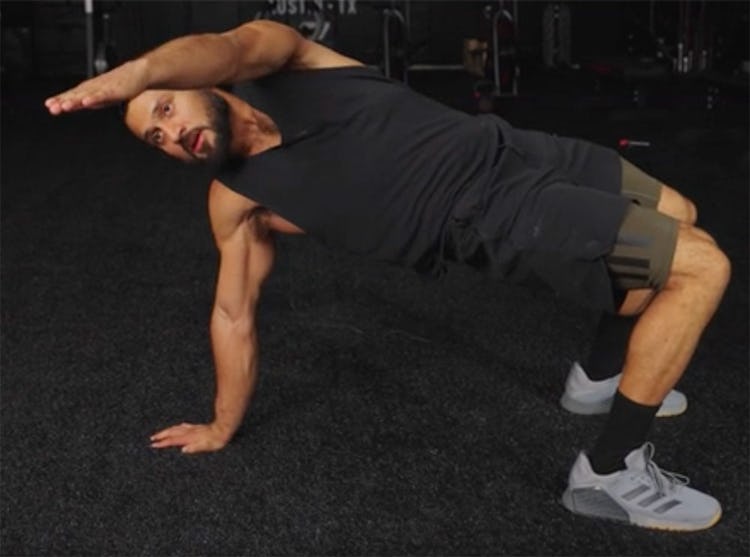
2. Table Top With Reach

Step 1. Sit on the floor and plant your hands under your shoulders; place your feet flat. Extend your spine so it’s long from your head to your tailbone. Drive your shoulders down away from your ears.
Step 2. Raise your left hand in front of you as you extend your hips to lockout. Your body should form a straight line from your shoulders to your hips (brace your core so you don’t hyperextend); keep your hips square as you squeeze your glutes.
Step 3. Reach your arm across your body to your right side, allowing your torso to twist but keeping your hips square and locked out. Feel your upper and middle back stretch. Reverse the motion and repeat on the opposite side.
Alternatives To The Rack Pull
(See 11:30 in the video.)
The rack pull has two main limitations: it can damage the equipment you’re using (the barbell and power rack), and it can be difficult to set up when the gym is crowded (good luck getting a free rack at 6:00 p.m. on a weekday). Try these two variations to reap benefits similar to rack pulls. You can do them when a rack isn’t available, or sub them into your program for four to six weeks for variety’s sake.
Trap Bar Deadlift
Why Do It: The trap bar features elevated handles. This means you don’t have to bend over as far to reach the bar as you would deadlifting with a straight bar, and the reduction in range of motion is similar to what you get with a rack pull (for the sake of saving your low back). And, like the rack, the trap bar puts you in a stronger position so you can lift heavier loads.
How To Do It:
Step 1. Step into the center of a loaded trap bar (aka hex bar). Ensure that you’re using a trap bar with elevated handles. Place your feet in your normal deadlift stance.
Step 2. Keeping a long spine, bend your hips back and then bend your knees until you can reach the handles. Your chest should face forward.
Step 3. Brace your core by squeezing your abs and imagine crushing some oranges in your armpits—drive your shoulders back and down. Now drive through your heels to stand up with the bar, pushing your hips forward.
Step 4. Lower the weight back to the floor by bending your hips back. Maintain a straight back with your chest up.
Banded Deadlift
Why Do It: Attaching a resistance band to a barbell helps strengthen your deadlift lockout similarly to the rack pull. As you pull the bar off the floor, the band will stretch, increasing the resistance where the deadlift is normally easiest—when your hips are approaching lockout.
How To Do It:
Step 1. Drape a loop resistance band evenly over the loaded barbell so both strands lie flat on the floor at the middle of the bar. Place each foot over both strands of the band at hip width (or your normal deadlift stance). Make sure the center of your foot pins the band down. If you cover it with only your heel or toe, the band may pop up while you’re pulling.
Step 2. Bend your hips back and hinge your torso over just like you’re doing a regular deadlift until you can grasp the bar just outside of your knees.
Step 3. Keeping your chest up and back flat, drive through your heels to lift the bar. Thrust your hips forward explosively to fight through the band tension and complete the rep.
Step 4. Drive your hips back and lower the weight to the floor under control.
Rack Pull Variations
(See 14:23 in the video.)
You can modify the training effect you get from the rack pull by adjusting how far off the floor the bar sits. The closer the barbell is to the ground, the more you’ll engage your glutes, hips, and lower back. The higher off the floor you start, the stronger the position you’ll be in and the more weight you can use, but the strength you build may not translate to your deadlift lockout as powerfully.
If you want to strengthen your deadlift lockout as directly as possible, set the barbell to just below the knees as we explained above; this is where most people run into issues finishing their deadlifts, and you can work to bring up this weak point. If you want to train your body to deadlift heavier weights, experiment with rack pull variations that have you start with the barbell closer to the middle of your shins.
Sumo-Stance Rack Pulls

Why Do It: “Doing the rack pull with a sumo deadlift technique will allow you to train other muscles that will aid in building your conventional deadlift,” says McFarland, such as the adductors (inner thighs). Of course, if you do your deadlifts sumo style rather than conventional, the carryover to your sumo deadlift is obvious. Note, however, that because you’re pulling with a wide stance, you may need to lower the safety bars of the power rack even further to ensure the barbell continues to sit just below your knees.
How To Do It:
Step 1. Set the safety bars of a power rack so the barbell sits just below your knees.
Step 2. Assume a sumo stance by setting your feet wide, near the plates on the bar, and turn your toes slightly outward. Sit back into a quarter squat so you can get low enough to grasp the barbell with a shoulder-width grip, hands inside your thighs.
Step 3. Squeeze your butt and drive your hips forward to stand up with the barbell.
Step 4. Bend your hips back and lower the weight back to the safety bars under control.
Who Should Do Rack Pulls?
(See 16:09 in the video.)
Anyone can perform rack pulls, but whether you should or not depends on your goals. Strength athletes—powerlifters and strongmen—or anyone looking to increase their one-rep maxes on deadlift variants will benefit the most from including rack pulls in their programs (see below for more details on how to do that).
Bodybuilders (competitive or hobbyists) can probably skip the rack pull. While it can build muscle in the glutes, hamstrings, and back, there are better exercises for targeting these muscles individually for maximum growth. The rack pull’s limited range of motion is one hindrance that makes it suboptimal for building muscle, as muscles seem to grow best when trained through a full range of motion, and possibly with specific emphasis on lengthened positions.
A 2023 systematic review published in the International Journal of Strength and Conditioning studied the effects of full and partial range of motion training on various outcomes (muscle hypertrophy, i.e. muscle growth, and muscular strength and power). The researchers found that training with a full range of motion was more effective than using a partial range of motion.
Another 2023 study published in Sports had 19 women perform biceps curls in two different ranges of motion—from full extension to partially flexed (bottom-half reps), and partially flexed to fully flexed (top-half reps). After eight weeks, the bottom-half rep group saw greater biceps hypertrophy and strength gains, leading the researchers to believe that more muscle growth occurs in ranges of motion where the muscle is most stretched.
Another problem with the rack pull is the lack of focus on the eccentric, or lowering phase, of each rep. Muscles are stronger when they’re lengthening under load than when shortening (ever notice how you can control the weight easier on the way down than you can lifting it up?). That means that they don’t have to work as hard. So, in order to work the tissue maximally, you need to slow down the speed and emphasize tension as you lower the weight, so it gives your muscles the same stimulus on the way down as it did on the way up. This is why you often see bodybuilders lowering weights more slowly than they raise them up. While you can try to control your descent on a rack pull, the fact is that using heavy weights makes it impractical and dangerous to try for eccentrics that are two to three seconds long. Therefore, keep your rack pull reps controlled, but emphasize getting the weight up fast and explosively.
How and When To Incorporate Rack Pulls Into Your Training
(See 16:54 in the video.)
“Rack pulls are one of my favorite exercises to perform as a main movement, so perform them immediately following your warm-up,” says McFarland.
If you want to hit a new PR on your deadlift and have determined that your lockout is holding you back, McFarland recommends replacing your deadlift with rack pulls in three-week cycles. Gradually add weight for a series of warm-up sets, keeping your reps under 5, and work up to 100% of your deadlift max for a single rep. In Week 2, work up to a single rep with 105%, and then perform a single with 110–115% in the third week. For example, if you can currently deadlift 405 from the floor for one rep with good technique, use 405 on the rack pull in Week 1, 425 in Week 2, and 445 or more in Week 3.
In Week 4, deload by going back to your regular deadlift and working up to a single rep at 80–85% of your deadlift max. This will give your body a little break and keep your regular deadlifting skills sharp. The next week (Week 5), try for a new deadlift PR.
“Programming rack pulls closer to when you’re looking to max out will give your body the stimulation needed to prime the central nervous system [for greater strength],” says McFarland, “without fatiguing the muscles as much as the standard deadlift.”

)


