

Chest training makes you look like you’re wearing a suit of armor on your torso, and biceps curls are a must for filling out your shirtsleeves, but apart from the fun and glory of training these two body parts together, the combination is also a pretty good way to organize your workouts, despite being less popular than other workout splits that train the pushing and pulling muscles separately. We looked at the research and consulted a veteran bodybuilder and coach to bring you the best chest and biceps routines for any experience level.
Why Do People Usually Work Out Back and Bis or Chest and Tris?
Back and biceps is a common workout pairing, as is chest and triceps… so what’s with this chest and biceps idea? To understand why these are popular options, let’s back up a bit and look at the whole idea of workout splits.
A workout split is the way in which you break up the muscle groups you train over the course of a week. One of the most common splits among lifters of any kind (regardless of their goals) is the push-pull, wherein you train the muscles that perform pushing movements one day and pulling movements on another. A push day, for instance, could train the chest and triceps together—or chest, shoulders, and triceps—because all of these are involved in pressing exercises of any kind.
A pull day would target the back and biceps directly, and may also include some extra work for the rear delts and forearms as well, since all these muscles are recruited for row and pulldown movements. (Legs may be trained on a third workout day, or they may be split up and added to the push and pull days. For example, you could train quads and calves on the push day and hamstrings and glutes in the pull workout.) There are many benefits to this kind of programming.
For one thing, training two or three body parts at a time allows you to focus on just a few areas, as opposed to the whole body, which saves you energy and time, and it lets you direct more effort into each exercise and muscle group. For another, each workout works totally separate muscles, so you don’t have to worry about training a body part again (however inadvertently) the day after you just worked it—for example, it’s not a great idea to train triceps the day after chest and/or shoulders, because the triceps will still be recovering from the pressing you did.
The push-pull split is also a very convenient, intuitive way to train. On push day, for instance, you’d typically start by training the biggest muscles first, and work your way down to the smaller ones. So you could do bench presses for chest, overhead presses for the shoulders, and finish with triceps extensions for the tris. The chest exercises warm up your shoulders and triceps, so the rest of the workout flows smoothly. You won’t need many warmup sets by the time you get to your triceps exercises. All the muscles that perform related functions get worked on the same day, and therefore don’t need to be worked again for a while. (I.e., you don’t need separate days for chest, shoulder, and triceps training.)
The same goes for back and bis. Back exercises work the biceps and forearms automatically, so you might as well finish the workout with some direct arm work while those smaller muscles are warmed up and ready.
Why Train Chest and Biceps Together?
Push-pull splits are perfectly fine, but, like any split, they can have their drawbacks. One argument against the push-pull split is that, because the shoulders work to support the chest and the triceps are trained in all pressing movements, the delts and tris can get fatigued from the chest work, limiting your ability to train them with the heaviest possible weight and the greatest focus.
In other words, by the time you get to triceps, you’re tired, and not able to train them as hard as if you were fresh. The same goes when biceps are trained after back. If your goal is to drastically increase your strength or muscle in these areas because they’re lagging, the push-pull split may not be ideal, particularly if it’s the only split you’ve followed for years.
Pairing the biceps with chest eliminates any carryover fatigue. Since the biceps really aren’t involved with pressing exercises (well, they are as a stabilizer, but not to a degree that causes real fatigue), you can train them when they’re very fresh. “I think a great change of pace is to group together muscles that are not synergistic,” says Jonny Catanzano, CES, an IFBB pro bodybuilder and coach to physique competitors as well as recreational lifters (@jonnyelgato_ifbbpro).
Catanzano points out that since the pecs and biceps don’t compete at all, you can do sets of each in alternating fashion. (Note: this is sometimes called supersetting.) For instance, do a set of bench presses, rest briefly, or not at all, and then a set of curls. Your chest can rest while you work your biceps and vice versa, so your workout moves along at a brisker pace while each muscle gets a little extra time to recover.
A study in the Journal of Strength and Conditioning Research found that, when lifters alternated sets of unrelated muscle groups, they saved workout time and were able to lift more overall weight. “Practitioners wishing to maximize work completed per unit of time,” said the study authors, “may be well advised to consider [paired set] training.”
If you train chest and biceps together, it would make sense then to have a back and triceps day, or do a shoulder and triceps day and train back by itself on a third upper-body day in the week. “This kind of split is a good idea for anyone who considers their arms to be a weak point,” says Catanzano. The biceps will be fresh when you train them with chest, and the triceps will be able to handle more load if worked with back or shoulders, so the extra stimulus should produce gains.
One caveat here is that while the biceps don’t compete with the pec muscles, they do overlap with back—remember, any back work you do will work the biceps to a degree by default. So it’s best not to train back the day before or after a chest and biceps workout. You shouldn’t do triceps a day before or after either, because you’ll have worked them when you hit chest.
Dorian Yates, a six-time Mr. Olympia and widely considered one of the cleverest bodybuilders when it came to program design, used this very split himself (as laid out in his book, Blood and Guts). Yates trained delts and triceps on Monday, back on Tuesday, and took Wednesday off. He then did chest and biceps Thursday, legs on Friday, and took Saturday off. On Sunday, the cycle repeated. (Notice how Yates spaced out the chest and biceps day in his training week.)
Such a training split will probably require you to take a day off every third day or so, as Yates did, but that’s OK. You won’t be able to train each muscle group quite as frequently as you would following the classic push-pull split, but it will be frequent enough to elicit growth.
In its 2021 position stand on muscle-growth training, the International Universities Strength and Conditioning Association reported that the training frequency needed for a muscle to grow may be only one session per week—provided that a minimum of 10 working sets (not including warmups) are performed for the muscle area. As 10 hard sets can be difficult to achieve in one workout, many coaches recommend training a body part twice every seven days to get adequate volume—so chest and biceps workouts as prescribed in the split above (repeated every 6 days) would suffice just fine.
The Science of Chest and Biceps Training
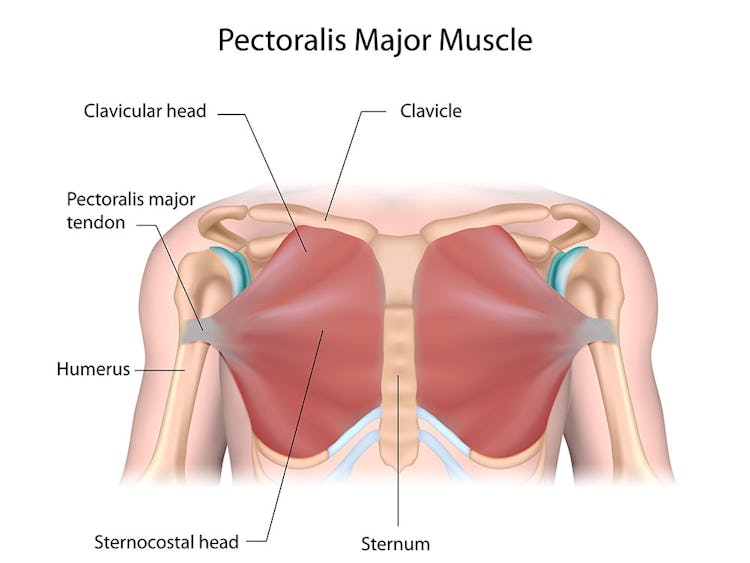
“When approaching chest training, I try to focus on different angles to place tension on the different heads of the pec major muscle,” says Catanzano. Flat pressing, or exercises where your arms reach straight out in front of you, will emphasize the sternal section of the pec muscles (“middle chest”), while incline movements and an arm path that reaches upward at an angle will target more of the clavicular heads (“upper chest”).
Decline pressing, where the arms move downward at an angle, targets the costal heads of the pecs, or the muscles’ bottom-most division. “You don’t need to work all the parts of the pecs in one workout,” says Catanzano, but a complete program should attack one or two of these areas each session. He emphasizes the upper pecs in the workouts he designed below, because it’s such a common weak point in most physiques.
For biceps, Catanzano likes to stress the muscles at different lengths, which is accomplished by curling with the arm in different positions. Curls done with the elbows in front of the body make the biceps work hard in their most shortened position, while just the opposite is true of incline curls and stretch curls. (Standard curls with the elbow in line with the torso work the muscle most at its mid-range.) As with chest training, playing all the angles, so to speak, leads to the greatest development, forcing the muscles to get stronger no matter what their leverage advantage (or disadvantage).
How To Stretch Before Your Chest and Biceps Workout
The shoulders are the most mobile joints in the body, and that means they’re also the most unstable, which makes them susceptible to injury. When you’re doing a chest and biceps workout, remember also that the biceps get trained after chest, and chest pressing and flyes don’t do much to pump blood into the biceps muscles. Your biceps can be nearly cold when you go to do your first set of curls, and that’s not ideal from the standpoint of preventing injury (it’s not ideal for promoting good performance either).
Shane Heins, Onnit’s Director of Fitness Education, put together a sequence of mobility drills that will warm up your shoulder joints, chest muscles, elbows, biceps, and forearms, preparing your body to lift heavy weights and stimulate the muscles you’re training safely. They’re also great for maintaining flexibility in these areas, which can diminish if you add a lot of muscle size but fail to balance it with mobility training (and what good is being big and strong if you don’t have the athleticism to use these qualities?).
DIRECTIONS
Perform the exercises as a circuit, completing one set of each in sequence. Do 10 reps for each exercise, and repeat the circuit for 4 total rounds.
1. Scap Pushup
(See 01:06 in the video above)
Step 1. Get on all fours with your hands under your shoulders and your knees under your hips. Brace your core.
Step 2. Squeeze your shoulder blades together so that your chest lowers toward the floor, and then spread your shoulders apart so that it rises back up. Your arms do not bend—keep the movement at your shoulders. That’s one rep.
2. Kneeling Pushup Elbow Circle
(See 01:45 in the video)
Step 1. From the same quadruped position as the scap pushup (all fours), turn your elbows to point out to the sides and then bend them, lowering your body to the bottom of a pushup.
Step 2. Turn your elbows toward your body and extend your arms to return to the starting position. That’s one rep.
3. Mobile Table
(See 03:02 in the video)
Step 1. Sit on the floor and place your hands by your hips, fingers pointed out to the side.
Step 2. Press your hands into the floor as you extend your hips until your torso is parallel to the floor. Be careful not to extend your hips above your shoulders—that would mean you’re hyperextending your lower back. That’s one rep.
4. Shinbox to Tripod Extension
(See 03:50 in the video)
Step 1. Sit on the floor as you did for the mobile table, and let your knees fall to your left side. Reach your left hand behind you and plant it on the floor behind your tailbone.
Step 2. Press your hand into the floor as you extend your hips and reach upward with the opposite arm. Keep your core braced so you don’t overextend at the spine. Spread your shoulders apart as wide as possible, allowing the rotation to open your upper back. That’s one rep.
At-Home Chest and Biceps Workout
Forget the heavy bench presses, fancy chest machines, and variety of curl bars—you don’t need more than a few pairs dumbbells and some resistance bands to work your chest and biceps at home, or in a bare-bones gym. The following workout, designed by Catanzano, should take about 45 minutes and can be done almost anywhere.
DIRECTIONS
The exercises in the workout are organized into pairs, marked A and B. Perform a set of the A exercise, rest, then perform a set of the B exercise, rest again, and repeat until all sets are complete for each move in the pair. Then go on to the next pair and do the same thing. Rest 2 minutes between sets. You’ll do 3 sets of 15 reps for each exercise.
1A. Feet-Elevated Pushup
(See 00:43 in the video above)
Pushups work your chest, but when you elevate your feet on a bench or boxes, you recruit more of the upper-chest muscle fibers, the same way you do if you were performing an incline bench press.
Step 1. Get into pushup position with your hands shoulder-width apart, and rest your feet on a bench or boxes so that your body is angled toward the floor.
Step 2. Keeping your body in a straight line and your core braced, lower yourself until your head is just above the floor, and then push back up. That’s one rep.
1B. Resistance-Band Stretch Curl
(See 01:13 in the video)
Curling with a band that pulls from behind you puts more tension on the biceps in their lengthened position, an effect you don’t get from conventional barbell and dumbbell curls.
Step 1. Anchor a resistance band to a sturdy object behind you and hold the free end in one hand, allowing the band to pull your arm behind your torso. Stagger your stance for balance.
Step 2. Without moving your upper arm forward, curl the band until your biceps are fully contracted. Complete your reps on that arm, and then switch arms and repeat.
2A. Single-Arm Incline Dumbbell Chest Press
(See 01:46 in the video)
Here’s some more work for the upper part of the chest, and you don’t even need an incline bench to do it.
Step 1. If you have an adjustable bench, set it to a 30 to 45-degree incline. If you don’t have a bench that inclines, elevate the head of a flat bench on some mats or weight plates. Hold a dumbbell in one hand and lie back on the bench with the weight at shoulder level.
Step 2. Press the dumbbell over your chest. Complete your reps on that arm, and then switch arms and repeat.
2B. Standing Single-Arm Preacher Curl
(See 02:14 in the video)
You can use a flat bench here, or really any sturdy, flat, object to sub for a preacher curl bench. Just elevate it so that your armpit can rest at the top. The preacher curl stresses the biceps in their shortened position and makes for a very strict movement.
Step 1. Incline your bench or elevate the surface you’re using so you can brace the top of your arm against it. Check that your forearm won’t be completely vertical at the top of the movement—that would mean your wrist and elbow are stacked and there’s no tension on the biceps.
Step 2. Hold a dumbbell and curl the weight with strict form. Complete your reps, and then repeat on the other arm.
3A. Seated Band Press
(See 03:11 in the video)
This move mimics a cable press exercise. An advantage here over pressing with free weights is that the bands keep tension on the pecs at the end range of motion, rather than letting the tension drop off, which is what happens when you reach lockout on dumbbell and barbell pressing.
Step 1. Attach resistance bands to a sturdy object at about waist height and grasp the open ends in each hand. Sit with your back braced against a bench or a sturdy chair. You can also do the exercise standing if you don’t have a bench.
Step 2. Press the bands as if they were dumbbells, but bring your hands together to meet in front of your chest in order to fully shorten the pec muscles.
3B. Arnold Concentration Curl
(See 03:45 in the video)
This is an old-school move we all owe the Governator, Arnold Schwarzenegger, for popularizing. The concentration curl really lets you stretch the biceps in the bottom position, and allows you to focus your mind on the muscle while you’re training it.
Step 1. Stand and hold onto a bench or other sturdy object for stability. Hold a dumbbell in your other hand, and bend at the hips. Allow your working arm to hang.
Step 2. Without moving your upper arm much, curl the weight to a full contraction and control its descent back down. Complete your reps, and then repeat on the opposite side.
The Best Intermediate Chest and Biceps Workout For Getting Stronger
If you’ve been training a year or more, try this chest and biceps routine from Catanzano (who also demonstrates it in the video below). It uses dumbbells and cables (or resistance bands), and will work the muscles from some angles and positions you probably haven’t tried before. It should only take you about 45 minutes to complete.
The exercises in the workout are organized into pairs, marked A and B. Perform a set of the A exercise, rest, then perform a set of the B exercise, rest again, and repeat until all sets are complete for each move in the pair. Then go on to the next pair and do the same thing. Rest 2 minutes between sets. You’ll do 3 sets of 12 reps for each exercise.
1A. Neutral-Grip Dumbbell Press
(See the video above at 00:52)
This hand position creates an arm path that’s easier on the shoulder joints and gives the pecs better leverage for more muscle recruitment.
Step 1. Lie back on a bench with a dumbbell in each hand and turn your palms to face each other, hands at shoulder level.
Step 2. Keeping your elbows tucked to your sides, press the weights over your chest. That’s one rep.
1B. Standing Cable Pulley Curl
(See the video at 01:23)
Curling with a cable or band while your elbows are in front of your body stresses the biceps in their shortened position.
Step 1. Attach a handle to the low pulley of a cable station and grasp it with your palms facing up, hands at shoulder width. You can also use resistance bands.
Step 2. Curl the weight, allowing your elbows to move forward in order to fully shorten the biceps. That’s one rep.
2A. Incline Cable Pulley (or Band) Press
(See the video at 01:41)
The incline press done with cables or bands keeps tension on the upper pec muscle fibers throughout the range of motion, and particularly as you reach lockout with your elbows.
Step 1. Set a bench at a 45- to 60-degree angle and place it between two facing pulley stations. You can also use resistance bands. Set the cables or bands to a height that will allow them to line up with your upper chest fibers—around waist height or below when you’re sitting on the bench should work. Lie back on the bench and hold the cables or bands at shoulder level at your sides. Make sure there’s tension on the cables or bands in this bottom position.
Step 2. Press the cables or bands over your chest to lockout. That’s one rep.
2B. Stretch Curl
(See the video at 02:10)
Curling with a band that pulls from behind you puts more tension on the biceps in the fully contracted position, an effect you don’t get from conventional barbell and dumbbell curls.
Step 1. Anchor a resistance band to a sturdy object behind you at or below knee height, and hold the free end in one hand, allowing the band to pull your arm behind your torso. Stagger your stance for balance.
Step 2. Without moving your upper arm forward, curl the band until your biceps are fully contracted. Complete your reps on that arm, and then switch arms and repeat.
3A. Incline Flye
(See the video at 03:00)
The flye motion can be done with dumbbells, cables, or bands. It isolates the pecs better than pressing does, and, if you’re using bands, they’ll give you more tension in the top position (where it usually drops off with free-weight exercises).
Step 1. Set a bench at a 45- to 60-degree angle. Lie back on the bench and hold the weights over your chest.
Step 2. Lower your arms out to your sides, bending your elbows as you go to take tension off the shoulders. Your elbows should be bent 45 to 60 degrees in this bottom position. Bring your arms back in front of your chest again as if you were hugging somebody, straightening your elbows as you do. That’s one rep.
3B. Alternating Cross-Body Hammer Curl
(See the video at 03:28)
This move puts more focus on the shorter head of the biceps, contributing more to a biceps peak.
Step 1. Hold a dumbbell in each hand and turn your palms inward to face your body.
Step 2. Curl the weight in one hand in the direction of your opposite shoulder. Lower it, and repeat on the other arm. One curl on each side equals one rep.
The Best Advanced Chest and Biceps Workout For Getting Stronger
If you’ve been training for a few years and feel you’ve hit a plateau in your gains, try this routine from Catanzano to break through. It has a finisher at the end that combines three exercises with little to no rest in between. Called a tri-set (or giant set), it’s an advanced training technique used by bodybuilders to completely exhaust a body part and force as much blood into the area as possible.
DIRECTIONS
Most of the exercises in the workout are organized into pairs, marked A and B. Perform a set of the A exercise, rest, then perform a set of the B exercise, rest again, and repeat until all sets are complete for each move in the pair. Then go on to the next pair and do the same thing. Rest 2 minutes between sets.
You’ll do 3 sets of 10 reps for each exercise. The last three exercises are done as a tri-set. So you’ll do one set of 4A, then 4B, and then 4C before resting 2–3 minutes.
1A. Cable (or Band) Incline Press-Around
(See 01:08 in the video above)
Even though you’re not lifting on an incline bench, this exercise targets the upper chest in the same way, but puts more tension on the muscle in its fully contracted position.
Step 1. Set a cable or resistance band at around knee height and grasp the handle or open end, holding it at shoulder level. Stagger your stance for balance, and rest your free hand on a bench or other sturdy support in front of you for extra stability.
Step 2. Bring your arm up and across your body so you feel a full contraction in your working pec. Complete your reps, and then repeat on the opposite side.
1B. Seated Curl on Lat Pulldown
(See 01:50 in the video)
Curling against the knee pads of a lat-pulldown station may seem strange, but it’s one of the strictest movements you can do for the biceps. The stability that the pads provide lets you really isolate the biceps, avoiding any momentum from swinging the arms.
Step 1. Sit at a lat-pulldown station with your back to the machine. Hold dumbbells and brace your arms against the knee pads.
Step 2. Curl the weights using the pads to keep your arms stationary and stable. Note: if there are people waiting to use the lat-pulldown for actual lat-pulldowns, be considerate and pick a different biceps exercise!
2A. Converging Chest Press with Cables (or Bands)
(See 02:24 in the video)
Bringing your arms together in front of you fully shortens the pec muscles, an effect you can’t get from dumbbell and barbell pressing while keeping tension on the muscles. A converging press done with cables or bands does it perfectly.
Step 1. Attach handles to the pulleys of two facing cable stations, or, use resistance bands set to knee height. Bend your elbows up to 90 degrees in the bottom position to take pressure off your shoulders.
Step 2. Press the cables or bands in front of your chest, bringing your hands together in front of you.
2B. Dumbbell Preacher Curl
(See 03:07 in the video)
The preacher curl stresses the biceps in their shortened position and makes for a very strict movement. You can perform it one arm at a time, or, if you have a preacher bench, you can train both arms at the same time.
Step 1. Incline your bench or use a preacher bench and brace the top of your arm against it. Check that your forearm won’t be completely vertical at the top of the movement—that would mean your wrist and elbow are stacked and there’s no tension on the biceps.
Step 2. Hold a dumbbell and curl the weight with strict form. Complete your reps, and then repeat on the other arm.
3A. Decline Dumbbell Press
(See 03:50 in the video)
The decline press targets the costal head of the pectoral muscles—“lower chest” in layman’s terms.
Step 1. Set a bench to a 15 to 35-degree decline. If you don’t have one that adjusts to a decline, elevate the foot of a flat bench on some weight plates or mats.
Step 2. Lie back on the bench holding dumbbells at chest level, and press the weights over your chest.
3B. Incline Dumbbell Curl
(See 04:18 in the video)
The incline curl trains the biceps from a stretched position, which research has specifically shown helps build muscle.
Step 1. Set a bench at a 45- to 65-degree angle and lie back against it with a dumbbell in each hand.
Step 2. Without allowing your upper arms to move, curl the dumbbells until your biceps are fully contracted, and then control their path back down.
FINISHER
4A. Landmine Press
(See 05:43 in the video)
More work for the upper chest here. If you don’t have a landmine unit, you can wedge a barbell into a corner.
Step 1. Load a barbell into a landmine and hold the opposite end with both hands at chest level. If you have the V-handle from a cable row machine, use that on the bar to give yourself a better grip. Stagger your stance for balance and lean forward so your weight is on your front foot.
Step 2. Press the bar up—it will move on an angle, similar to the path your arms travel when you’re performing an incline press.
4B. Iron Cross Chest Flye
(See 06:13 in the video)
Since your arms are moving on a downward path, this flye targets the lower chest.
Step 1. Use cables or resistance bands, set to above head level. Allow the cables or bands to pull your arms out to your sides at shoulder level.
Step 2. Keeping your arms fairly straight, flye the cables/bands down in front of your belt line, bringing your hands together.
4C. Alternating Cross-Body Hammer Curl
(See 06:44 in the video)
This move puts more focus on the shorter head of the biceps, helping to develop the biceps peak.
Step 1. Hold a dumbbell in each hand at your side, and turn your palms inward to face your body.
Step 2. Curl the weight in one hand in the direction of your opposite shoulder. Lower it, and repeat on the other arm. One curl on each side equals one rep.


