At first glance, resistance band exercises may seem remedial to the average trainee, something used only by those who are recovering from injuries or new to working out.
Resistance band movements seem simple and the amount of resistance generated may seem like it does nothing to add strength, muscle, or the ability to increase your athletic performance.
Resistance band movements seem simple and the amount of resistance generated may seem like it does nothing to add strength, muscle, or the ability to increase your athletic performance.
However, before writing off this seemingly trivial piece of equipment, adding some resistance band exercises to your training protocol might be the exact thing you need to increase your mobility and correctly activate some dormant muscles.
In this article, I will give you my 4 essential resistance band exercises and how to add them into your current training program without making it look like you are taking an exercise class at the local senior center.
The nice thing about resistance band exercises is that they are easy to execute and you can perform countless reps without taxing your body. However, because of the general ease of movement and the moderate resistance compared to traditional strength exercises, it is easy to use resistance bands sub-optimally.
When working with resistance bands, it is crucial to execute the exercises slowly and controlled through the largest range of motion (ROM) possible. The most common mistake I see are trainees pulling a resistance band to forcefully in the concentric motion and letting the band snap back during the eccentric portion.
Doing the exercises in this manner will not activate or strengthen the stabilizing muscles of the movement; it will actually limit the potential increase in mobility of the joint you are trying to train.
When performing any of the exercises below you will get the most out of the movements by maintaining correct posture throughout the exercise, moving slowly, and keeping constant tension on the resistance band. It is important to concentrate on how your body is responding during the movement to see if you are activating the correct muscles while increasing your ROM.
It is best to perform these movements as a part of a dynamic warm-up. After your usual mobility warm-up, a few sets of resistance band exercises, focusing on the muscles and joints you are using for your main workout, can warm up the muscles and get the joints fine tuned.
One other way to perform these exercises is in between your main lift as an active recovery set. For example, after you finish your set of squats throw in 15 reps of Resistance Band Front Pull Aparts as you rest.
Resistance Band Exercise #1: Front Pull Aparts
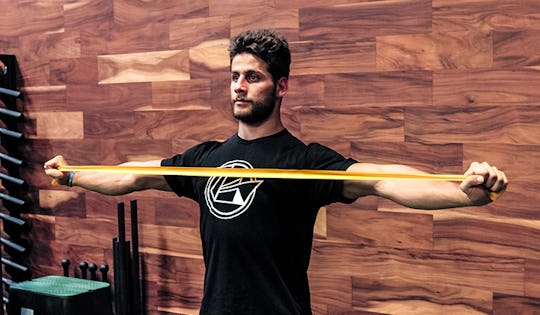
Onnit recently posted an article by Joe DeFranco about Resistance Band Front Pull Aparts and I first learned this great exercise from him years ago. Resistance Band Front Pull Aparts are a staple in my training as well as in my athletes’ programs. This exercise is particularly easy to fall into the traps mentioned above by thinking it is easy.
This mindset will not allow you to get the most out of the movement. However, if done properly, Resistance Band Front Pull Aparts are one of the best ways to improve scapular mobility and strength in the back and shoulder muscles.
Set up with a resistance band in front of you, wrists as straight as possible, shoulder blades and rib cage down. When you draw the resistance band towards your body maintain a neutral posture throughout the exercise, and use your back to perform the exercise allowing your shoulder blades to move freely.
Imagine your shoulders gliding along the side of your body. Do not allow the resistance band tension to forcibly retract to the starting position, maintain your posture, and control the movement back to the beginning.
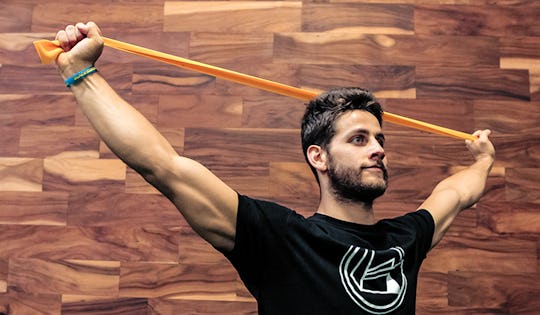
Resistance Band Exercise #2: Shoulder Flexion
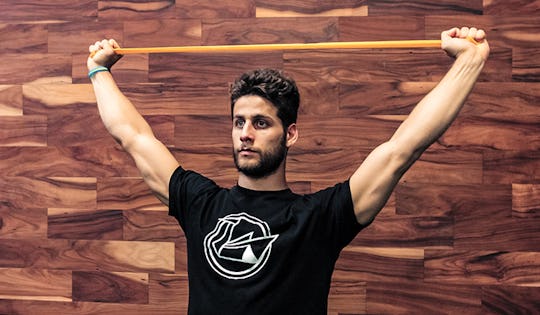
Resistance Band Shoulder Flexion is my favorite resistance band movement for the upper body, because of the shoulder mobility gained through the movement.
Our daily lives constantly pull our shoulders forward. Activities such as driving, doing work on the computer, and carrying around children cause our shoulders to get pulled forward and can limit mobility, especially overhead.
Set up the resistance bands just like you do for the Front Pull Apart, and move the resistance band upwards like a front raise. Maintain your posture throughout the movement. Focus on keeping your ribcage and shoulder blades down as the resistance band gets overhead.
Stop and reset the movement if you feel your shoulders and ribcage move away from neutral posture. Also, do not try to gain more false ROM by pulling the resistance band apart; rather keep the same amount of tension on the resistance band during the movement.
Resistance Band Exercise #3: Lateral Walks
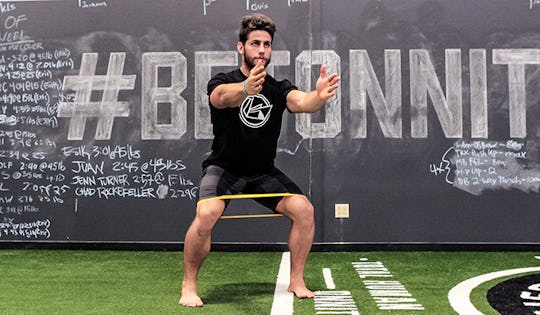
Most lower body exercises are performed in the saggital plane. While playing sports, we move in different planes and getting the hip rotator muscle to activate by training laterally is essential. Resistance Band Lateral Walks are great for activating the hip rotator muscles.
I prefer a small resistance band set up between the legs, just above the knees. If you do not have access to a small resistance band, you can use a full reistance band by placing it under the feet and holding it up with your arms.
Keeping your foot and knee aligned take a set outward, laterally. I like to complete the step in a quarter or half squat, then with slow control, bring the other foot towards the first, reset, and step again.
Resistance Band Exercise #4: Knee Stabilizers
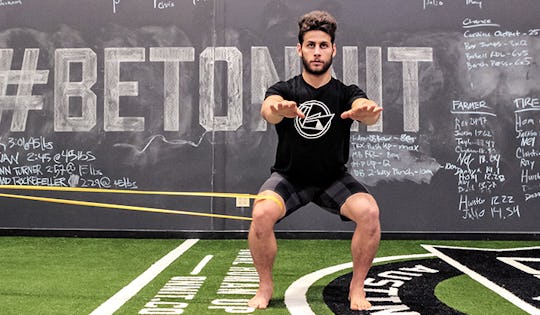
Resistance band exercises are a great way to train stability of certain joints and add some isometric tension. The resistance band tension creates a perturbation effect (vibration) which activates the muscles to contact and stabilize a joint during side to side motions that are common in sporting activities.
Use a large resistance band and set up a slip knot around a squat rack or post. Wrap the resistance band around your thigh just above the knee, and move away from the anchor so you are facing 90 degrees in either direction.
When the tension feels right, bend you knee slightly and work to maintain knee and foot alignment while your quads activate to stabilize your knee joint. I usually like to set a timer and go for about 30 seconds.
Add these resistance band exercises into your training program to work your way to better mobility and joint stability.
)