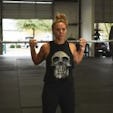
The snatch is one of the two lifts contested in the sport of Olympic weightlifting. To describe it in the simplest terms, it has you lifting a barbell from the floor and over your head in one efficient movement—arguably the most complex and challenging task you can do in all of strength training. Like its counterpart, the clean and jerk (the other Olympic lift), the snatch has been broken down into many variants that have been used by weightlifters and other athletes to improve several athletic qualities. One of these variants is the power snatch, which has been popularized by CrossFit.
The power snatch is a little more user-friendly than the classic Olympic weightlifting snatch, safer, and easier to learn, but it’s no less effective in developing power, explosiveness, strength, and total-body coordination. In just a few steps, I’ll teach you how to do the power snatch, and show you why it’s a great move to master for anyone looking to become a more powerful athlete.
Bonus: once you know how to do it and why, you’ll be able to drop the word “snatch” into more of your conversations, no doubt turning some heads, ruffling some feathers, and setting the stage for many a crude (but entertaining) joke.
What Is The Power Snatch?
The power snatch was born from the original barbell snatch, a movement performed in Olympic weightlifting to test overall strength and power. Any variant of the snatch is a great measure of these qualities because it requires triple extension—the ability to extend the hips, knees, and ankles simultaneously, which creates maximum explosiveness. As any smart coach will tell you, getting these joints to extend together with the correct timing is no easy feat, and a thing of beauty when it’s done right. This is why Olympic lifters (as well as anyone else who practices the snatch and its variants) take a lot of time to drill good technique. Olympic lifts are the most technical weight-training exercises you can do.
Olympic weightlifters use the power snatch as a supplemental exercise to improve their performance on the regular snatch, but many other athletes use the power snatch in place of the snatch to train the explosiveness they need for the field, court, or mat, so the power snatch is the more widely used between the two lifts.
The biggest difference between the snatch and the power snatch is the ranges of motion used. The classic snatch has you lift the bar from the floor to overhead while you drop into a deep squat and then stand up tall. With the power snatch, you don’t have to catch the weight in a deep squat position (you’ll end up in more of a quarter-squat), making the lift less of a test of thoracic and lower-body mobility.
Because you don’t drop into a full squat, your arms have to move a little farther to get the bar overhead in a power snatch. This is one reason Olympic lifters drill the power snatch—to get the bar traveling higher, which ultimately makes it easier to catch in the finish position of a regular snatch. That extra range means you’ll have to use lighter weight than you would doing a full snatch, but that’s a blessing in disguise. Less weight means you’ll be able to move the bar faster, and that generates even more power. It also makes make the lift safer, and easier to get the hang of.
How To Properly Power Snatch
There are six parts to the power snatch when it’s done properly. Remember, all Olympic lifts and their variants are highly technical, so you have to invest the time to learn them correctly if you want to maximize the weight you can lift safely. It’s best to start with an empty barbell, or, if you have bumper plates, very light weights. Bumper plates (the kind that bounce) will allow you to reach the bar while it’s on the floor, and let you drop the weight from overhead rather than control the bar’s path back to the floor.
I’ll walk you through the technique in this video.
Now I’ll break it all down in a lot more detail.
Step 1. Start Position
Place your feet between hip and shoulder-width apart, and turn your feet out a few degrees. Think about how you’d stand to do a vertical jump—that’s the stance you want to use for the power snatch. (You’re going to maximally accelerate the bar upward, which is not unlike trying to jump as high as you can).
Roll the bar into position so that it’s over your feet. When you look down, the bar should be directly over mid-foot.
Bend your hips back, and then bend your knees as needed, to reach down and grasp the bar with hands about twice shoulder width—arms straight. (You’ll have to play around with the grip width to see what feels most natural. The National Strength and Conditioning Association recommends starting out by measuring the distance between both elbows when your arms are held out 90 degrees from your sides and parallel to the floor—that’s the space that should be between your hands when grasping the bar.)
Draw your shoulders down so your traps are stretched, not shrugged. Think about crushing an orange in your armpits so you feel your lats tense.
Take a deep breath into your belly, and draw your ribs down so they’re closer to your pelvis—brace your core as if you were about to get punched in the stomach.
Your chest should point forward—so anyone standing in front of you could see the logo on your T-shirt—but your back shouldn’t be excessively arched. Aim to create a long, straight line from your head to your butt.
Draw your head back as if making a double chin. Your shoulders should be directly over the bar or slightly in front of it. If you have a friend nearby, ask him/her to check on this.
KEY POINT: Get into a position that makes you think of how you’d load up your hips to jump up in the air. Make sure your head, spine, and pelvis make a long, straight line, so your lower back is flat (not rounded forward). Get your body tight. Imagine it as a coiled spring ready to be released.
Step 2. First Pull
This is the portion of the lift that goes from the moment the bar leaves the floor until it’s just below your knees.
Push your feet down so that your hips and knees begin to extend and the bar breaks off the floor. You should feel your weight start on your mid-foot and shift to your heels as you lift.
Keep pulling the bar in tight to you—maintain that tension in your lats (crushed oranges). The bar should travel upward in a straight line along the front of your shins.
This part of the lift does not need to be done explosively. That comes later. Focus on creating enough tension so that your whole body is tight and moving as one unit. It’s OK if the bar comes off the floor slowly.
KEY POINT: Keep the bar pulled in tight and start standing up. Control everything.
Step 3. Transition Phase
The transition phase is when the bar passes the knees. The goal here is to position the body so you can create maximum acceleration with the bar. When the first pull is done correctly and the bar is close to you, your knees will make room for the bar to pass when you extend your legs.
Once the bar passes the knees, extend your hips explosively. Snap them! The bar will usually come up to the top of the hips, but it can also be beneficial to think about “bringing the bar to your hip pockets.”
If your timing is right, your knees will actually re-bend so they pass in front of the bar. This will happen automatically when the form is right. You should feel your weight shift back to mid-foot, but your heels stay on the floor.
KEY POINT: As soon as you feel the bar rise above the knees, drive your hips forward explosively.
Step 4. Second Pull
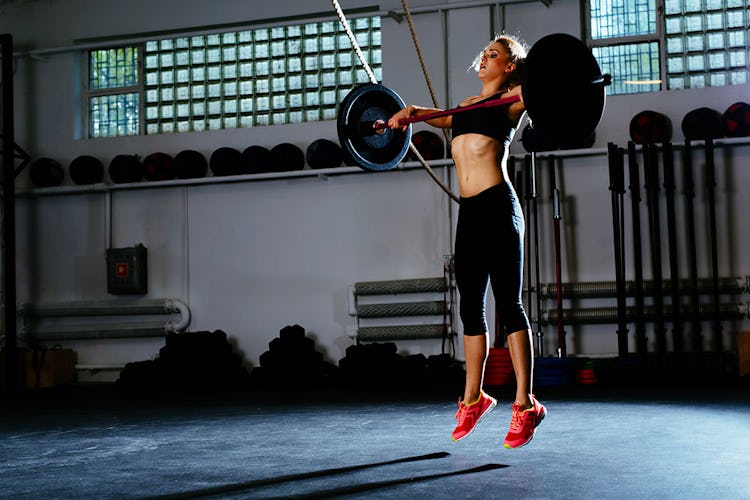
Here’s where that powerful triple extension comes in.
Keep extending your hips as you also extend your knees and ankles to accelerate the bar upward (just think about jumping). Shrug your shoulders powerfully, but keep your arms relaxed.
Because you’re maximally accelerating the bar, you will have full hip extension at this point, and your shoulders will move behind the bar.
Your feet may also rise off the floor.
When your shoulders are fully shrugged, bend your elbows, as if doing an upright row. Begin pulling your body under the bar.
KEY POINT: Think about it like a vertical jump. I also like to cue it as “throw the bar straight up to the ceiling.”
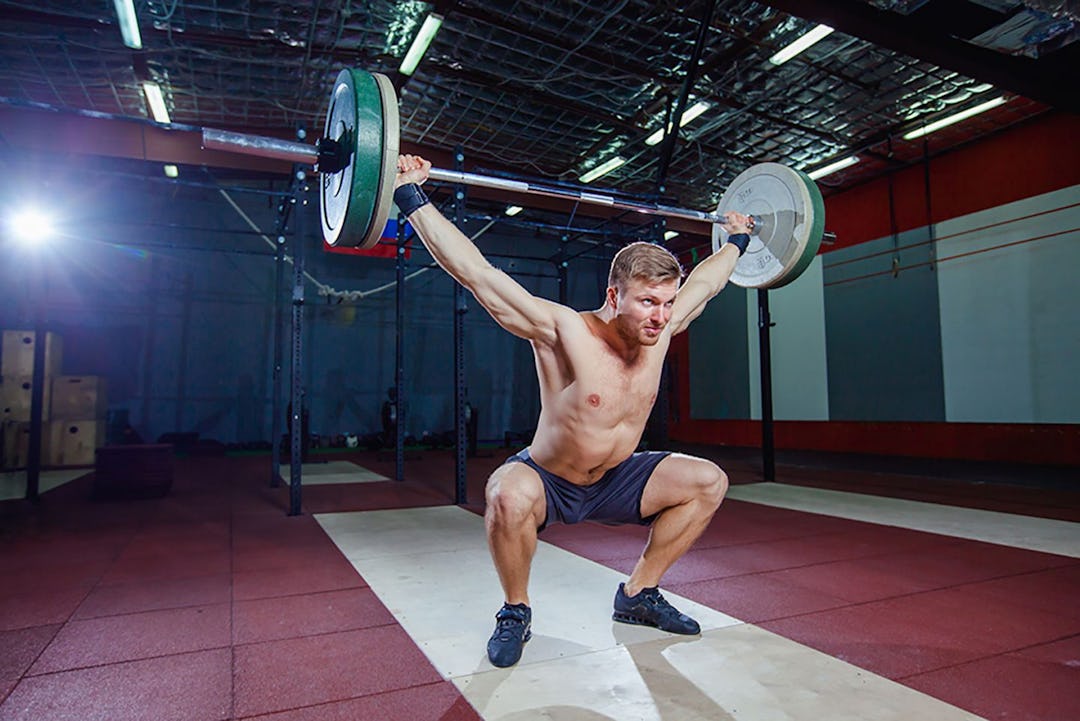
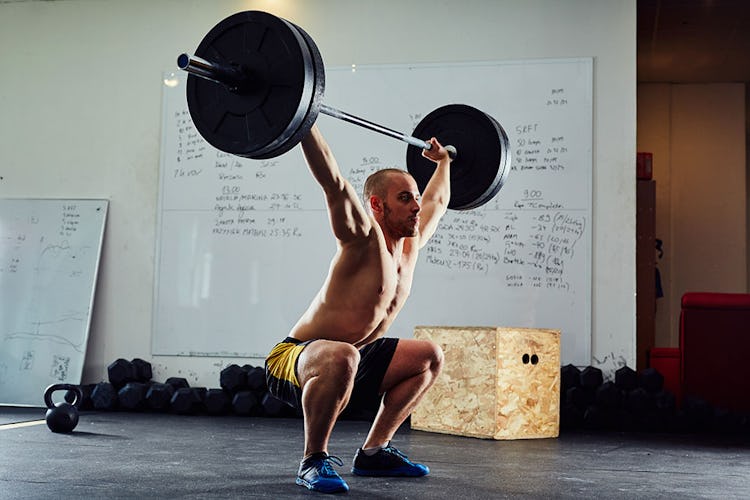
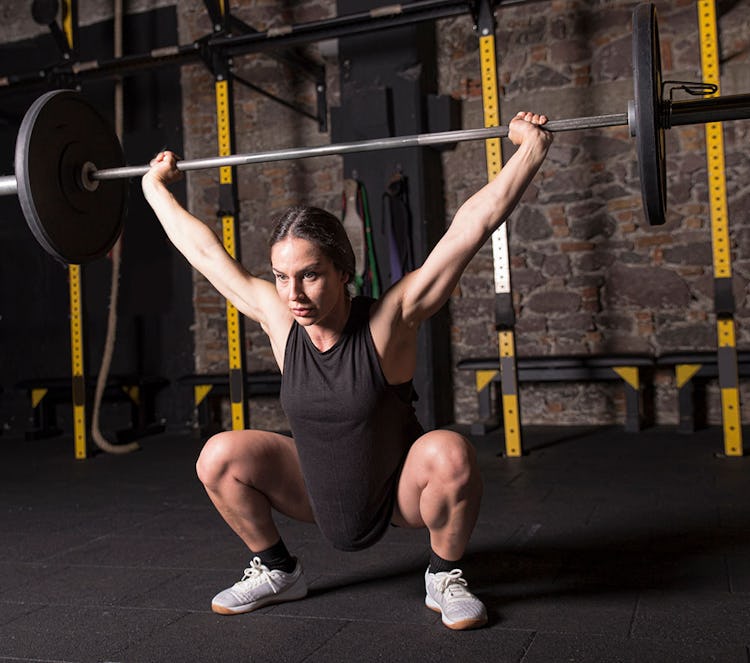
Step 5: Catch
Now the goal is to safely catch the bar overhead.
As the bar travels up in front of your torso, it will feel weightless. Drive your elbows out wide so the bar stays close to your body.
Bring your body underneath the bar quickly by bending your knees and “catching” the bar in a quarter- or half-squat with arms locked out.
Your feet will land a little wider than they started. Ideally, the width you’d take to perform overhead squats (if you’ve practiced them before).
KEY POINT: When the bar feels weightless, focus on getting your body underneath it. Flip your elbows around to catch the bar at its highest point.
Step 6: Recovery
Once you have control of the bar, stand up straight and tall with it overhead, and your arms locked out.
Lower the bar to your chest, and then to the floor, or let it drop in front of you with control (if you’re using bumper plates).
Reset yourself before you perform another rep. Don’t rush your set.
It’s important to understand that the goal of the power snatch is to increase power input, so there’s no point in loading it up heavy and grinding out a slow rep. (Leave the heavy snatching to experienced weightlifters.) The rate of acceleration, not the load used, should be the main marker you strive to improve.
Loading the bar with 65%–85% of your one-rep max (1RM) is ideal for most athletes. (Since you’re new to snatching, just estimate it, or start with 10–25 pounds each side.) This should be a weight you can get for three to six fast, clean reps. Repeat this for 3–5 sets.
Only increase the weight if acceleration and proper technique can be maintained for the whole set, and expect to spend several workouts with the same weight until that’s the case.
A common complaint with the power snatch is that the wide grip spacing aggravates the shoulders. If you find that to be the case, you can move your grip inward slightly, which may be more comfortable. Doing so will increase the distance the bar has to travel in order to get overhead, and that will force you to sacrifice load, but it will also help you lift even faster and develop more explosiveness. (See my video on this below.)
Many lifters find the power snatch easier to perform when they wear weightlifting shoes. These shoes have an elevated heel that can help compensate for poor ankle mobility, which is an issue for many people. See my video below for more explanation.
How To Do The Hanging Power Snatch Technique
Some people don’t have the hip and ankle mobility to start a snatch from the floor. If you feel you have trouble reaching the bar, you can’t keep your lower back flat, or your heels tend to rise off the floor at the start/bottom position of the lift, you may want to try the hanging power snatch instead, which is the same basic movement but starting somewhere between your shins and hips, thereby eliminating the bottom portion of the exercise and focusing on the range where you generate the most power.
Depending on your mobility, you can do hanging power snatches from your shin, just below the knees, just above the knees, your mid-thighs, or hip crease.
Hanging power snatches are also good for troubleshooting weak points in your snatch technique. If you want to focus on the second pull, for instance, you can start with the bar at hip level. The hanging power snatch helps you develop power in shorter ranges of motion, which is necessary in many sports—say, a jump shot in basketball.
The hanging power snatch also adds an eccentric component to the exercise. The eccentric is the negative, or lowering, phase of any lift, where the target muscles get stretched under tension. The classic snatch and power snatch don’t really have an eccentric, since you typically drop the weight to the floor to set up for the next rep, or lower it as quickly as possible. With the hanging power snatch, however, you start by standing tall and then taking the bar somewhere between your hips and shins to load up for the rep. That keeps your posterior chain muscles (the backside of your body) much more engaged than if you just began the rep from the floor. You basically end up doing a Romanian deadlift right before a power snatch.
Emphasizing the eccentric component of any lift aids muscle growth, as it causes more muscle damage that the body needs to repair. This is one reason trainers will tell you to lift a weight explosively, but take two or three seconds to control it on the way down. So, it can be argued that the hanging power snatch is a good choice for adding muscle size.
What Muscles Does The Snatch Work?
The power snatch is really a full-body exercise, making it a very efficient lift for developing muscle and strength from head to toe. The posterior chain takes on the brunt of the work—that is, the muscles that work together on the backside of the body that contribute to the powerful triple extension. But once the bar is traveling up in front of the torso, the upper back and shoulders do their part to get the bar overhead, so the upper body gets worked hard as well.
Here’s a broad list of the muscles that contribute to a good power snatch, from the ground up.
- Calves
- Hamstrings
- Quads
- Glutes
- Spinal erectors
- Core
- Deltoids
- Traps
Power Snatch Benefits

There are several good reasons to invest the time to learn the power snatch. For one thing, if you have aspirations of competing in Olympic weightlifting, the power snatch offers a good starting point for learning the snatch that you’ll have to perform in competition. It’s an easier movement to master, safer to perform, and once you’ve got it down, it isn’t much harder to learn how to transition into a deep squat (thereby completing the full snatch).
For athletes, or anyone looking to enhance their athleticism, the power snatch can be used to develop triple extension power—a skill used in virtually every sport. The power snatch will absolutely help you take off into a run faster, jump higher, and hit harder.
The power snatch offers a good middle ground between exercises like the deadlift and the sprint. In a deadlift, the focus is building absolute strength, so you lift heavy but the bar moves relatively slow. That means it’s good for developing the muscles that help you perform fast movements, but it doesn’t train you to move fast in and of itself. A sprint, on the other hand, trains you to move fast, but it doesn’t offer the resistance the deadlift does to build muscle and strength. The power snatch fits perfectly in between them, providing enough load to stimulate strength gains while focusing on explosive speed to develop the ability to apply force rapidly. A strong guy/gal who can generate a lot of force in an instant is a formidable athlete.
If you are (or were) an athlete, you’re probably familiar with the power clean, another Olympic lifting variant that’s commonly used to build power. I like the power snatch better than the power clean for this purpose for a couple of reasons. For one, the power snatch actually develops more power output than the power clean, or even the regular snatch, for that matter, because the weight used is lighter and the bar moves faster.
The power snatch is also harder to cheat. With power cleans, you’ll often see lifters pulling hard with their backs and arms to get the weight up, failing to utilize the triple extension movement the way they’re supposed to. The power clean then becomes more of a sloppy reverse curl. When you use a power snatch, however, that’s not a concern. There’s no heaving the weight up with the wrong muscles. You have to emphasize hip and leg drive, or you simply won’t be able to do it.
Power Snatch Vs. Snatch
The main thing that differentiates the power snatch from the snatch is the position the bar is caught in. Remember, in the power snatch, you catch the weight in roughly a quarter-squat position—a knee angle of 90 degrees or more, thighs above parallel to the floor. In the classic weightlifting (full) snatch, you descend into a deep squat—knees bent 60 degrees or less, thighs below parallel.
The power snatch also finds you pulling the weight higher, since you aren’t going into a deep squat position to help control the bar. The greater pulling range means you have to produce more power, and that will require using less weight than in the snatch.
Because the snatch requires a lot of mobility in the ankles, hips, and thoracic spine—and for most trainees, achieving a deep overhead squat is very challenging—it’s not as widely used as the power snatch. The power snatch is the better choice for most people who want to develop power and explosiveness, but aren’t weightlifters preparing for competition.
Power Snatch Exercise Alternatives
Before you add any exercise to your workouts, you should always ask yourself, “What’s the goal of this exercise, and what is the risk vs. reward?” The power snatch can certainly be used to build power, helping an athlete get faster, jump higher, and become more athletic, but it can also be difficult to learn and risky for those who have prior injuries or restrictions in their mobility.
If you have your heart set on power snatching, that’s cool. Just make sure you seek out a qualified coach to watch you perform it and tweak your form as needed. Remember to work on technique and speed before adding weight. Don’t be too eager to load up the bar solely for the sake of chasing big numbers. Understand that mastering any Olympic lift will take time and effort, and it may leave less time and energy for other exercises in your program.
The truth is, for the vast majority of people, I feel there are better exercise options than the power snatch to develop power, explosiveness, and athleticism. There are many movements that teach triple extension that can be taught and learned much faster, with much less risk to the lifter. Whether you choose to power snatch or not, you should be aware of the following moves, which offer many of the same benefits, and arguably many more.
For all of the following, perform 3–5 sets of 3–5 reps to start, resting as needed between sets. (Choose one per workout; don’t do more than power exercise in a session.) If you feel yourself slowing down or losing height on any rep, end the set there.
Box Jump
The box jump is a simple plyometric exercise that teaches you to explode from the hips and, just as importantly, absorb the force of a landing.
Step 1. Place a box that you estimate will be moderately challenging to jump up onto on the floor in front of you. Stand a foot or so behind it.
Step 2. Bend your hips and knees and swing your arms backward to generate momentum. Throw your arms forward as you jump up onto the box and land in its center with soft knees. Try to land as silently as possible. Step down off the box; don’t jump off.
Trap-Bar Deadlift Jump
The trap-bar provides a great alternative to the old-fashioned straight bar for a variety of lower-body exercises. It allows you to keep the load you’re lifting closer to your own center of mass, which reduces shear forces on the spine. It also lets you get into a more natural, athletic position when you deadlift, which should have more carryover to athletic activity. Doing jumps with the trap-bar loads the hips safely and builds explosiveness, and the form is easy to learn.
Step 1. Stand with feet between hip and shoulder-width and bend your hips back. Keep your head, spine, and pelvis in a long, straight line as you reach down to grasp the bar’s parallel handles. Crush oranges in your armpits to generate lat tension, and brace your core.
Step 2. Jump straight up in the air, as high as you can. Land softly, and pause a moment before your next rep to make sure you’re positioned correctly.
Medicine-Ball Scoop Toss
Many coaches like using medicine balls for power development because they’re very user-friendly and allow you to move as fast as possible. The weight can’t get too heavy, so you’re really able to explode with it, and, unlike with a barbell, you don’t have to worry about decelerating the load at the end of the range of motion—you can just release it and let the ball fly. The scoop toss simulates the triple extension used in all snatch variants very closely.
Step 1. Place a moderately-weighted medicine ball on the floor and straddle it with feet outside shoulder-width. (It should be a ball with a soft shell; one that won’t bounce.) Bend your hips and knees to reach down and grasp the ball while keeping a long spine.
Step 2. Scoop up the ball and explode upward, jumping up as you throw the ball as high as you can. Watch its path, and move as needed to avoid the ball landing on you. When the ball lands and comes to a stop, perform your next rep.
Single-Arm Dumbbell Snatch
Not all snatches have to be done with a barbell. You can use one dumbbell to perform a snatching motion, making for a safer lift that also challenges your balance and stability to a greater degree. As with all unilateral exercises, it can help you identify which side of your body is stronger.
Step 1. Place a dumbbell on the floor, and straddle the weight with feet a bit outside shoulder-width. Observe all the same form points for the snatch described above to bend down and grasp the weight.
Step 2. Use triple extension to raise the weight off the floor and straight up in front of your torso until it’s overhead. Your feet should land just as your arm locks out the elbow. You can reach your free arm out to the side to help you balance. Lower the weight to your chest under control, and then return it to the floor.
)