

Just when you think you’re up to date on the latest fitness trends, and you’re sure you’re doing everything possible to get in peak shape, you see a new term popping up on the Internet: “isotonic.” What is this strange, exotic, and no doubt highly sophisticated kind of training? And how soon must you incorporate it to get the body of your dreams??
Relax. You don’t have to scrap your current workout to do isotonic exercises, because, chances are, you’re doing them already. While the technical-sounding name makes for a good buzzword—hence the reason you see it showing up in articles and videos online from time to time and getting attention—isotonic exercise is an umbrella term for most of the movements you’ll do in a typical gym workout. With that said, it’s helpful to understand how and why they work to build muscle and strength (as well as aid your fat-loss goals), so prepare for a crash course on the topic—streamlined in layman’s terms so there’s no heavy lifting.
What Is Isotonic Exercise?
The term isotonic means “same tension,” which refers to the tension that’s placed on the muscles you’re contracting while they’re moving the joint(s) they act on. The idea is that you’re keeping the same amount of tension on the muscle throughout the full range of motion. Most of the exercises you’re no doubt already familiar with do this: pushups, squats, running, etc.
There is some nuance to this concept, though. “The term isotonic in resistance training has evolved away from its technical definition,” says Eddie Jo, PhD, CSCS*D, Director of the Human Performance Research Lab at Cal Poly, Pomona. “In real-life situations, your typical resistance exercise is not truly isotonic because of a variety of interwoven factors.”
One of these factors, according to Jo, is the relationship between a muscle fiber’s length and the amount of force it can produce, called the “length-tension relationship” by exercise scientists. This is a description of how much force a muscle fiber can produce at different lengths. Each muscle fiber has an optimal length—a degree at which it can produce the most amount of force—which is often dictated by the ability of the two major contractile components of a muscle fiber (the protein filaments actin and myosin) to interact with one another. The farther the fiber is stretched or shortened past this optimal point, the less tension you’ll see in the muscle and the less force it will be able to produce.
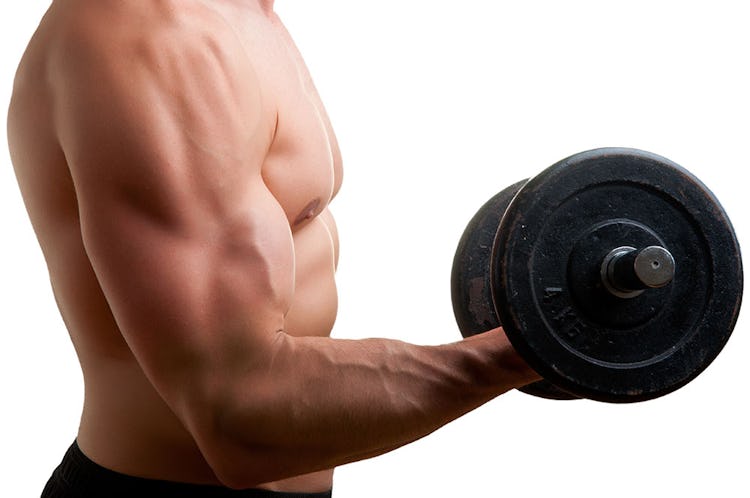
Need a visual? Imagine doing a biceps curl. Due to the length-tension relationship in the muscle, your biceps will be strongest when the elbow is bent around 90 degrees. If it’s bent more than 90 degrees, the structures that make the muscles contract overlap too much, and it can’t contract as strongly. If the elbow is straighter (less than a 90-degree bend), there’s too little overlap and, again, the muscles can’t produce as much force.
Therefore, it’s technically impossible to maintain the exact same amount of tension on a muscle throughout the entire range of motion in an exercise—even a so-called isotonic one.
The second concept that you have to consider with isotonic exercise is biomechanical advantage—the fact that different joint angles produce different mechanical advantages (or disadvantages) during a given movement. We’re talking about leverage.
The horizontal distance that the weight (or other source of resistance) is held from the point of rotation (the working joint) determines the force that’s needed to move that load. Further away (a longer lever) requires more force, and closer, less force.
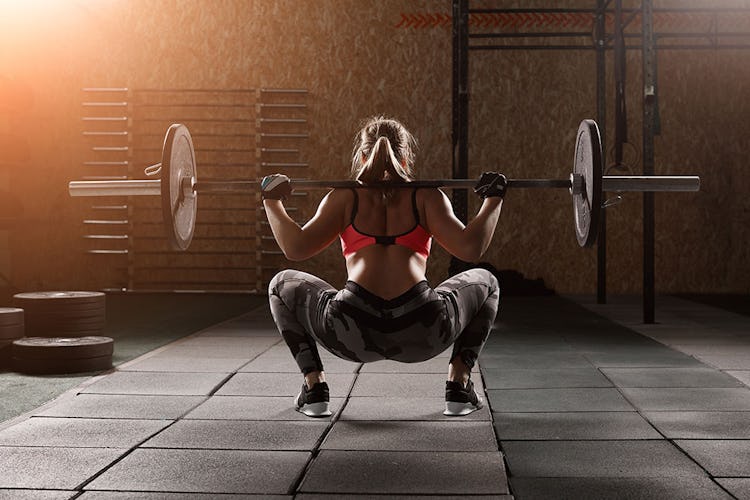
Let’s look at how the glutes work during a back squat¦
As you lower your body into the squat, the distance between your glutes and the barbell on your back gets longer and longer. As a result, their mechanical advantage gets worse and worse. When it’s time to power you out of the hole at the bottom of the lift, extending your hips to come back up to lockout, the glutes have to work much harder than if you had just done a half squat, descending only part of the way so that your glutes were nearer to the bar throughout the whole rep.
As you come back up, the glutes get closer to the bar, your leverage improves, and they don’t have to work as hard to extend the hips. In short, this is why the last few inches of a squat feel a lot easier to perform than coming up from the very bottom.
Because of these two considerations, pure isotonic movement doesn’t really exist, especially in compound exercises that most of us do (squats, pushups, pullups, and so on). Dr. Jo explains: “There is no situation during dynamic resistance exercise where you produce constant tension, because in most cases, if not all, biomechanical factors are always changing and thus a change in tension is required.”
Therefore, the term isotonic is something of a misnomer. When trainers and exercise scientists throw it around, their intention is to describe the load that’s being moved to provide the muscle tension—i.e., it’s constant. The weight you lift on a squat or a pushup is the same throughout the entire rep—it’s not being modified by a machine or some interference. Nevertheless, the tension on the muscles will vary depending on the changing length of the muscle fibers and the muscles’ biomechanical advantage. So, while the weight may remain the same during the exercise, the way it feels to your muscles is changing all the time.
Did we say “no heavy lifting” to read this article? Sorry. But now that you understand the concept, it will get lighter from here.
What Are Examples of Isotonic Exercises?
Virtually any traditional exercise you can think of can be filed under the isotonic category. As we said above, you don’t absolutely have to know what isotonic exercises are because, more than likely, you’re doing (or have done) them already. Here are a few examples:
– Back squat
– Bench press
– Deadlift
– Pushup
– Pullup
– Biceps curl
– Triceps extension
– Dumbbell, barbell, or bodyweight lunge
– Leg extension
– Ab crunch
You may be wondering, then, what exercises are NOT isotonic. We’ll discuss that next.
Isotonic vs. Isometric Exercises
While the name isotonic might be somewhat new to you, you’re certainly familiar with the term isometric, as it’s been a part of the muscle vernacular for eons. Isometric means “same length,” as in, during an isometric muscle contraction, the length of the muscles does not change (and neither does the angle of the joint they act on). Any time you’ve stopped to hold and squeeze a rep in a particular position, you’re doing an isometric (which is why they’re sometimes called “iso holds”). Pausing your arm at the halfway point in a curl, or holding your body at the top of a chinup, are both examples of isometric training—your muscles are working hard, but there’s no actual movement being performed.
Isometrics can be added to isotonic exercises to increase the intensity of the workout. For instance, after you finish a set of squats, you could walk over to a wall and perform a wall sit (“sit” with your hips and knees 90 degrees and your back against the wall for support) and hold for time. This is a good way to fry your legs.
You can use isometrics to make light weights feel heavier. If you have an injury, say, and you don’t want to risk aggravating it with heavy weights, you can hold isometric contractions at different points in the range of motion to make the exercise feel much harder, thereby removing the need for more challenging loads. This is also a smart strategy when you find yourself at an ill-equipped hotel gym, or your Aunt Tilly’s house—when you’re visiting for the holidays and only have access to the pink dumbbells she left to collect dust in the garage. By slowing down your lifting speed and holding the middle, bottom, or top of certain exercises, you can make the weight feel much heavier and get more out of it.
Slowing down your sets with isometrics is also a good way to ensure that your form stays tight. You’re less apt to race through your set and get sloppy if you have to stop and hold every rep.
You might also do isometrics to strengthen a weak point in a lift you’re trying to improve. If you find that your sticking point on the bench press is a few inches from lockout, you could perform bench presses with an isometric hold at that point in the range of motion. Set the safety catches of a power rack at that position and rest the bar on them. Load the bar with a super-heavy weight—one you can’t actually lift—and set up as if you were benching like normal. Try to press the bar, pushing as hard as you can for three seconds. Of course, the weight won’t move, but you will have performed an isometric that trains your muscles to be stronger in that position. With a few weeks of isometric training, your sticking point should be gone.
Another fancy exercise science term you may hear in conjunction with isotonics and isometrics is isokinetic training. Isokinetic means “same speed.” These exercises are done on special machines that adjust the resistance they provide based on your movement speed, ensuring that the pace of your reps is constant no matter how hard you work. That means that the tension on the muscles is maximal throughout the full range of motion. The best way for most of us to see how isokinetic exercise works is to watch the training montage in Rocky IV. The leg extension and machine ab twists that Ivan Drago does are isokinetic!
The major benefit of isokinetics is safety. Since the machine controls the pace, it’s commonly used in rehab settings to help people come back from injury with low-risk training. Research suggests that isokinetic lifting may be more efficient for rehab than isotonic exercise, but unless you train at an elite facility, or you’re paying for the best possible physical therapy, isokinetic training is impractical and out of reach, so we won’t spend any more time on it.
Remember also that Drago got KO’d at the end of that movie, so if isotonic exercise was enough for Rocky, it’s enough for you.
Benefits Of Isotonic Workouts
Isotonic exercises are effective and efficient. You train the target muscles through a full range of motion, which maintains, and can even increase, their flexibility. Training through full ranges also activates the greatest number of muscle fibers. To achieve similar gains in muscle and strength from isometric training, research shows you may have to train the muscle at four different joint angles—that is, hold and squeeze your reps in four different places. Ain’t nobody got time for that.
Isotonic exercises are also intuitive. You’ve probably been doing them for years, but even if you’re brand new to exercise, you can learn to perform the basic ones proficiently without much of a learning curve. There’s no fancy equipment required (unlike with isokinetic training), and you don’t need a protractor and a guy in a lab coat present to help you figure out the joint angles you need to train. Simple bodyweight training is isotonic training.
Whether your goal with exercise is to build muscle and strength, power and endurance for sports, change your body composition, or just stay active as you age, isotonic exercise should be your foundation. Isometric training and, if possible, isokinetic work, will only be adjuncts.
Good Stretches for Loosening Up
Regardless of whether you’re doing isotonic, isometric, or isokinetic training, you need to warm up and prepare your muscles to handle resistance safely. Many people stretch as part of their warmup, intending for the temporary increase in range of motion to help them get more out of their exercises, but stretching alone doesn’t raise the temperature in the muscles sufficiently, and it can cause injury if your stretches are too aggressive. A better warmup strategy is mobility training, which combines stretching and light movement to both raise your core temperature and prepare the muscles to work through the ranges of motion that you’ll use during your workout.
Integrate some or all of the following mobility drills into your warmup routine, courtesy of Natalie Higby, co-founder of the Durable Athlete app. Perform 5–10 reps for each, and repeat for 2–3 total sets.
Straight-Leg Hip Circle
Step 1. Hold onto a sturdy object for support, and raise one leg up in the air 90 degrees. Keep the knee as straight as you can.
Step 2. Keeping your shoulders facing forward, draw your leg outward and away from you to the side. When you feel you’re running out of range, begin turning your foot over to face the floor.
Step 3. When you’ve made a complete circle, return your foot to the floor. Reverse the entire motion on your next rep.
Wide-Stance Hinge
Step 1. Stand with feet outside shoulder width and bend only at the hips, driving your butt straight back to lower your torso as far as you can. Allow your knees to bend as needed.
Step 2. Take a deep breath and then let it out, folding your body forward on the exhale so your fingers can touch the ground (or close to it).
Step 3. Bend your knees further as you tuck your pelvis under and slowly extend your spine to come up to standing again.
Ankle Roll
Step 1. Stand with feet outside shoulder width and place your hands on your knees.
Step 2. Begin making big circles with your knees, shifting your weight to the balls of your feet, then the edges of your feet, and then your heels and arches as your knees move. You can reverse direction on your next set.
Sky Reach To Arm Thread
Step 1. Get on all fours with your hands under your shoulders and your knees directly beneath your hips. Brace your core.
Step 2. Draw your right arm up and across your chest as you twist your right shoulder toward the ceiling and reach overhead. Be careful to keep your hips facing the floor.
Step 3. Reverse the motion, reaching your arm across your body and behind the support arm. Twist as far as you can, ideally until the back of your right shoulder touches the floor. Complete your reps on that side, and then switch sides.
Floor Hand Rotation
Step 1. Get on all fours with your hands under your shoulders and your knees directly beneath your hips. Brace your core.
Step 2. Reach your right arm up and forward, and then, keeping your elbow straight, rotate it down to reach for your lower back. Turn your wrist so your palm faces up as you move. When the back of your hand touches your low back, draw your elbow down to the floor.
Step 3. To reverse the motion, raise your elbow back up, lift your hand off your low back, and rotate the arm back in front of you again. Complete your reps on that side and then switch sides.
See other mobility exercise options HERE.
Sample Beginner’s Isotonic Workout
Here’s a sample upper-body strength workout using isotonic exercises.
1. Bench Press
Sets: 4 Reps: 4 Rest: 3 to 5 minutes
Step 1. Set up with the bar just over your eyes. Make sure that your feet are flat on the floor and your shoulders, back, and butt maintain contact with the bench. Grasp the bar with hands about shoulder-width apart (you may have to slide them an inch or two in either direction), so that when you lower the bar to your chest, your elbows make a 90-degree angle.
Step 2. Unrack the bar and hold it over your chest. Lower the weight to your chest. After touching your chest, press the bar back to the starting position.
2. Dip
Sets: 3 Reps: 15 Rest: 90 seconds to 2 minutes
Step 1. Suspend your body over the bars of a dip station and brace your core.
Step 2. Drive your elbows back as you lower yourself down. Once your shoulders are parallel with your elbows, press yourself back to the starting position.
3. Pullup
Sets: 3 Reps: 15 Rest: 90 seconds to 2 minutes
Step 1. Place your hands on the bar with palms facing forward, just outside your shoulders. Hang from the bar but keep your core braced.
Step 2. Pull yourself up until your chin is over the bar.
4. Overhead Banded Triceps Extension
Sets: 3 Reps: 20 Rest: 60–90 seconds
Step 1. Attach a circle band to a sturdy object overhead and grasp an end in each hand. Step away from the anchor point and raise your arms overhead. Your legs should be staggered. Bend your hips back to put tension on the band. Your body should form a straight line from the top of your head to the heel of the back foot.
Step 2. Extend your elbows without moving your upper arms or torso. Switch the front leg on each set.
5. Dumbbell Reverse Fly
Sets: 3 Reps: 20 Rest: 60–90 seconds
Step 1. Hold a light dumbbell in each hand and hinge your hips back to about a 45-degree angle. Brace your core, and extend your arms in front of your body with a slight bend in your elbows (but don’t relax your shoulders).
Step 2. Raise the dumbbells out to your sides by squeezing your upper back and shoulders together. Make sure that your shoulders stay down and you are not shrugging during the lift. Lower the weights under control.


