
If shoulder pain has made you hit “pause” on your favorite sports and activities, you might have shoulder impingement syndrome.
Shoulder impingement is painfully common. In fact, it’s thought to be the culprit behind 44–65% of all shoulder pain complaints (1, 2). According to the Cleveland Clinic, the problem tends to crop up most in people who do sports and activities that involve a lot of overhead motions. This includes baseball, swimming, tennis, and volleyball, as well as weight training, particularly when heavy weights are hoisted overhead (such as in Olympic weightlifting and CrossFit). According to Gianna Paladino, DPT, clinical director of SportsMed Physical Therapy in Lyndhurst, New Jersey, people age 40 and over are often diagnosed with shoulder impingement as well, as the result of years of repetitive motion.
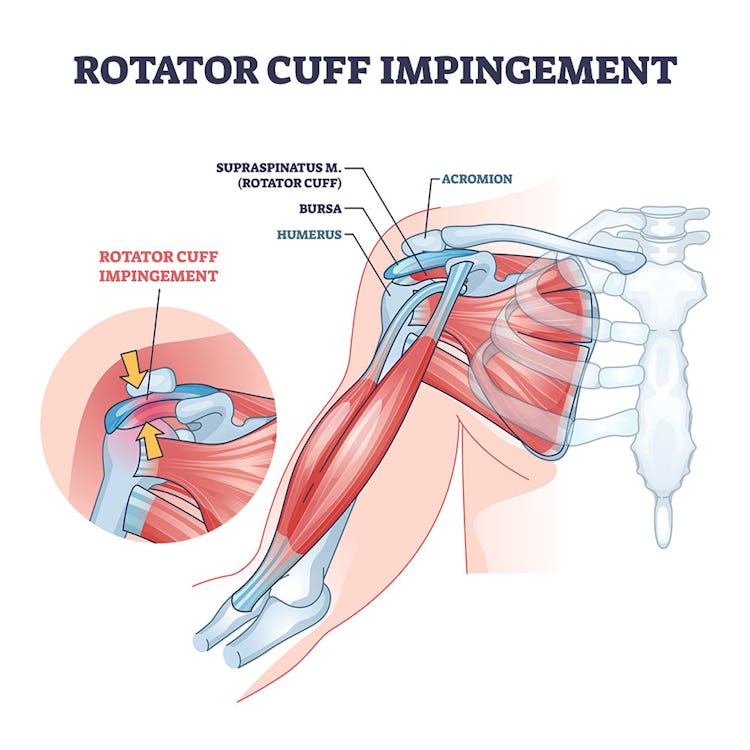
Repeatedly raising your arms overhead narrows the already tight space between your humerus (upper-arm bone) and the top outer edge of the shoulder blade (the scapula), pinching the rotator cuff in between. This is called an impingement, and it can lead to swelling and irritation. Unfortunately, swelling reduces the space in your shoulder even more, causing more impingement and pain, and the vicious cycle continues.
While we can’t diagnose your condition, this article can be one of your first steps toward ending this painful rinse-and-repeat. The next step? Seeing your doctor for an official diagnosis and recovery program.
How To Tell If You Have a Shoulder Impingement
The problem with shoulder impingement syndrome is that it’s not a single diagnosis. An impingement can show up in any of the ligaments or muscles and tendons that surround the shoulder’s ball-and-socket joint (known collectively as the rotator cuff). So, the only way to truly know your shoulder’s status is to get it assessed by a physical therapist or another medical professional.
That said, there are a few simple self-tests you can do right now that can help you decide if a visit to a PT is in the cards. Dr. Paladino recommends the three tests below to check if you may have an impingement in specific areas of your shoulder. If any of these self-tests suggest the answer is “yes,” the next step is to get checked out by a qualified provider.
1. The Painful Arc Test
[See the video above at 00:45]
Step 1. Lift your troublesome arm out to the side and over your head, as though you were doing a jumping jack with one arm.
If you feel pain in your shoulder when your arm reaches the midpoint or above, you may have a shoulder impingement.
2. The Hawkins-Kennedy Test
[See the video at 01:10]
Step 1. Cross the affected arm over your body, resting your hand on the opposite shoulder. Your elbow will be bent about 90 degrees.
Step 2. Lift your elbow gently as high as you can without letting your hand raise off your shoulder.
You may have a shoulder impingement if you feel pain in the shoulder in the bottom range of the movement.
3. The Neer Test
[See the video at 01:20]
Step 1. Lift the arm straight in front of your body to 90 degrees, and turn your thumb to point toward the floor.
Step 2. Raise the arm overhead while keeping the thumb down.
Feeling pain in the shoulder toward the top of the movement may indicate a shoulder impingement.
What Exercises Are Good for Recovering From A Shoulder Impingement?
Shoulder impingements can usually be resolved by improving shoulder mobility and strengthening the muscles that stabilize the shoulder blade (including the rotator cuff, serratus anterior, and lower traps). This is done in addition to resting the injury, avoiding any movement that causes irritation, icing the area, and, if you choose, taking over-the-counter medication to help bring the inflammation down.
Apart from any exercises your physical therapist may recommend, here are a few moves you can use to kick-start your shoulder impingement recovery.
Paladino recommends doing these for 2–3 sets of 8–12 reps. These can be performed 2–3 times per week with a rest day in between. If any of these exercises cause pain, hold off or scale back.
1. Bilateral Shoulder External Rotation with Resistance Band
[See the video at 02:00]
If your rotator cuff isn’t strong enough to stabilize your shoulder joint and hold it in the correct position, the joint can shift all over the place when you move your arms. “It might jam forward or up, and that’s where you get that pinching that can cause pain,” Paladino says. She recommends this resistance band exercise to help strengthen those rotator cuff muscles, which will keep the shoulder stable and prevent pain during movement.
Step 1. Grip a resistance band with hands shoulder-width apart and palms facing up. Bend your elbows 90 degrees, and tuck your arms against your sides.
Step 2. Keeping the elbows tight against your body, squeeze your shoulder blades together to pull the band apart with both hands, stretching it out. Slowly reverse the motion until your hands are shoulder-width apart again. That’s one rep.
2. Shoulder Extension with Resistance Band
[See the video at 02:25]
Good posture is key for healthy shoulders. In particular, keeping the shoulders down and back—as opposed to hunched over or shrugged up—helps to maximize the space in your shoulder joints. “The worse your posture is, the smaller the space in the shoulders becomes, and that’s when the pinching starts happening,” Paladino explains. This exercise opens up the shoulders and brings the shoulder blades down and back by strengthening the lower traps and lats.
Step 1. Attach a resistance band to a sturdy fixture that’s approximately head-height. Grip one end of the band in each hand and step back until you feel slight tension in the band.
Step 2. Keeping your elbows straight, pull both ends of the band straight down and back, finishing outside your hips. Allow your arms to skim your torso as you do it.
Step 3. Squeeze your shoulder blades together at the end of the range, and then return your hands to the starting position. That’s one rep.
3. Side-Lying Shoulder Flexion
[See the video at 02:50]
This is another move for the rotator cuff, but it’s performed in a lying position. This minimizes any compensation by the upper trap muscle, which can kick in and take over the movement when you perform external rotations standing up, Paladino says. It also targets the lower traps and serratus anterior.
Step 1. Lie on your side, with the painful shoulder facing up. Let your top arm lie against your side.
Step 2. Keeping your elbow straight, slowly sweep your arm in front of your body and bring it overhead. Try to keep it close and don’t allow it to lift too high (away from your body) as you go.
Step 3. Once your arm is overhead, reverse the motion to bring it to your side again. That’s one rep.
Perform the exercises on both shoulders, even if one of them doesn’t hurt. Training to keep both shoulders equally mobile and strong helps prevent future injuries.
When Can I Begin Rehabbing and Working Out My Shoulder?
The good news is that you don’t have to wait until your shoulder no longer hurts to do the exercises recommended. “These exercises are simple and low-level enough that they will help with everything that’s going on in the shoulder,” Paladino says. Gentle exercises like the three above get the shoulder joint and muscles moving again while allowing inflammation to go down.
However, if the above exercises cause a significant amount of discomfort (say, a 4 or above on a scale of 1 to 10, with 10 being great pain), you should hold off and rest your shoulder longer, Paladino says. You should also let your PT know. He or she may be able to adjust the dosage (e.g., suggest doing fewer reps or using less resistance), or help you dial in your form better.
There are other generally safe exercises you can do to strengthen the shoulder while it heals. “You don’t technically have to move the shoulder to strengthen it,” Paladino says. Working the muscles that attach to the shoulder can help you maintain—or even gain—strength when you have a pain flareup.
According to Paladino, these exercises are generally easy to do and likely won’t aggravate shoulder pain:
● Most row variations (ex., inverted rows, bent-over rows, low-lat rows)
● Biceps curls
As your pain improves, you’ll be able to experiment with the exercises you’re probably used to and add them back into your training one at a time. But it’s important not to rush the process. You may not be able to do a dumbbell or barbell overhead press for a while, but you may find that a landmine press done from a half-kneeling position feels OK. The arc that the bar travels in a landmine press doesn’t stress the shoulder joint so directly, so many people find that it allows them to train the shoulder with a full range of motion without pain, with the extra benefit of strengthening the serratus anterior, which anchors the shoulder blade to the ribcage, stabilizing it.
See a demonstration of the landmine press below, and directions for it in the article “The Best Shoulder Exercises and Workouts for Women.”
To be safe, check with your PT before including these, or any, new exercises in your rehab program.
Activities and Exercises That Should Be Avoided With a Shoulder Impingement
“I wouldn’t say there’s anything you must avoid, unless it’s something that’s causing a lot of pain for you,” Paladino says. In many cases, you can continue doing your favorite sports and activities with a shoulder impingement, as long as you modify your intensity.
“If you tell someone who loves swimming to stop, they’re not going to stop, or they’re going to be miserable, so it’s not worth telling them to quit,” Paladino says. “They should simply scale it back.”
If you can’t manage to do the activity comfortably at any intensity, find another activity to keep you busy until you’ve recovered enough to try again. This way, you can maintain your strength, overall activity level, and mobility while giving your shoulder a rest.
In the weight room, Paladino cautions against overhead pressing exercises and chest exercises like the chest press and pushup, until you’re able to get guidance from a PT. “Those moves are often done incorrectly, or people go overboard with the intensity, which can close the space in the shoulder even more than usual,” she explains.
The Best Shoulder Impingement Stretches
Adding these two Paladino-recommended stretches to your rehab program may help increase range of motion in the shoulders and counteract the hunched-over position many of us default to when sitting for long periods. Both actions minimize pinching in the shoulders to lessen pain.
These stretches can be done 3-4 times a week, but if you’re really stiff, feel free to increase the frequency to every day, or every other day, Paladino says.
If you feel pain during these stretches, you may be doing them too aggressively. Ease up a bit or pause while you consult your PT.
Perform both exercises on both shoulders.
1. Wall Slide
[See the video at 03:10]
Step 1. Place your hand flat against a wall with your arm straight.
Step 2. Keeping your arm straight, slide that hand up the wall as far as you can go. You’ll have to step toward the wall to make this happen.
Step 3. Hold the top position for a couple of seconds before sliding your hand back down the wall. That’s one rep. Do 10–20 reps.
2. Pec Stretch
[See the video at 03:30]
Step 1. Stand in a doorway (or use a rack as shown) and place one hand on the side of the doorframe with your elbow bent 90 degrees.
Step 2. Stagger your stance and gently push your torso forward until you feel a stretch across your pectoral (chest) muscles.
Step 3. Hold the stretch for 30 seconds and release. Do 2–5 sets.
Usual Shoulder Impingement Recovery Time

Many factors affect your recovery time, including your age, activity level, the severity of pain, how long you waited to get treatment, and how closely you follow your PT program. In general, though, if you’ve put off getting care, and your pain is substantial, Paladino says you may be looking at about six months to fully recover. But it may take less time if the pain is mild and/or you seek help right away.
You can help your recovery along by staying consistent with your program, respecting your body, and adjusting your activity level as needed.
Over-the-counter non-steroidal anti-inflammatory drugs (NSAIDs), like ibuprofen and naproxen, can help you deal with pain and inflammation, but they’re not a long-term solution. Plus, NSAIDs can cause unpleasant side effects like gas, heartburn, nausea, diarrhea, and/or constipation.
Icing for 10–15 minutes may be a better way to handle pain and inflammation when your shoulder flares up, Paladino says.
Above all, stay active. Moving your shoulder and the surrounding muscles through a tolerable range of motion—whether through stretches or strength exercises —helps to maintain shoulder mobility and keep nutrient-rich blood flowing to the area. “Gentle movement is an effective pain treatment,” Paladino says.
Like what you're reading? You'll love a FREE trial of some of our top products. Get more out of your workouts and daily life.
Learn More Here